Table of Contents
Advertisement
Quick Links
OPERATION AND
INSTALLATION
MANUAL
SDS SERIES
SOLAR ELECTRIC PUMP
&
PCA-30-M1D SERIES
PUMP CONTROLLER
MANUFACTURED & SERVICED BY:
SUNPUMPS, INC.
325 EAST MAIN STREET
SAFFORD, ARIZONA 85546
UNITED STATES OF AMERICA
PHONE # (928) 348-9652
FAX # (928) 348-9653
Made in the U.S.A.
DC# SDS-PCA-30-M1
REV 2011
Advertisement
Table of Contents

Related Manuals for SUNPUMPS SDS Series

Summary of Contents for SUNPUMPS SDS Series
- Page 1 OPERATION AND INSTALLATION MANUAL SDS SERIES SOLAR ELECTRIC PUMP & PCA-30-M1D SERIES PUMP CONTROLLER MANUFACTURED & SERVICED BY: SUNPUMPS, INC. 325 EAST MAIN STREET SAFFORD, ARIZONA 85546 UNITED STATES OF AMERICA PHONE # (928) 348-9652 FAX # (928) 348-9653 Made in the U.S.A.
-
Page 2: Table Of Contents
Table of Contents Introduction ………………………………………………………………………... 1.0 Precautions Product Overview …………………………………………………………………. Features ……………………………………………………………………………. Application ………………………………………………………………………... Installation and Operations ………………………………………………………… 3.0 Location …………………………………………………………………………… System Design Basics ……………………………………………………………… 3.2 Well Measurements ……………………………………………………………… 3.3 Pump Installation …………………………………………………………………… 3.4 Figure 1: System Installation Layout Figure 2: Top of Pole Mount Rack Installation Wiring ………………………………………………………………………………. -
Page 3: Introduction
1.0 Introduction Thank you for selecting a SunPumps SDS series pump system. The SDS series pump and PCA series controller are the key components to a high quality submersible pump system. Their stand-alone, pollution free and low noise operation makes them an ideal solution for remote homes, wildlife and stock watering problems without violating the environment. -
Page 4: Features
2.2 Application The only application the PCA-30-M1 controllers are designed for is the interface between the SunPumps SDS series of pumps and the DC power source as well as peripheral pump system signal devices. The PCA-30-M1 controllers are capable of operating with two different DC inputs, solar electric modules or batteries. -
Page 5: Location
5” (12.7 cm) and for and SDS-Q series pump it is 6” (15 cm). Sand damage to an SDS series pump is not covered under warranty. It is therefore highly recommended that sand shrouds be installed on all SDS series pumps in an unproven well (bore hole). -
Page 6: Well Measurements
Never install the pump in a well that has or has had an oil-lubricated line shaft turbine in it. Any drip oil remaining in the water may damage the diaphragm and seals. If the pump is used in a well over 100 feet (30 meters) deep, install a check valve above the pump. -
Page 7: Pump Installation
3.4 Pump Installation 1. Connect the drop pipe, safety rope and sand shroud (if used) to the pump. Splice the drop cable to the motor lead using an under water splice kit. (See wire splicing instructions provided with splice kit.) Unroll the drop cable, drop pipe and safety rope and lay them on the ground in a straight line. -
Page 8: Wiring
) wire up to 250 feet (76 meters). If distances greater than this is required please refer to a DC voltage loss table or call your SunPumps dealer. All other system equipment should be installed before proceeding with wiring the controller. - Page 9 Figure 3 Solar Panel Wiring Diagram (Generic)
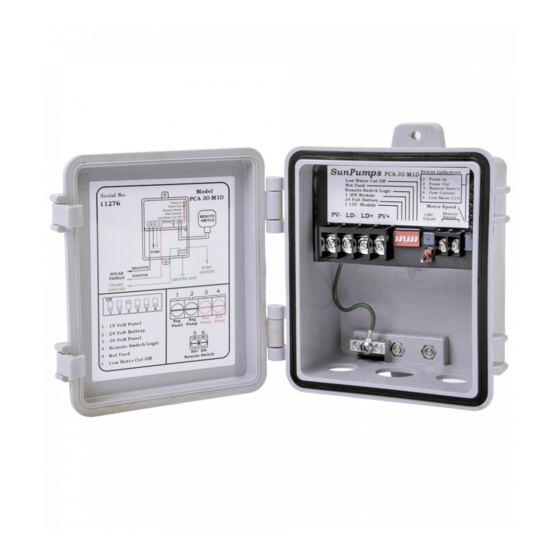
- Page 10 Figure 4 Controller Wiring Diagram 3.6 Auxiliary Control Circuits The PCA-30-M1 controllers feature remote peripheral interface functions with easy programming. The remote switch interface supports float switches (storage tank level), pressure switches or a remote system “ON/OFF” toggle switch. Use only “Shielded Wire”...
-
Page 11: Remote Switch
The Low Water Cut-Off circuit is used to protect a pump from running dry. The controller has already been adjusted at the factory to fit the SDS series submersible pumps and no further adjustments are usually necessary. If a different pump is being used, the LWC should be tested to verify that it is adjusted properly. -
Page 12: Adjustment Procedures
To reset the circuit breaker, turn the On/Off switch off and then back on. If power is removed from the controller it will also reset. Each morning the controller will automatically be reset on start-up. This is the standard setting for all SDS series pumps. -
Page 13: Output Voltage Adjustment
While the pump is off, an amber indicator light will be flashing. . This setting is for special use pumps only. Do not use with SDS series pumps. 5. To activate the Low Water Cut-Off feature, turn switch number 6 on. When the pump runs dry, the LWC feature will turn the pump off and an amber indicator light will flash. -
Page 14: Troubleshooting
4. With the pump turned on and pumping water, pull the pump out of the water. It will not damage an SDS series pump to run dry for several minutes. 5. Very slowly turn the “LWC” trim pot clockwise until the pump turns off. This is now the set-point where the pump will turn off. -
Page 15: No Voltage At The Ld+ And Ld- Terminals
RED AND GREEN LIGHTS ARE ON, AMBER LIGHTS ARE OFF AND THE PUMP DOES NOT RUN To verify power coming out of the controller, connect a DC voltmeter across LD+ and LD-. If 12 Volts or more is coming out then: 1. -
Page 16: Technical Specifications
11.5 12.3 31.1 16.5 PCA-30-M1D 12.7 15.2 Voltage rating is 12 – 30V D.C. amperage rating is .1 – 5 A. Note: All SDS series pumps are round and the width refers to the outside diameter including the cable guard. -
Page 17: Warranty Statement
(12) months after the original date of purchase, but not to exceed thirty (18) months from the date of manufacture. At its option, SunPumps will repair or replace any SunPumps product, which has failed due to a defect in material or workmanship during this warranty period. A PCA series controller must be installed in conjunction with the pump to validate the warranty. - Page 18 Pump Model_________________________ Pumping Level_________________________ Pump Serial No.______________________ Additional Vertical Lift___________________ Controller Model_____________________ Pump Depth___________________________ Controller Serial No.___________________ Total Dynamic Head____________________ Warranty Card No.____________________ Well Depth___________________________ For Technical Support Contact: SunPumps, Inc. 325 E. Main Street Safford, AZ 85546 Phone: (928) 348-9652 (928) 428-1092 Web Site: www.sunpumps.com...
Need help?
Do you have a question about the SDS Series and is the answer not in the manual?
Questions and answers