
Summary of Contents for getAir TOUCH
- Page 1 ECO-MODUS MENU TOUCH MONTAGE- & BEDIENUNGSANLEITUNG INSTALLATION & USER GUIDE DEEN 190128-01 TO 50007177...
- Page 2 © 2019 getAir GmbH Die in diesem Dokument enthaltenen Informationen sind Eigentum des Herstellers. Die Veröffentlichung, ganz oder in Teilen, bedarf der schriftlichen Zustimmung. Eine innerbetriebliche Vervielfältigung, die zur Evaluierung des Produktes oder zum sachgemäßen Einsatz bestimmt ist, ist erlaubt und nicht genehmigungspflichtig.
-
Page 3: Table Of Contents
Inhaltsverzeichnis Symbolerklärung ......4 1.1 Hinweise....... . 4 1.2 Sicherheitshinweise . -
Page 4: Symbolerklärung
1 Symbolerklärung 1.1 Hinweise • WICHTIG! Vor Gebrauch sorgfältig Die folgende Auflistung zeigt die in diesem lesen! Aufbewahren für späteres Dokument verwendeten Warn- und Infor- Nachschlagen! mationshinweise und definiert die Art und • Überprüfen Sie die Lieferung bei Schwere der Folgen, falls die Anweisungen Erhalt anhand des Lieferscheines auf nicht befolgt werden. -
Page 5: Sicherheitshinweise
einschlägigen Regeln der Technik. Es Elektroinstallationen nur von autori- müssen die Bestimmungen der ört- sierten Elektrofachleuten ausgeführt lichen Bauordnung und Bauauflagen werden. Im Zweifelsfall die örtlichen beachtet werden. Behörden ansprechen. • Der Inhalt dieses Dokumentes • Alle Kleinspannungskabel von ist auf Übereinstimmung mit den Netzspannung führenden Kabeln beschriebenen Produkten geprüft. -
Page 6: Funktion
2 Funktion und geltenden Bauvorschriften, die Feuer- schutzverordnung und Unfallverhütungs- Die Steuerung verbindet mehrere dezen- vorschriften der Berufsgenossenschaft trale Lüftungsgeräte und kontrolliert das zu beachten. Details müssen während der gesamte Wohnraumlüftungssystems. Es Planung des Systems mit dem Fachplaner lassen sich verschiedene Funktionen, wie oder zuständigen Fachbetrieben bespro- zum Beispiel die Wärmerückgewinnung chen werden. -
Page 7: Abmessungen
3 Abmessungen Ø 54 1 Bedieneinheit 4 Unterputz-Netzteil 2 Rahmen 5 Hutschienen-Netzteil 3 Basis... -
Page 8: Installation
4 Installation +42 V Bus B Bus A Bus A Bus B +42 V 42 V 1 Netzanschluss 230 V AC 4 Basis 2 Netzteil 5 Lüfter Anschlussreihe 1 3 Lüfter Anschlussreihe 2... -
Page 9: Montage
4.1 Montage Das verwendete BUS-Leitungssystem kann flexibel, sternförmig oder in Reihe zu den Lüftern verlegt werden. Die zum Lüfter gehenden Kabel müssen flexibel sein (z.B. LiYY). Um Kabelbrüche zu vermeiden, dürfen keine Massivdraht-Kabel verwendet werden. Abhängig vom verwendeten Netzteil und Je nach gewähltem Kabelquerschnitt des der Verkabelungsart können bis zu 6 Lüfter genutzt werden. - Page 10 VORSICHT Beschädigung der elektrischen Komponenten! 42 V Nach Unterbrechung der Stromversorgung hält das Netzteil die Ausgangsspannung für einen kleinen Zeitraum aufrecht. Durch falsche Belegung der Anschlüsse an der Basis können die elektrischen Komponenten der Lüfter und Steuerung beschädigt werden. 230 V •...
-
Page 11: Steckerverbindung
8. Netzteil in der Unterputzdose 1. Am Montageort der Steuerung in platzieren. Normhöhe einen Wandausbruch für die Unterputzdose erstellen. 9. Basis in der Unterputzdose befestigen. 2. Anschlusskabel der Lüfter in die Unter- 10. Bedieneinheit und Rahmen in die Basis putzdose führen. einstecken. -
Page 12: Dip-Schalter
Kabelende angeschlossen. Bei einer Reihenverkabelung mehrerer Lüfter wird empfohlen von der Haupt-An- schlussleitung Abzweigungen zu jedem einzelnen Lüfter zu legen. Dabei ist die Segmentlänge L des verwendeten Ka- belquerschnitts (Kapitel 4.1) zu beachten. Außerdem muss das Kabel flexibel sein. Es dürfen keine starren Kabel zum Lüfter geführt werden. -
Page 13: Bedienung
Startrichtungen aus. 5 Bedienung INFORMATION 1 Schalter 1 - 3: Zone 1 - 3 Die Steuerung nutzt einen resistiven Touch- (Oben = AN, Unten = AUS). screen. Aufgrund der Drucksensitivität muss 2 Schalter 4: Startrichtung etwas fester gedrückt werden. -
Page 14: Anzeige & Bedienelemente
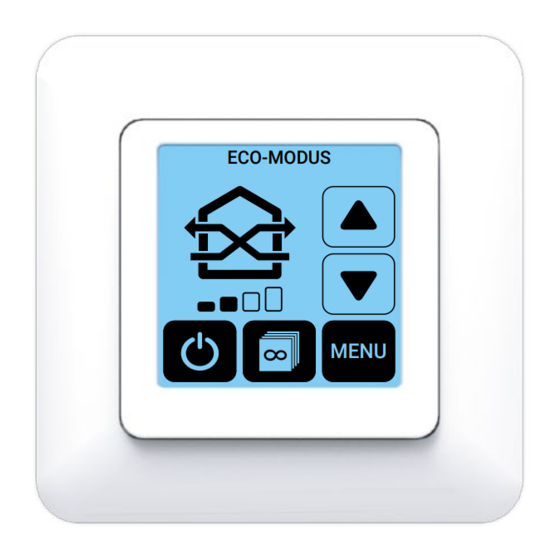
5.2 Anzeige & Bedienelemente 3. Aktuelle Uhrzeit in Stunden und Minu- ten einstellen. Der Hauptbildschirm stellt alle wichtigen 4. Räume in Zone 1 definieren. Informationen zum aktiven Modus dar. 5. Falls vorhanden Zone 2 (siehe ECO-MODUS DIP-Schalter) aktivieren und Räume der Zone 2 zuordnen. -
Page 15: Modi & Funktionen
5.3 Modi & Funktionen Eco-Modus (Wärmerückgewinnung) Die Laufrichtung der Lüfter wechselt alle 50 - 70 Sekunden abhängig von der Lüfterstufe. Durchlüften-Modus Die Laufrichtung der Lüfter bleibt konstant, dabei ist keine Wärmerückgewinnung möglich. Im Hauptbildschirm kann die Laufrichtung über das Modus Symbol gewechselt werden. Schlaf-Modus Die Lüftung wird für einen Zeitbereich (1 - 9 Stunden) ausgeschaltet. - Page 16 Zeit-Modus Für Wochentage und das Wochenende lässt sich in 3 Zeiträumen (08:00 - 16:00, 16:00 - 22:00, 22:00 - 08:00) die Lüftung auf die eigenen Gewohnheiten abstimmen. Die Konfiguration kann im Hauptbildschirm über das kleine Uhrensymbol rechts neben dem Icon gestartet werden. Filterstatus Zeigt den aktuellen Filterstatus in vier Abstufungen an.
-
Page 17: Konfiguration Der Modi
5.4 Konfiguration der Modi Stoßlüften-Modus Die Laufzeit des Modus kann in einem Be- Die folgenden Modi können zusätzlich reich von 15 Minuten – 5 Stunden gewählt konfiguriert werden. Dazu muss im Haupt- werden. bildschirm auf das Icon des aktuellen Mo- dus gedrückt werden. -
Page 18: Filterwechsel
5.5 Filterwechsel kann nur ein Sensor verwendet werden. Die Steuerung bestimmt, abhängig von der geförderten Luftmenge, den Zeitpunkt des nächsten Filterwechsels. Sobald ein Filter- wechsel notwendig ist, blinkt im Hauptbild- schirm das Filterstatus Icon auf. Im Menü Filterstatus kann der Filterwechsel bestätigt werden und das Intervall wird zurückgesetzt. -
Page 19: Störungsbehebung
6 Störungsbehebung Störung Ursache Behebung • Position der DIP-Schalter am Lüfter prüfen. Zone falsch konfi- • Zonen-Einstellung an der Steuerung über- guriert. Lüfter reagiert prüfen und ggf. neu konfigurieren. nicht. Installations- oder • Verkabelung am Lüfter und der Steue- Wartungsfehler. rung überprüfen lassen. -
Page 20: Gewährleistung
Wiederverwertung zugeführt werden. Eine Vorlage des Kaufbelegs das Produkt unter separate Entsorgung des Produkts trägt zur Verwendung von Austausch-/Ersatzteilen Minderung des Verbrennungs- oder Depo- innerhalb eines angemessenen Zeitrah- nieabfalls bei und reduziert die Belastung mens repariert oder durch ein gleiches der menschlichen Gesundheit und Umwelt. -
Page 21: Haftung
• Das Problem durch unsachgemäße, zu Personenschäden führen für die der harte oder unachtsame Behandlung, Hersteller nicht haftbar gemacht werden Verwendung bzw. Wartung verur- kann. Der Hersteller haftet für keinerlei sacht wurde. Schäden, der auf folgende Ursachen zu- rückzuführen ist: •... - Page 23 Contents Explanation of symbols ......24 1.1 Instructions ......24 1.2 Safety instructions .
-
Page 24: Explanation Of Symbols
1 Explanation of symbols 1.1 Instructions • IMPORTANT! Read carefully prior to The following is a list of the warning and use. Retain for future reference. information notices used in this docu- • On receipt, check your shipment ment, and defines the type and severity against the delivery note for com- of the consequences of failing to follow pleteness and any damage sustained... -
Page 25: Safety Instructions
• We have reviewed the content of this and people with impaired physical, document to ensure conformity with sensory or mental capabilities, or a the products described. However, dis- lack of experience and knowledge, crepancies may still exist; we cannot may use this device only under therefore accept liability for full con- supervision, or following instructions... -
Page 26: Function
2 Function regulations of the employer‘s liability insur- ance association. Discuss the details with The control unit connects several decen- the specialist planner or specialist compa- tralised ventilation units and regulates ny responsible during the planning phase. the home ventilation system as a whole. It allows you to adjust various functions, Intended use such as heat recovery or ventilation. -
Page 27: Dimensions
3 Dimensions Ø 54 1 Programming unit 4 Flush mounted power supply unit 2 Frame 5 Top-hat rail power supply unit 3 Base... -
Page 28: Installation
4 Installation +42 V Bus B Bus A Bus A Bus B +42 V 42 V 1 230 V AC power supply 4 Base 2 Power supply unit 5 Fan connection row 1 3 Fan connection row 2... -
Page 29: Montage
4.1 Montage The bus cable system is flexible in terms of configuration – it can be star-connected or series-connected to the fans. The cables connecting to the fan must be flexible (e.g. LiYY). To avoid cable breaks, solid wire cables must not be used. Depending on the cable cross-section Up to 6 fans can be used, depending on selected, the segment length LS var-... - Page 30 CAUTION Risk of damage to electrical components! 42 V If the power supply is interrupted, the power supply unit remains live with the output voltage for a brief period of time If connections are assigned to the base incor- rectly, the electrical components of the fan and control unit may be damaged.
- Page 31 8. Place the power supply unit in the 1. Create a standard height wall opening flush box. for the flush box at the control unit in- stallation site. 9. Secure the base in the flush box. 2. Route the connecting cables for the fans 10.
-
Page 32: Connection
4.2 Connection CAUTION For easy disconnection of the fans from Risk of fan damage! the connecting cable for maintenance pur- poses, a plug-in connector is attached to Incorrect connector assignments can cause the fan to malfunction, or damage it. the cable end. •... -
Page 33: Operation
CAUTION Risk of over/underpressure! In each zone, the start directions must offset the number of fans. • Check the fourth switch of each fan in a zone and offset the number of both start directions if necessary. 5 Operation INFORMATION 1 Switch 1 - 3: zone 1 –... -
Page 34: Display & Programming Unit
5.2 Display & programming unit 4. Define the rooms in zone 1. 5. If there is one, enable zone 2 (see DIP The main screen shows you all the most switch) and assign rooms to it. important information about the active mode. -
Page 35: Modes & Functions
5.3 Modes & functions Eco mode (heat recovery) The fans change direction every 50-70 seconds, depending on the fan stage. Quick ventilation mode The rotation direction of the fans remains constant; heat recovery is unavailable. You can switch the rotation direction in the main screen using the mode icon. Sleep mode The system stops working for 1-9 hours. - Page 36 Timer mode For weekdays and weekends the ventilation can be adjusted to your own habits in 3 periods (08:00 - 16:00, 16:00 - 22:00, 22:00 - 08:00). The configuration can be started in the main screen via the small clock symbol to the right of the icon. Filter status Displays the current filter status in four gradations.
-
Page 37: Modes Configuration
Do not press directly in the centre of the next to the mode icon in the main screen. mode icon. To configure the mode, touch the clock and choose the current day of the week. Quick ventilation mode You can then freely adjust the three peri- ods (08:00 –... -
Page 38: Filter Replacement
5.5 Filter replacement sensor per zone. The control unit determines when the filter should be replaced, depending on the re- quired air flow rate. As soon as a filter re- quires replacement, the filter status icon in the main screen flashes. In the filter status menu, you can confirm filter replacement and the interval will reset. -
Page 39: Troubleshooting
6 Troubleshooting Fault Cause Solution • Check the DIP switch position on the fan. Zone configured • Check the zone setting on the control unit; incorrectly. Fan not reconfigure if necessary. responding. Installation or • Check the cabling to the fan and control maintenance fault. -
Page 40: Warranty
reduce incinerated and landfill waste vol- timeframe, and on presentation of proof umes, and reduces the impact on environ- of purchase. mental and human health. Sort packaging To use the warranty service, the product materials and dispose of them accordingly. must be returned, with purchase receipt or other proof of purchase, to the retailer from whom the product was purchased. -
Page 41: Liability
changes or modifications to the product. • The issue was caused by fire or other natural disaster. • The issue was caused by incorrect installation, repair or configuration. 10 Liability The product has been designed and manu- factured for the intended use described in this document. -
Page 42: Anhang / Attachment
11 Anhang / Attachment 11.1 Technische Daten / Technical data Allgemein General Eingangsspannung Input voltage 42 DC Leistungsaufnahme Power consumption Steuerungsausgabe Control output RS 485 AB Anzahl Lüfter Amount fans Schutzart Type of protection IP 30 Schutzklasse Appliance class Batterie intern Internal battery CR 2032 Betriebstemperatur Operating temperature °C... - Page 43 11.2 Verkabelungsprotokoll / Wiring protocol Startrichtung Start direction Gerät Geschoss Raum und Positionierung Device Floor Room and Position Zuluft Abluft Supply air Exhaust air...
- Page 44 GmbH Krefelder Straße 670 | 41066 Mönchengladbach +49 2161 990 95 - 0 | +49 2161 990 95 - 99 service@getair.eu | www.getair.eu M A D E I N G E R M A N Y...
Need help?
Do you have a question about the TOUCH and is the answer not in the manual?
Questions and answers