Advertisement
Quick Links
Advertisement

Related Manuals for BlackVue DR750X Plus


Summary of Contents for BlackVue DR750X Plus
- Page 1 DR750X Plus l DR750X-1CH Plus l DR750X-2CH Plus ENGLISH...
- Page 2 BLACKVUE DR750X Plus l DR750X-1CH Plus l DR750X-2CH Plus For manuals, customer support and FAQs go to www.blackvue.com...
-
Page 3: Important Safety Information
If the product is damaged or the power supply is cut due to an accident, video may not be recorded. y Do not remove the microSD card while the microSD card is saving or reading data. y The data can be damaged or malfunctions may occur. DR750X Plus l DR750X-1CH Plus l DR750X-2CH Plus... -
Page 4: Fcc Compliance Information
This device complies with Part 15 of the FCC Rules. Operation is subject to the following two conditions: (1) This device may not cause harmful interference, and (2) This device must accept any interference received, including interference that may cause undesired operation of this device. FCC ID: YCK-DR750XP BLACKVUE... - Page 5 Contact local authorities to learn about disposal and recycling options available in your area. 2. The correct disposal of your BlackVue dashcam will help prevent potential negative consequences for the environment and human health.
- Page 6 L’exploitation est autoriséee aux deux conditions suivantes: (1) l’appareil ne doit pas produire de brouillage, et (2) l ’utilisateur de l’appareil doit accepter tout brouillage radioélectrique subi, méme si le brouillage est susceptible d’encompromettre le fonctionnement. BLACKVUE...
-
Page 7: Need Help
In the box Check the box for each of the following items before installing the BlackVue dashcam. Rear camera Front camera (DR750X-2CH Plus only) Cigarette lighter Hardwiring power power cable cable microSD microSD card card reader Double-sided tape Double-sided tape... -
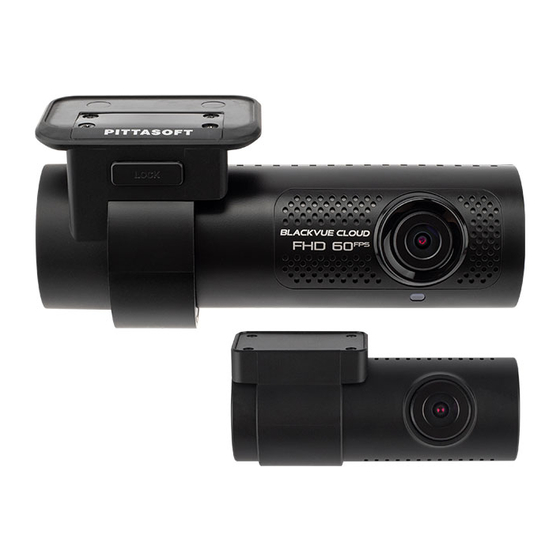
Page 8: Front Camera
At a glance The following diagrams explain each part of the BlackVue dashcam. Front camera 118.5 mm Lock button Camera lens Mounting bracket Front security LED : Lights on during (i) normal mode, (ii) an event is being recorded (impact detected), (iii) manual recording has started, or (iv) motion is detected in parking mode. - Page 9 (ii) manual recording has started. : Lights green in parking mode when motion is detected. Connectivity details label: - Default Wi-Fi SSID - Default Wi-Fi password - Cloud code - QR code Serial number label DR750X Plus l DR750X-1CH Plus l DR750X-2CH Plus...
- Page 10 Available options: - Turn on/off audio recording (default) - Manual recording trigger - Off Rear camera connection port Micro USB port Cover DC in (power connector) microSD card slot Wi-Fi button: - Press once to turn on/off Wi-Fi. 10 BLACKVUE...
- Page 11 : Stays on in all (Front camera recording modes connection port) but can be turned off from firmware settings. Note y For DR750X-1CH Plus user, the BlackVue rear camera is an optional accessory. DR750X Plus l DR750X-1CH Plus l DR750X-2CH Plus 11...
- Page 12 Remove any foreign matter and clean and dry the windshield before installation. Note y For DR750X-1CH Plus user, the BlackVue rear camera is an optional accessory. Warning y Do not install the product in a location where it can obstruct the driver's field of vision.
- Page 13 Adjust the angle of the lens by rotating the body of the rear camera. Connect the front camera ('Rear' port) and the rear camera ('V out') using the rear camera connection cable. DR750X Plus l DR750X-1CH Plus l DR750X-2CH Plus 13...
- Page 14 Use the pry tool to lift the edges of the windshield trim/molding and tuck in the power cord. Power cord Rear camera connection cable Turn on the engine. The BlackVue dashcam will power up and start recording. Video files are stored on the microSD card. 14 BLACKVUE...
- Page 15 A low voltage power cut-off function and a parking mode timer to protect the automotive battery from discharge is installed in the device. Settings can be changed in the BlackVue App or Viewer.
- Page 16 Connect the GND cable to metal ground bolt. Connect the power cable to the DC in terminal of the front camera. BlackVue will power up and start recording. Video files are stored on the microSD card. Note y When you run the dashcam for the first time the firmware is automatically loaded onto the microSD card.
- Page 17 Playing video files on your (Android/iOS) Search for the BlackVue app in the Google Play Store or Apple App Store and install it on your smartphone. “Pair” your smartphone with the BlackVue dashcam via Wi-Fi direct. (i) Press the Wi-Fi button once to turn on Wi-Fi.
- Page 18 (v) Open the BlackVue app and select Wi-Fi. Select the video file you want to play from the video list. Note y Wi-Fi direct lets you connect your smartphone to your dashcam via Wi-Fi within a range of 10m. y For quick playback and download of the recordings, you can select the “Quick play file”...
- Page 19 To remove Insert the card into the microSD card reader and connect it to a computer. Download BlackVue Viewer program from www.blackvue.com > Support > Downloads and install it on your computer. DR750X Plus l DR750X-1CH Plus l DR750X-2CH Plus 19...
- Page 20 Run BlackVue Viewer. To play, select a video and click on the play button or double click the selected video. Windows/macOS Viewer Note y All images shown are for illustration purpose only. Actual program may differ from images shown. 20 BLACKVUE...
- Page 21 The dashcam's time zone is initially set to (GMT-11). To display the correct time please select your time zone. Using your smartphone (Android/iOS) “Pair” your smartphone with the BlackVue dashcam via Wi-Fi direct (for details see STEP 2 ‘Playing video files on your smartphone’). Open the BlackVue app and select Wi-Fi.
- Page 22 Settings that can be changed include Wi-Fi SSID & password, image quality, sensitivity settings, voice recording on/off, speed unit (km/h, MPH, off), LEDs on/ off, voice guidance volume, Cloud settings etc. and tap Save. Once settings are configured, tap 22 BLACKVUE...
- Page 23 (km/h, MPH, off ), LEDs on/off, voice guidance volume, Cloud settings etc. For more information about changing the settings in BlackVue Viewer, please refer to the manual from www.blackvue.com > Support > Manuals. DR750X Plus l DR750X-1CH Plus l DR750X-2CH Plus 23...
- Page 24 STEP 4 Connect to BLACKVUE CLOUD (Optional) If you don’t have a mobile Wi-Fi hotspot, Blackvue connectivity module or if you don’t want to use the BLACKVUE CLOUD service, you can skip this step. If you have a mobile Wi-Fi hotspot (also known as a portable Wi-Fi router), BlackVue...
- Page 25 Register. Connect your BlackVue dashcam to a Wi-Fi hotspot for Cloud connectivity (i) Make sure your BlackVue dashcam and mobile Wi-Fi hotspot are on. (ii) “Pair” your smartphone with the BlackVue dashcam via Wi-Fi direct (for details see STEP 2 ‘Playing video files on your smartphone’) (iii) Open the BlackVue app.
- Page 26 (v) Choose your Wi-Fi hotspot from the list. Enter the password and tap OK. Note y Up to 3 Wi-Fi hotspot SSIDs can be saved (e.g. home, portable hotspot and work). y The BlackVue DR750X Plus dashcam is not compatible with 5GHz wireless networks. 26 BLACKVUE...
- Page 27 If LTE connection is preferred at all times, please remove Wi-Fi hotspot information. Connect your BlackVue dashcam to Cloud connectivity (Using CM100LTE) Make sure your BlackVue dashcam and connectivity module is connected. Then, follow the below steps for SIM registration. DR750X Plus l DR750X-1CH Plus l DR750X-2CH Plus 27...
- Page 28 SIM card activation (iv) Configure the APN settings to activate the SIM card. For detailed information, please check "SIM activation guide" in the packaging box or visit BlackVue Help Center: https://helpcenter.blackvue.com -> SIM Activation Guide (LTE series). (v) Once your dashcam is connected to the internet, you can go to the Cloud menu to use BlackVue Cloud features.
- Page 29 For full details, refer to the "SIM activation guide" that is included in the CM100LTE package. y To use the BlackVue Cloud Service, SIM card must be properly activated for Internet access via LTE network. y When the dashcam is connected to internet, you can use BlackVue Cloud features such as remote Live View and Video playback, Real-time location, push notification, Auto-upload, remote Firmware update etc.
-
Page 30: Tips For Optimal Performance
Download BlackVue Windows Viewer from www.blackvue.com > Support > Downloads and install it on your computer. Insert the microSD card into the microSD card reader and connect the reader to your computer. Launch the copy of BlackVue Viewer that is installed on your computer. Click the Format button, select the card drive and click OK. -
Page 32: Operation Temperature
Parking Mode (WiFi On / GPS Off / 1CH) : Avg. 230mA / 12V Parking Mode (WiFi Off / GPS Off / 1CH) : Avg. 180mA / 12V y DR750X Plus / DR750X-2CH Plus : Power Consumption Normal Mode (WiFi On / GPS On / 2CH) : Avg. 390mA / 12V Normal Mode (WiFi Off / GPS On / 2CH) : Avg. - Page 33 Others Adaptive Format Free File Management System * STARVIS is a trademark of Sony Corporation. Note y For DR750X-1CH Plus user, if rear camera is added, refer to 2CH specification. DR750X Plus l DR750X-1CH Plus l DR750X-2CH Plus 33...
-
Page 34: Product Warranty
Product Warranty The term of this product warranty is 1 year from the purchase date. (Accessories such as an External Battery/ microSD Card: 6 Months) We, PittaSoft Co., Ltd., provide the product warranty according to the Consumer Dispute Settlement Regulations (drawn up by the Fair Trade Commission). - Page 35 Notes...
- Page 36 FCC ID : YCK-DR750XP / HVIN : DR750X-1CH Plus DR750X Plus / DR750X-2CH Plus: FCC ID : YCK-DR750XP / HVIN : DR750X-2CH Plus DR750X Plus, DR750X-1CH Plus, DR750X-2CH Plus A 4th floor, ABN Tower, 331, Pangyo-ro, Bundang-gu Address Seongnam-si, Gyeonggi-do South Korea instagram.com/blackvueofficial...
Need help?
Do you have a question about the DR750X Plus and is the answer not in the manual?
Questions and answers