Advertisement
Quick Links
M A N U A L D E I N S T R U C C I O N E S
ANDADOR
PARA NIÑOS
CON BANDEJA ELETRÓNICA
Infant Walker and Electronic Play Tray
Owner's Manual
REF.: 435 - 436 - 437
Estándard europeo aprobado
EN1273:2005
EN71-1-2-3
Read all instructions before assembly and use of the walker.
Keep instructions for future use.
The child may be hurt if you do not follow these instructions.
Lea las instrucciones antes de montar y utilizar el andador .
IMPORTANT! KEEP FOR FUTURE REFERENCE.
Guarde las instrucciones para futuras consultas.
WARNING! TO BE ASSEMBLED BY AN ADULT!
El niño puede sufrir alguna herida si no sigue las instrucciones.
¡IMPORTANTE! GUARDE LAS INSTRUCCIONES
PARA FUTURAS CONSULTAS.
¡ PRECAUCIÓN! ¡EL ANDADOR LO DEBE MONTAR UN ADULTO!
Advertisement

Related Manuals for Innovaciones M.S. 435


Summary of Contents for Innovaciones M.S. 435
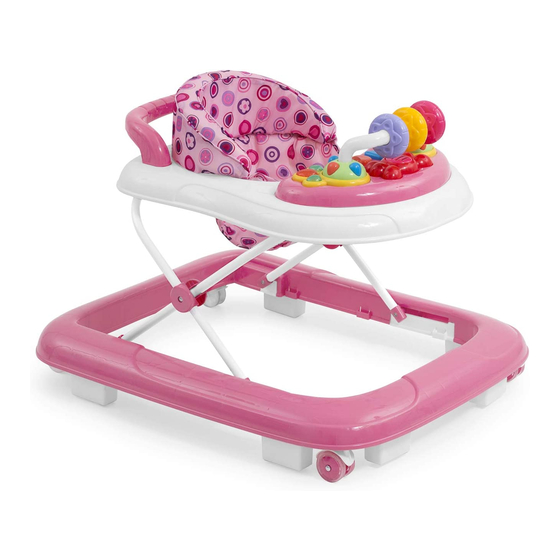
- Page 1 ANDADOR PARA NIÑOS CON BANDEJA ELETRÓNICA Infant Walker and Electronic Play Tray Owner’s Manual REF.: 435 - 436 - 437 Estándard europeo aprobado EN1273:2005 EN71-1-2-3 Read all instructions before assembly and use of the walker. Keep instructions for future use.
- Page 2 Parts List Partes del andador Check that you have all the parts for this model BEFORE assembling your product. Compruebe que tiene todas las partes del andador ANTES de montar el pro- No tools required. ducto. No necesita ninguna herramienta para montar este andador. D.
- Page 3 ASSEMBLY Assembling Procedures Assembling Procedures Proceso de Montaje step 1 Paso 1 1. Turn the baby walker frame upside down. Fix the wheels in the appropriate housings. Ensure that 1. Ponga el chasis del andador boca abajo. Coloque las ruedas en su hueco correspondiente. Asegúrese de que the wheels are firmly pushed all the way into the housing on the down base of the walker.
- Page 4 step 4 Paso 4 4. Open the baby walker frame in the in-use position, ensuring that all wheels touch the floor. Slowly 4. Abra el chasis del andador como si fuera a utilizarlo, asegúrese de que todas las ruedas tocan el suelo. Con raise the tray by polling it in an upward direction, until a click indicates that the frame has been cuidado, levante la bandeja tirando hacia arriba, hasta que un “clic”...
- Page 5 step 7 Paso 7 7. Introduzca los juguetes pequeños en sus agujeros correspondientes, luego apriete y mantenga los botones 7. Insert all small toy parts into corresponding holes, then press and hold the front of the toy tray safe delanteros de la bandeja apretados , mientras coloca la bandeja en la parte correspondiente del chasis, luego buttons, while the toy tray to put on the dinner plate, release the button, then the toy tray is locked.
- Page 6 How to Adjust the Height of Baby Walker Frame Como ajustar la altura del chasis del andador ¡PRECAUCIONES! Al abrir, cerrar a ajustar el andador, asegúrese de que el niño esté a una distan- When opening, closing or adjusting the walker, ensure that your child is at a safe cia segura.
- Page 7 How to Install the Strip Como instalar las gomas de freno Paso 11 step 11 11. Coloque las gomas de freno en su lugar correspondiente en el chasis del andador, en la base. Coloque los 11. Put the soft bumpers on the corresponding position of the baby walker frame, lock screw and tighten. tornillos y enrósquelos.
- Page 8 Fitting and / or Replacing Batteries Para colocar / o cambiar las pilas ¡PRECAUCIONES! La bandeja del andador necesita 2x AA ´´ 1.5 Vol pilas alcalinas ( ESTAS The toy of the walker frame requires 2X"AA" 1.5Volt alkaline PILAS NO VAN INCLUIDAS EN EL PRODUCTO ) type batteries(not included).
- Page 10 GARANTÍA FORMAL Los contenidos de este documento como se muestra a continua- ción tendrán efecto desde el momento que se compra el producto. Innovaciones M.S. S.L. el distribuidor oficial situado en Pol. Ind. La Cava. Avda. Generalitat Valenciana s/n. Sector Industrial 5. 46892 MONTAVERNER.
- Page 11 diciones ambientales adversas, o a cambios repentinos de tiempo, cuando el producto se corroe , se oxida o se repara o se altera el producto sin autorización previa, si lo repara utilizando piezas de re- puesto no autorizadas , si el uso o mantenimiento del producto no es el correcto, o no hace ningún tipo de mantenimiento sin hacer lo que se dice en el manual de instrucciones, se monta mal, tiene algún ac- cidente , se estropea a causa de la comida o la bebida, por cualquier...
- Page 16 IMPORTADO POR IMPORTADO POR INNOVACIONES M.S., S.L. Pol. Ind. La Cava. C/ Benigànim, 9 46892 MONTAVERNER (Valencia) Spain Tel. 96 229 76 70 Fax 96 229 76 76 INNOVACIONESMS.COM...
- Page 17 INFANT WALKER AND ELECTRONIC PLAY TRAY Infant Walker and Electronic Play Tray Owner’s Manual REF.: 435 - 436 - 437 Estándard europeo aprobado EN1273:2005 EN71-1-2-3 Read all instructions before assembly and use of the walker. Keep instructions for future use.
-
Page 18: Parts List
Parts List Check that you have all the parts for this model BEFORE assembling your product. No tools required. D. Large spoiler A. wheels C. safe rubbers B. rear fix wheels E. Baby walker frame F. Padded seat G. Electronic play tray Read the instructions carefully before use and keep them for future reference. - Page 19 ASSEMBLY Assembling Procedures Assembling Procedures step 1 1. Turn the baby walker frame upside down. Fix the wheels in the appropriate housings. Ensure that the wheels are firmly pushed all the way into the housing on the down base of the walker. step 2 2.
- Page 20 step 4 4. Open the baby walker frame in the in-use position, ensuring that all wheels touch the floor. Slowly raise the tray by polling it in an upward direction, until a click indicates that the frame has been locked correctly in one of the three positions. step 5 5.
- Page 21 step 7 7. Insert all small toy parts into corresponding holes, then press and hold the front of the toy tray safe buttons, while the toy tray to put on the dinner plate, release the button, then the toy tray is locked. step 8 8.
- Page 22 How to Adjust the Height of Baby Walker Frame When opening, closing or adjusting the walker, ensure that your child is at a safe distance. Before placing the child in the walker ensure that the secondary lock button is correctly locked again. step 9 9.
- Page 23 How to Install the Strip step 11 11. Put the soft bumpers on the corresponding position of the baby walker frame, lock screw and tighten. Using Electronic Play Toy Tray The walker includes one electronic play tray that attaches to the walker frame as shown in step 7.
-
Page 24: Product Care And Maintenance
Fitting and / or Replacing Batteries The toy of the walker frame requires 2X"AA" 1.5Volt alkaline type batteries(not included). • Batteries must only be fitted by an adult. • To fit and/ or replace batteries: loosen the screw on the battery compartment cover with a suitable screwdriver, press the tab and remove the battery compartment cover. - Page 26 IMPORTED BY INNOVACIONES M.S., S.L. Pol. Ind. La Cava. C/ Benigànim, 9 46892 MONTAVERNER (Valencia) Spain Tel. 96 229 76 70 Fax 96 229 76 76 INNOVACIONESMS.COM...
- Page 27 ANDADOR PARA CRIANÇAS Infant Walker and Electronic Play Tray COM BANDEJA ELECTRÔNICA Owner’s Manual REF.: 435 - 436 - 437 Estándard europeo aprobado EN1273:2005 EN71-1-2-3 Read all instructions before assembly and use of the walker. Keep instructions for future use.
- Page 28 Parts List Partes do andador Check that you have all the parts for this model BEFORE assembling your product. Comprove que tenha todas as partes do andador ANTES de montar o produto. No tools required. Não é necessário nenhuma ferramenta para montar este andador. D.
- Page 29 ASSEMBLY Assembling Procedures Assembling Procedures Processo de Montagem step 1 Passo 1 1. Turn the baby walker frame upside down. Fix the wheels in the appropriate housings. Ensure that 1. Ponha o chassis do andador de ponta cabeça. Coloque as rodas em seus buracos correspondentes. Assegure- the wheels are firmly pushed all the way into the housing on the down base of the walker.
- Page 30 step 4 Passo 4 4. Open the baby walker frame in the in-use position, ensuring that all wheels touch the floor. Slowly 4. Abra o chassis do andador como si fosse a utiliza-lo, assegure-se de que todas as rodas tocam o chão. Com raise the tray by polling it in an upward direction, until a click indicates that the frame has been cuidado, levante a bandeja tirando-a para cima, até...
- Page 31 step 7 Passo 7 7. Introduza os brinquedos pequenos em seus buracos correspondentes, logo aperte e mantenha os botões 7. Insert all small toy parts into corresponding holes, then press and hold the front of the toy tray safe dianteiros da bandeja apertados, enquanto coloque a bandeja na parte correspondente do chassis, logo solte os buttons, while the toy tray to put on the dinner plate, release the button, then the toy tray is locked.
- Page 32 How to Adjust the Height of Baby Walker Frame Como ajustar a altura do chassis do andador PRECAUCOES! Ao abrir, fechar e ajustar o andador, assegure-se de que a criança esteja a uma When opening, closing or adjusting the walker, ensure that your child is at a safe distance.
- Page 33 How to Install the Strip Como instalar as borrachas de freio step 11 Passo 11 11. Coloque as borrachas de freio em seu lugar correspondente no chassis do andador, na base. Coloque os 11. Put the soft bumpers on the corresponding position of the baby walker frame, lock screw and tighten. parafusos e enrosque-os.
- Page 34 Fitting and / or Replacing Batteries Para colocar / ou trocar as pilhas PRECAUCOES! A bandeja do andador precisa de 2x AA ´´ 1.5 Vol. pilhas alcalinas (ESTAS The toy of the walker frame requires 2X"AA" 1.5Volt alkaline PILHAS NÃO ESTAO INCLUSAS NO PRODUTO) type batteries(not included).
- Page 36 IMPORTADO POR INNOVACIONES M.S., S.L. Pol. Ind. La Cava. C/ Benigànim, 9 46892 MONTAVERNER (Valencia) Spain Tel. 96 229 76 70 Fax 96 229 76 76 INNOVACIONESMS.COM...
- Page 37 MARCHEUR POUR ENFANTS Infant Walker and Electronic Play Tray AVEC PLATEAU ÉLECTRONIQUE Owner’s Manual REF.: 435 - 436 - 437 Estándard europeo aprobado EN1273:2005 EN71-1-2-3 Read all instructions before assembly and use of the walker. Keep instructions for future use.
- Page 38 Parts List Parties du marcheur Check that you have all the parts for this model BEFORE assembling your product. Vérifiez que vous avez toutes les parties du marcheur AVANT de monter le No tools required. produit. Il n’est nécessaire aucun outil pour monter ce marcheur. D.
- Page 39 ASSEMBLY Assembling Procedures Assembling Procedures Proccedure de montage step 1 Pas 1 1. Mettez le chasis du marcheur la tête aux pieds. Mettez les roues dans leurs correspondants trous. Assurez- 1. Turn the baby walker frame upside down. Fix the wheels in the appropriate housings. Ensure that vous que les roues sont bien placées dans la place qui les correspond sur ls partie inférieure de la base du the wheels are firmly pushed all the way into the housing on the down base of the walker.
- Page 40 step 4 Pas 4 4. Open the baby walker frame in the in-use position, ensuring that all wheels touch the floor. Slowly 4. Ouvrez le chassis du marcheur comme si vous allez l’ utiliser. Assurez-vous que toutes les roues touchent le raise the tray by polling it in an upward direction, until a click indicates that the frame has been sol.
- Page 41 step 7 Pas 7 7. Introduissez les petits jouets dans les trous correspondants. Ensuite poussez et laissez les touches devant du 7. Insert all small toy parts into corresponding holes, then press and hold the front of the toy tray safe plateau poussées, tandis que vous placez le plateau dans la partie correspondant du chassis.
- Page 42 How to Adjust the Height of Baby Walker Frame Comment serrer l’hauteur du chassis du marcheur PRECAUTIONS! En ouvrant, fermer à serrer le marcheur, assurez. Vous que l’enfant se trouve à When opening, closing or adjusting the walker, ensure that your child is at a safe distance.
- Page 43 How to Install the Strip Comment installer les gommes de frein step 11 Pas 11 11. placez les gommes du frein dans leur lieu correspondant dans le chasis du marcheur, danscla base. Placez 11. Put the soft bumpers on the corresponding position of the baby walker frame, lock screw and tighten. les vis et visez- les.
- Page 44 Fitting and / or Replacing Batteries Pour placer / changer les batteries PRECAUTIONS! Le plateau du marcheur a besoin des batteries 2x AA ´´ 1.5 Vol batteries The toy of the walker frame requires 2X"AA" 1.5Volt alkaline alcalines ( CES BATTERIES NE SONT PAS INCLUSES DANS LE PRODUIT) type batteries(not included).
- Page 46 IMPORTÉ PAR INNOVACIONES M.S., S.L. Pol. Ind. La Cava. C/ Benigànim, 9 46892 MONTAVERNER (Valencia) Spain Tel. 96 229 76 70 Fax 96 229 76 76 INNOVACIONESMS.COM...
- Page 47 A N L E I T U N G KINDERLAU- FHILFE Infant Walker and Electronic Play Tray MIT ELEKTRONIK-FACHBODEN Owner’s Manual REF.: 435 - 436 - 437 Estándard europeo aprobado EN1273:2005 EN71-1-2-3 Read all instructions before assembly and use of the walker. Keep instructions for future use.
- Page 48 Parts List Teile der Kinderlaufhilfe Check that you have all the parts for this model BEFORE assembling your product. Prüfen Sie alle Teile BEVOR Sie es zusammenbauen. Es wird kein Werkzeug No tools required. benötigt um es zusammenzubauen. D. Large spoiler A.
- Page 49 ASSEMBLY Assembling Procedures Assembling Procedures Montageverfahren step 1 Schritt 1 1. Legen Sie das Chassis auf den Kopf. Stellen Sie die Räder in das entsprechende Loch. Achten Sie darauf, die 1. Turn the baby walker frame upside down. Fix the wheels in the appropriate housings. Ensure that Räder an ihrem Platz an der Unterseite der Basis der Kinderlaufhilfe platziert sind.
- Page 50 step 4 Schritt 4 4. Open the baby walker frame in the in-use position, ensuring that all wheels touch the floor. Slowly 4. Öff nen Sie das Fehrgestell der Kinderlaufhilfe als wenn Sie es verwenden wollten, stellen Sie sicher, dass alle raise the tray by polling it in an upward direction, until a click indicates that the frame has been Räder den Boden berühren.
- Page 51 step 7 Schritt 7 7. Legen Sie die kleinen Spielzeuge in die entsprechenden Löcher, drücken und halten Sie die Tasten auf der 7. Insert all small toy parts into corresponding holes, then press and hold the front of the toy tray safe Frontschale fest, während Sie das Fach an dem entsprechenden Teil des Chassis platzieren und Tablett ist an buttons, while the toy tray to put on the dinner plate, release the button, then the toy tray is locked.
- Page 52 How to Adjust the Height of Baby Walker Frame Wie die Fahrhöhe der Kinderlaufhilfe anpassen VORSI C HTSMASSNAHMEN! Beim Öff nen, Schließen der Kinderlaufhilfe, stellen Sie sicher, dass das Kind in When opening, closing or adjusting the walker, ensure that your child is at a safe distance.
- Page 53 How to Install the Strip Wie man die Gummibremsen installiert step 11 Schritt 11 11. Befestigen Sie die Gummibremse an dem entsprechendem Platz am Chassis der Kinderlaufhilfe. Setzen Sie 11. Put the soft bumpers on the corresponding position of the baby walker frame, lock screw and tighten. die Schrauben ein und festschrauben.
- Page 54 Fitting and / or Replacing Batteries So platzieren / oder ersetzen Sie die Batterien VORSI C HTSMASSNAHMEN! Die Kinderlaufhilfe benötigt 2x AA-Alkaline-Batterien Vol. 1.5’’ (DIESE BAT- The toy of the walker frame requires 2X"AA" 1.5Volt alkaline TERIEN SIND NICHT MIT ENTHALTEN) type batteries(not included).
- Page 56 IMPORTIERT VON: INNOVACIONES M.S., S.L. Pol. Ind. La Cava. C/ Benigànim, 9 46892 MONTAVERNER (Valencia) Spain Tel. 96 229 76 70 Fax 96 229 76 76 INNOVACIONESMS.COM...
- Page 57 GIRELLO PER BAMBINI Infant Walker and Electronic Play Tray CON VASSOIO ELETTRONICO Owner’s Manual REF.: 435 - 436 - 437 Estándard europeo aprobado EN1273:2005 EN71-1-2-3 Read all instructions before assembly and use of the walker. Keep instructions for future use.
- Page 58 Parts List Parti del girello Check that you have all the parts for this model BEFORE assembling your product. Si assicuri di essere in possesso di tutte le parti del girello PRIMA di montare il No tools required. prodotto. Non ha bisogno di nessun attrezzo per montare questo girello. D.
- Page 59 ASSEMBLY Assembling Procedures Assembling Procedures Processo di Montaggio step 1 Passo 1 1. Capovolga la struttura del girello . Inserisca le ruote nei loro spazi corrispondenti. Si assicuri che le ruote siano 1. Turn the baby walker frame upside down. Fix the wheels in the appropriate housings. Ensure that ben collocate nei loro spazi corrispondenti nella parte inferiore della base del girello.
- Page 60 step 4 Passo 4 4. Open the baby walker frame in the in-use position, ensuring that all wheels touch the floor. Slowly 4. Apra la struttura del girello come se lo volesse utilizzare, si assicuri che tutte le ruote tocchino il suolo. Con raise the tray by polling it in an upward direction, until a click indicates that the frame has been attenzione, alzi il vassoio spingendo verso l’alto, sino a che un “click”...
- Page 61 step 7 Passo 7 7. Introduca i giochi piccoli nei loro fori corrispondenti, successivamente prema e mantenga i bottoni anteriori 7. Insert all small toy parts into corresponding holes, then press and hold the front of the toy tray safe del vassoio premuti, mentre colloca il vassoio nella parte corrispondente della struttura, successivamente lasci i buttons, while the toy tray to put on the dinner plate, release the button, then the toy tray is locked.
- Page 62 How to Adjust the Height of Baby Walker Frame Come regolare l’altezza della struttura del girello ATTENZIONE! Quando apre, chiude e regola il girello, si assicuri che il bambino mantenga una When opening, closing or adjusting the walker, ensure that your child is at a safe distance.
- Page 63 How to Install the Strip Come collocare le gomme del freno step 11 Passo 11 11. Collochi le gomme del freno nel loro spazio corrispondente nella struttura del girello, nella base. Collochi le 11. Put the soft bumpers on the corresponding position of the baby walker frame, lock screw and tighten. viti e le avviti .
- Page 64 Fitting and / or Replacing Batteries Per collocare / o cambiare le batterie ATTENZIONE! Il vassoio del girello ha bisogno di 2x AA´´1.5 Vol batterie alcaline (QUESTE The toy of the walker frame requires 2X"AA" 1.5Volt alkaline BATTERIE NON SONO INCLUSE NEL PRODOTTO ). type batteries(not included).
- Page 68 IMPORTATO DA: INNOVACIONES M.S., S.L. Pol. Ind. La Cava. C/ Benigànim, 9 46892 MONTAVERNER (Valencia) Spain Tel. 96 229 76 70 Fax 96 229 76 76 INNOVACIONESMS.COM...
Need help?
Do you have a question about the 435 and is the answer not in the manual?
Questions and answers