
Related Manuals for BEL Engineering i-Thermo G Series

Summary of Contents for BEL Engineering i-Thermo G Series
- Page 1 User manual i-Thermo G163M, GA64M and i-Thermo G62L, G163L Revision of the software BPgTh_1_00 MAN_B_iThermoG_EN_BPgTh_1_00_Rev1.docx Created on 19/04/19...
-
Page 2: Table Of Contents
TABLE OF CONTENTS SAFETY INSTRUCTIONS AND WARNINGS ................. 2 INSTALLATION .......................... 3 ....................... 3 ACKAGE ONTENTS ....................4 OSITIONING OF THE DEVICE ..........................5 TART STANDBY OFF FUNCTION ....................10 SIMPLE WEIGHTING AND SETTINGS FOR FIRST USE ..........11 ......................12 ANGUAGE SELECTION ...................... - Page 3 1 Safety instructions and warnings WARNING: Please read these installation and operating instructions carefully before starting your work with the new scale. Any use of the device other than that specified in this manual no longer guarantees the safety of the product. Keep the instruction manual carefully.
-
Page 4: Installation
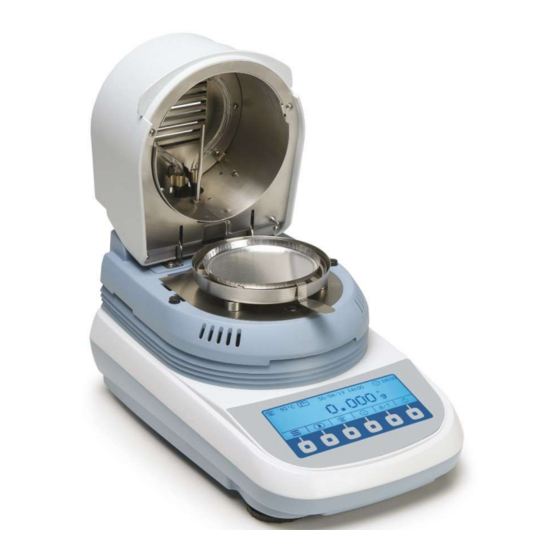
2 Installation Gently remove the device from the packaging, check that the device has no visible damage caused by transport and that there are all the accessories listed below. 2.1 Package Contents Moisture determination tool. VDE power cable 15-pole M/F cable for connection of the scale/heater Underplate Sample-holder plate extractor Tray with antiventilation cylinder... -
Page 5: Positioning Of The Device
2.2 Positioning of the device The device was manufactured in such a way that reliable weighing results are obtained under normal operating conditions. The choice of the correct placement of the device is therefore important to ensure optimal and precise operation. To choose the place where to install the device, the following criteria must be met: Do not install the scale in environments where there are drafts, strong temperature changes. -
Page 6: Start-Up
2.3 Start-up All the operations to be performed to prepare the device for the first start-up are described below. Open the oven lid and place: 1. Tray with antiventilation cylinder 2. Place the flat sample holder tray extractor 3. Place the star-shaped item on the weighing cone. - Page 7 Wait 30 minutes after switching on and calibrate the device after leveling it. Perform device calibration whenever it is moved to another location. It is recommended not to drop objects of excessive weight on the weighing plate of the scale to avoid damaging it.
- Page 8 3 Keyboard and display The device is equipped with a backlit graphic display and a keyboard with six function keys. The function of the keys varies according to the operations to be performed, and is indicated in the part above the key in the lower area of the display. Key bar available on simple weighing screens.
- Page 9 Available key bar during the drying cycle. Key to cancel the drying cycle in progress. Key for interrupting the drying cycle. Touching this key stops the drying cycle. Key for displaying the parameters set for drying. Key for selecting the parameter to be displayed, in rotation: ...
-
Page 10: Standby Off Function
4 Standby off function After inserting the power cable into the mains socket, the device will turn on automatically and after performing the system test it will be positioned on the standby screen. Press the key corresponding to the power symbol to start the device. -
Page 11: Simple Weighting And Settings For First Use
5 Simple weighting and settings for first use After connecting the power supply, the software version and the model of the device will appear on the display. The device will now be in the standby state, so press the key to switch on the device and then display the weighing screen. -
Page 12: Language Selection
5.1 Language selection The tool can be set to display information in 6 different languages. Italian German French Spanish Portuguese English Press and hold the menu key for 2 seconds. Use the arrow keys to move up and down in the menu and go to section 3 - Language. -
Page 13: Preferences: Backlight And Contrast
5.3 Preferences: backlight and contrast. You can set, according to your needs, the contrast and the backlight of the device display. Press and hold the menu key for 2 seconds. Use the arrow keys to move up and down in the menu and go to section 4 - Backlight. -
Page 14: Setting The Weighing Parameters
5.4 Setting the weighing parameters For a correct use of the scale, you can set the right settings of the weighing parameters according to the environment of use. This section describes the parameters of autozero, filter, stability and unit of measurement of the weighing. - Page 15 Use the arrow keys to move up and down in the menu and go to section 9 - Stability. Stability: this function allows you to adapt the scale to the environmental working conditions. When using the device in a virtually vibration- free environment, select level 0.
-
Page 16: Calibration And Calibration Mode Setting
5.5 Calibration and calibration mode setting The electronic scale makes mass measurements using gravity (g). Different geographical regions and differences in altitude correspond to different values of gravity acceleration (g). Therefore, to obtain accurate measurements, the scale must be adapted to the place of use and to the environmental conditions. -
Page 17: Display And Print Of The Scale Calibration Data
External choice By selecting the "external choice" calibration mode, you can calibrate the scale with a different weight than the default one. After confirming, the calibration procedure will be activated. Load on the plate a weight equal to or greater than the default calibration weight, so the scale will recognize as valid a weight equal to or greater than the calibration weight as long as it is... -
Page 18: Device Settings
5.7 Device Settings This section describes the functionalities and the relative settings of the RS232 serial output with which the device is equipped. Press and hold the menu key for 2 seconds. Use the arrow keys to move up and down in the menu and go to section 1 –... - Page 19 2 – Printer: this function allows you to select the device connected to the serial output. Generic print: print on command, by pressing the key For general purpose serial print. Tlp50: command printing, pressing the key for Tlp50 printer model 3 –...
-
Page 20: Main Menu
6 Main menu This section describes all the functions available for the analysis of the moisture content of the substances and the parameter settings relating to the operating mode of the heater. Press the menu button From the main menu, you can act on the parameters: 1 - Heater setup 2 - GLP Setup... - Page 21 Rapid this method is suitable for samples with a moisture content greater than 30%. After starting, the temperature will exceed the set value by about 30% for 2 minutes and then settle at the set value. This is to speed up the drying process.
-
Page 22: Glp Setup
4 - Delayed start: The start of the drying cycle can be delayed with a time interval between 0 and 15 seconds. Use the keys to increase and decrease the time. Then confirm the selection with the key 5 - Stability test: This function allows you to activate "On"... -
Page 23: Heater Calibration Data
Scale calibration data This function allows you to view and print the data related to the last calibration of the scale. Calibration execution date. Calibration mode. Value of the correction made. 6.3 Heater Calibration Data By selecting this function, you can display and print the thermometer calibration data. -
Page 24: Heater Calibration
6.6 Heater calibration This function allows the thermometer calibration of the heater to be performed. N.B. The calibration must be performed by specialized personnel. To perform the test, the STCi-02 accessory must be placed. Refer to the instructions supplied with the accessory for correct use. Use the keys to increase and decrease the temperature and the keys... -
Page 25: Moisture Determination
7 Moisture determination. This section describes how to set the drying parameters to be able to perform the analysis of the moisture content. Temperature End of drying mode 7.1 Temperature setting From the weighing screen, press the key to set the desired drying temperature. - Page 26 Two methods are available for determining the end of the drying cycle: Use the arrows to switch from one mode to another. Then confirm the selection with the key Autostop: setting this end-of-drying method, the cycle will end when the change in the weight loss of the substance will be less than the value set for the indicated time interval.
-
Page 27: Start Of The Analysis
The default cycle time is 15min, so use the keys to increase or decrease the value. Keeping the key pressed for a long time, the value is increased or decreased rapidly. N.B. the settable duration ranges from a minimum of 1 minute to a maximum of 99 minutes. - Page 28 With the “Manual” start mode Perform the zeroing if necessary by pressing the Load the sample tray on the weighing star- shaped item and switch off the heater. Then press the key to confirm. After resetting the sample tray, load the substance to be analyzed on the tray.
-
Page 29: Features Available During And At The End Of The Drying Cycle
7.4 Features available during and at the end of the drying cycle. Below are all the functions available during and at the end of the drying cycle, valid for both "Simple" and "Advanced" modes. Heating mode Current heater End of drying temperature mode Drying cancellation... - Page 30 Parameters: by pressing the key you can display the parameters used for the drying cycle. Press the key to return to the drying screen. At the end of drying a short beep will be heard and the “Result” drying screen will be displayed.
- Page 31 4. Print the test result, by pressing the -------------------------------- 12/06/19 10:40:47 AM so you can decide what to -------------------------------- print of the test result. Scale ID: xxxx The print values and mode depend on the -------------------------------- settings made in the peripheral settings. User ID: yyyy --------------------------------...
-
Page 32: Serial Interface Connections
8 Serial interface connections The instrument is equipped with as standard with RS 232C interface for connection with a serial printer. To guarantee communication between the instrument itself and the printer, the following conditions must be satisfied: connect the printer using a suitable cable matching the position of the printer signals with those of the instrument. -
Page 33: Tips For The Determination Of The Humidity Content Of The Substances
10 Tips for the determination of the humidity content of the substances 10.1 Preparing the sample Prepare a sample only at a time to prevent humidity exchange with the environment. If you want to prepare multiple samples simultaneously, make sure to store them in a tightly closed container to prevent changes during storage. -
Page 34: Amount Of Substance And Duration Of The Drying Cycle
10.3 Amount of substance and duration of the drying cycle. The composition of the substance affects significantly the duration and the accuracy of the humidity measurement results. A small amount of the substance will result in a faster drying cycle, but with less precise results. -
Page 35: Error Codes
12 Error Codes ERROR MESSAGE MEANING POSSIBLE SOLUTIONS ON DISPLAY Protect the balance from Weight not stable after air flows or from ERR01 operation of tare vibrations of the working table Protect the balance from impossible to start the air flows or from ERR02 calibration due to instability of vibrations of the working... -
Page 36: Troubleshooting
13 Troubleshooting Problem Possible cause The device does not switch on VDE cable not connected. Cable connecting the balance and the heater not inserted. Fuses damaged (see Section 13 for any replacement). The measurement lasts too Switching off criterion set in a bad way. ... -
Page 37: Warranty
15 Warranty The term of the warranty is 24 months from the date of purchase proven by the product bill or the packing slip. The warranty covers all parts that may be defective in origin. It does not cover mechanical and electronic parts damaged due to improper installation, tampering or misuse.
Need help?
Do you have a question about the i-Thermo G Series and is the answer not in the manual?
Questions and answers