
Summary of Contents for Helmer U6
-
Page 1: Table Of Contents
Contents Safety Information Chapter 1: Understanding your amplifier 1.1 Features 1.2 Package Content 1.3 Remote Control 1.4 Wiring Instruction 1.5 Device Layout Chapter 2: Installation Chapter 3: Getting Started 3.1 Turning your device On and Off 3.2 Home Screen 3.3 Pre‐installed APPs 3.4 Imirror 3.5 WiseServer 3.6 Explorer Manual Instructions 3.7 Wiselink U6 / U9 / U10 Chapter 4: Technical Parameters ... -
Page 2: Features
RM/RMVB720P) Safety Information Time Display 1. Don’t use this product in a wet environment. Set time to turn on/off the unit 2. The product applies to power supply AC100‐240V, if you don't use Screw terminations on the rear of the unit for loudspeakers, it for a long time, please turn off the power. power and wired line input 3. Please make sure that the speaker line, power line, audio input Includes in‐line power supply(AC100‐240V) line are connected correctly. Software and firmware update 4. Don’t open and repair the product by yourself. 5. If the product crashes, you can press the reset button in the lower 1.2 Package Content left corner of the product to reset. 1 x amplifier 1 x metal bracket Understanding your amplifier 1 x back box 1.1 Features 4 x screws for mounting Stereo Amplifier Module (4 x 30W @ 4Ω) connect up to 8 1 x remote control (Extra ordered, cell battery CR2025 3V is not speakers included in package) 2 Zone ON/OFF and volume control ... -
Page 3: Device Layout
1.4 Wiring Diagram 1.5 Device Layout ... -
Page 4: Chapter 2: Installation
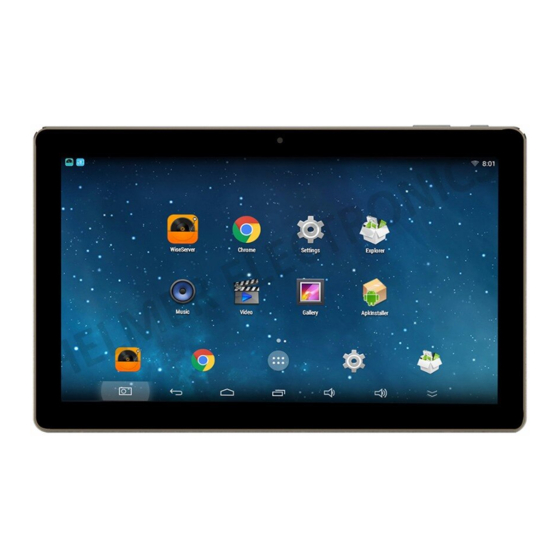
Chapter 2: Installation Chapter 3: Quick Start 3.1 Turning your device On and Off Turning your device on: Press and hold the power button until you see the welcome page. Turning your device off: Press and hold the Power button until the screen turn off. 3.2 Home Screen The home screen is the starting point for using your device. 1. Prepare all the cables going through the back box and wait for connecting with amplifier 2. Fix the metal bracket on back box with screws 3. Connect all the cables with the terminals of device 4. Hang the device on bracket ... -
Page 5: Pre-Installed Apps
3.3 Pre‐installed APPs 3.4 Imirror Apkinstaller: install or manage android application in device, USB or TF card. Downloads: Files,apk and other items you download from browser,gmail,etc. Explorer: Display all the files in device, TF card, USB. Play Store: Google play store that you can download applications. Setting: Configure your devie to your preferences. Wiseserver: to control the device’s amplifier function. See details in “WISESERVER”. Wiselink: to synchronize/control your device by mobile. 1.It’s at the left upper corner which is running when start device. 2.Connect both device and iphone(ipad) to same WIFI 3.Open screen mirroring on iphone(ipad) to choose the device (eg. WISELINK‐5364) 4. View picture or play music/video on your iphone/ipad, the amplifier will synchronize. -
Page 6: Wiseserver
3.5 WiseServer QR code: Scan to This app integrates all the main amplifier functions. download app for mobile phone. Setting: Set schedule to turn 2 Zone Control: on/off the device or Rename zone, play/stop music. Select input source. volume+/‐, Modify name and turn on/off each number of your device. zone. Input Source: To Sound Effect: choose local or Choose 8 different external source or effects or adjust by Bluetooth. yourself. ... - Page 7 Amplifier in LAN: Search for all the amplifiers connected with same WIFI router. You can control amplifiers from each other. Time On/Off: Set up schedule to turn on/off the device or play/stop music. Example: There are 2 WIFI amplifiers connecting to your home WIFI router. Device at hand‐‐A, Device in LAN‐‐B Playlist: List of Remote: Play contents (song, picture, and video) from B at B. music/video/images in Local: Play contents (song, picture, and video) from B at A. device, TF card and USB. Send: Play contents (song, picture, and video) from A at B. Upload: Copy and send contents (song, picture, video) from A to B. Other function: Play/ pause/ volume up/ volume down/ previous/ next for A or B. ...
-
Page 8: Explorer
3.6 Explorer From your mobile phone, Click contents in USB or TF card for seconds until you see menu that You can find all the amplifiers you can edit the file. Then click copy or move, back to where you connecting to same WIFI in want to paste, click paste. the list. You can control all of them by your mobile phone. You can play songs/movies from mobile local file. 3.7 Wiselink Connect both amplifier and mobile to same WIFI router, scan the QR code when open the Wiselink app to download app for mobile ... -
Page 9: Chapter 4: Technical Parameters
U10: 10.1" IPS Touch Screen (1024*600) Power Supply: AC100V‐240V Output Power(max): 4 x 30W @ 4Ω Output Impedance: 8Ω THD: 0.03% (1W, 1KHz) Frequency Response: 20Hz‐20KHz±3dB CPU: Cortex A9 quad core, 1.6G RAM:1G, ROM: 8G Extended Memory card up to 32G WIFI Transmit Distance:≤30m Product Size: 256 x 147 x 64mm(U10) 230 x 147 x 52mm(U9) 193 x 123 x 52mm(U6) ...
Need help?
Do you have a question about the U6 and is the answer not in the manual?
Questions and answers