Table of Contents
Advertisement
Quick Links
Infoblox Installation Guide
For the Trinzic Reporting 2000 Appliance
Contents
Introduction . . . . . . . . . . . . . . . . . . . . . . . . . . . . . . . . . . . . . . . . . . . . . . . . . . . . . . . . . . . . . . . . . . 3
Product Overview . . . . . . . . . . . . . . . . . . . . . . . . . . . . . . . . . . . . . . . . . . . . . . . . . . . . . . . . . . . . . . . . . . . . . . . . . . . . . . .3
Hardware Components. . . . . . . . . . . . . . . . . . . . . . . . . . . . . . . . . . . . . . . . . . . . . . . . . . . . . . . . . . . . . . . . . . . . . . . . . . .4
System, Environmental, and Power Specifications . . . . . . . . . . . . . . . . . . . . . . . . . . . . . . . . . . . . . . . . . . . . . . . . . . . .9
Installing an Appliance . . . . . . . . . . . . . . . . . . . . . . . . . . . . . . . . . . . . . . . . . . . . . . . . . . . . . . . . 11
Rack Mounting . . . . . . . . . . . . . . . . . . . . . . . . . . . . . . . . . . . . . . . . . . . . . . . . . . . . . . . . . . . . . . . . . . . . . . . . . . . . . . . 11
Installing the Backup Battery Unit. . . . . . . . . . . . . . . . . . . . . . . . . . . . . . . . . . . . . . . . . . . . . . . . . . . . . . . . . . . . . . . . 13
Powering the Appliance . . . . . . . . . . . . . . . . . . . . . . . . . . . . . . . . . . . . . . . . . . . . . . . . . . . . . . . . . . . . . . . . . . . . . . . . 13
Cabling the Appliance to a Network . . . . . . . . . . . . . . . . . . . . . . . . . . . . . . . . . . . . . . . . . . . . . . . . . . . . . . . . . . . . . . 14
Changing Power Supplies . . . . . . . . . . . . . . . . . . . . . . . . . . . . . . . . . . . . . . . . . . . . . . . . . . . . . . . . . . . . . . . . . . . . . . 15
Changing Fan Modules. . . . . . . . . . . . . . . . . . . . . . . . . . . . . . . . . . . . . . . . . . . . . . . . . . . . . . . . . . . . . . . . . . . . . . . . . 16
Changing Disk Drives . . . . . . . . . . . . . . . . . . . . . . . . . . . . . . . . . . . . . . . . . . . . . . . . . . . . . . . . . . . . . . . . . . . . . . . . . . 17
Changing the Backup Battery Unit . . . . . . . . . . . . . . . . . . . . . . . . . . . . . . . . . . . . . . . . . . . . . . . . . . . . . . . . . . . . . . . 20
Accessing the Appliance . . . . . . . . . . . . . . . . . . . . . . . . . . . . . . . . . . . . . . . . . . . . . . . . . . . . . . . 21
Connecting to the Appliance . . . . . . . . . . . . . . . . . . . . . . . . . . . . . . . . . . . . . . . . . . . . . . . . . . . . . . . . . . . . . . . . . . . . 22
Specifying Appliance Settings. . . . . . . . . . . . . . . . . . . . . . . . . . . . . . . . . . . . . . . . . . . . . . . . . . . . . . . . . . . . . . . . . . . 23
Infoblox GUI . . . . . . . . . . . . . . . . . . . . . . . . . . . . . . . . . . . . . . . . . . . . . . . . . . . . . . . . . . . . . . . . . . . . . . . . . . . . . . . . . 25
Infoblox CLI . . . . . . . . . . . . . . . . . . . . . . . . . . . . . . . . . . . . . . . . . . . . . . . . . . . . . . . . . . . . . . . . . . . . . . . . . . . . . . . . . . 26
Managing the Disk Subsystem . . . . . . . . . . . . . . . . . . . . . . . . . . . . . . . . . . . . . . . . . . . . . . . . . . . . . . . . . . . . . . . . . . 27
Copyright Statements
© 2011-2012, Infoblox Inc.- All rights reserved.
The contents of this document may not be copied or duplicated in any form, in whole or in part, without the prior
written permission of Infoblox, Inc.
The information in this document is subject to change without notice. Infoblox, Inc. shall not be liable for any
damages resulting from technical errors or omissions which may be present in this document, or from use of this
document.
This document is an unpublished work protected by the United States copyright laws and is proprietary to Infoblox,
Inc. Disclosure, copying, reproduction, merger, translation, modification, enhancement, or use of this document by
anyone other than authorized employees, authorized users, or licensees of Infoblox, Inc. without the prior written
consent of Infoblox, Inc. is prohibited.
For Open Source Copyright information, see Open Source Copyright and License Statements in the Infoblox NIOS
Administrator Guide.
1
Advertisement
Table of Contents

Related Manuals for Infoblox Trinzic Reporting 2000

Summary of Contents for Infoblox Trinzic Reporting 2000
-
Page 1: Table Of Contents
Infoblox, Inc. The information in this document is subject to change without notice. Infoblox, Inc. shall not be liable for any damages resulting from technical errors or omissions which may be present in this document, or from use of this document. - Page 2 Warranty Information Your purchase includes a 90-day software warranty and a one year limited warranty on the Infoblox appliance, plus an Infoblox Warranty Support Plan and Technical Support. For more information about Infoblox Warranty information, refer to the Infoblox website, or contact Infoblox Technical Support.
-
Page 3: Introduction
This guide provides an overview of the Trinzic Reporting 2000 network appliance, and explains how to install and configure the system. You can add the Trinzic Reporting 2000 appliance as a member to the Infoblox Grid and configure it as a dedicated logging and reporting appliance. Note that you cannot configure the reporting appliance as an HA pair. -
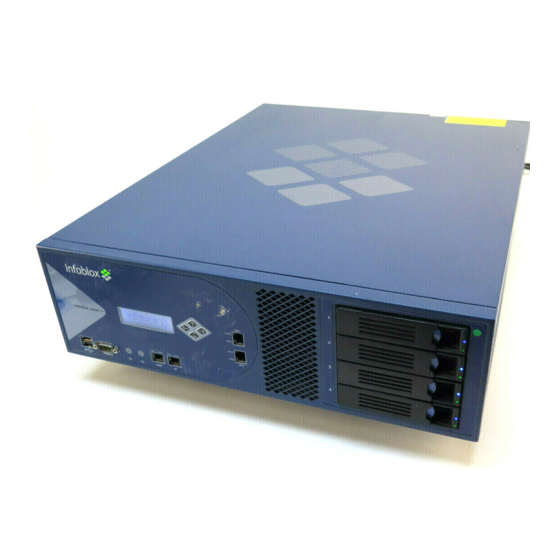
Page 4: Hardware Components
Introduction Hardware Components The Trinzic Reporting 2000 is a 3-U platform that you can easily mount in a standard equipment rack using the mounting brackets and bolts that ship with each appliance. The front panel components include the LCD (liquid crystal display) panel and navigation buttons, communication ports, hard disk drives, and indicator lights. - Page 5 If the dongle is connected to a laptop, this laptop must be grounded properly as well. Failure to do so may result in damage to the serial console port of the Infoblox appliance. Infoblox is not responsible for such damage.
- Page 6 1 and 2 transmit data, and the twisted pair connecting to pins 3 and 6 receive data. For 1000Base-T connections, all four twisted-pair wires are used for bidirectional traffic. All Infoblox Ethernet ports are auto-sensing and automatically adjust to standard straight-through and cross-over Ethernet cables.
- Page 7 Receive - BI_DB- Orange Green (not used) BI_DD+ White/Brown White/Brown (not used) BI_DD- Brown Brown (Looking into RJ-45 Ethernet ports on an Infoblox appliance) Legend: BI_D = bidirectional; A, B, C, D = wire pairings For the Trinzic Reporting 2000 Appliance...
- Page 8 Rear Panel The Trinzic Reporting 2000 has dual power supplies and three fan modules. The power supplies and fan modules are hot swappable, so you can replace any one of them at a time without disrupting the operations of the appliance.
-
Page 9: System, Environmental, And Power Specifications
U.S.: 100 – 240 VAC switchable, 50 – 60 HZ, 8 A, redundant, dual input — Europe: 208 – 265VAC, 50 – 60Hz, 4 A, redundant, dual input — Output Power: 540 watts each For the Trinzic Reporting 2000 Appliance... - Page 10 70° C 70° C (BME)/ BLACK-ICC Australia RVV 300/500 3C X IEC 320 C13/ 10A, 250V 70° C 1.00mmSQ GB2099.1 New Zealand GB1002 1.0/3 HO5VVF3 India IEC-320 10A, 250V 70° C 70° C C-13/BS South Africa 546SABS Infoblox Installation Guide...
-
Page 11: Installing An Appliance
Rack Mounting The Trinzic Reporting 2000 mounts into a standard 19” (48 cm) equipment rack. The appliance ships with mounting brackets at the front, and an accessory kit that contains a pair of rear slide brackets and mounting hardware. To mount the appliance to an equipment rack, you will also need a screwdriver with a cross-headed tip. - Page 12 Push the appliance in to the equipment rack until the front mounting brackets touch the left and right posts at the front of the equipment rack. Secure the front mounting brackets to the posts of the equipment rack, with the screws provided. Use two screws per side. Figure 8 Trinzic Reporting 2000 Front Mount Infoblox Installation Guide...
-
Page 13: Installing The Backup Battery Unit
Powering the Appliance The Infoblox appliance ships with two power supply modules (PS1 and PS2). Use the power cables shipped with the appliance to connect it to separate power circuits if possible. In the event of a power failure on one circuit, the appliance can operate on the other. -
Page 14: Cabling The Appliance To A Network
Disable other dynamic and proprietary protocols that might interrupt the forwarding of packets Use the Infoblox GUI to access the Infoblox appliance from a management system. Through the Infoblox GUI, you can set up and administer the appliance. For management system requirements and access instructions, Accessing the Appliance on page 21. -
Page 15: Changing Power Supplies
Although the Trinzic Reporting 2000 can run with only one power supply, it is advisable to install both power supplies that were shipped with the appliance. This practice minimizes the chance of system failure due to an individual power supply failure. -
Page 16: Changing Fan Modules
If a fan stops operating due to removal or a failure, the appliance continues to run, but generates an SNMP trap. You can also monitor the status of the fan modules by logging in to the Infoblox GUI, and from the Grid Perspective, select the appliance and click View ->... -
Page 17: Changing Disk Drives
Hot-swapping a disk drive is a simple process that does not require issuing commands or a GUI operation. When you replace a failed disk, you must replace it with an Infoblox supplied disk. To ensure that you receive the correct replacement disk, report the disk type or part number of the failed disk. The appliance displays the disk type... - Page 18 The disk drive automatically goes into rebuild mode. Disk Array Guidelines Infoblox has designed the disk array to be completely self managed. There are no maintenance procedures required for a normally functioning disk array. Mishandling the disk array can cause an unrecoverable error and result in a failed appliance.
- Page 19 24 hours. • Replace a failed or mismatched disk only with a replacement disk shipped from Infoblox. When you request a replacement disk, report the disk type displayed in the...
-
Page 20: Changing The Backup Battery Unit
Changing the Backup Battery Unit The Trinzic Reporting 2000 ships with a battery unit that provides backup power for RAID controller cache memory in the event of a power failure. You must replace the backup battery unit between three and four years of use. -
Page 21: Accessing The Appliance
Accessing the Appliance The management system is the computer from which you configure and monitor the Infoblox appliance. You can access the appliance from the management system remotely across an Ethernet network or directly through a serial cable. After completing the steps in... -
Page 22: Connecting To The Appliance
You can disable LCD input functionality. To disable the LCD, refer to the NIOS Administrator Guide. Console Port The Infoblox appliance has a male DB-9 console port on the front panel. You can log in to the appliance through this port and specify initial network settings using the Infoblox CLI. -
Page 23: Specifying Appliance Settings
A Grid is a group of two or more Infoblox appliances that share sections of a common, distributed, built-in database and which you configure and monitor through a single, secure point of access—the Grid Master. To set up a Grid, you must configure a single or HA Grid Master and at least one Grid member, which can also be a single appliance or an HA pair. - Page 24 Shared Secret Host Name Grid Master’s IP Address LAN1 Port IP Address and Netmask Gateway IP Address *Port Settings **Admin Password NTP Server IP Address On the last screen of the wizard, click Finish. The Infoblox GUI application restarts. Infoblox Installation Guide...
-
Page 25: Infoblox Gui
You can view reporting data and configuration settings and make configuration changes through the Reporting tab of the Infoblox GUI. Figure 15 Infoblox GUI Overview Global Search Reporting Tab Help Panel Finder Panel Toolbar Workspace For the Trinzic Reporting 2000 Appliance... -
Page 26: Infoblox Cli
The Infoblox CLI allows you to configure and monitor the appliance using a small set of Infoblox commands. There are some tasks, such as resetting the appliance, that you can only do through the CLI. You can access the Infoblox CLI through a direct console connection from your management system to the Infoblox appliance. -
Page 27: Managing The Disk Subsystem
Managing the Disk Subsystem The Trinzic Reporting 2000 uses a RAID (Redundant Array of Independent Disks) 10 array to provide the optimum mix of high database performance and redundant data storage with recovery features in the event of disk failures. - Page 28 The Infoblox GUI also displays detailed status of the RAID array. In the event of a disk failure, you must replace the failed disk with one that is qualified and shipped from Infoblox and has the same disk type as the rest of the disks...
Need help?
Do you have a question about the Trinzic Reporting 2000 and is the answer not in the manual?
Questions and answers