Advertisement
Quick Links
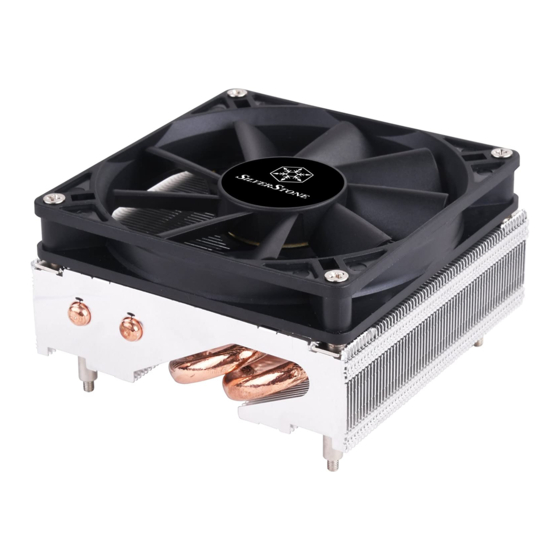
Great balance of silence and performance
Unique interweaving diamond edged fins for improved performance
Exclusive arrow guides distribute airflow evenly among heat pipes
Three heat-pipes and aluminum fins for excellent heat conducting efficiency
Heat-pipe direct contact (HDC) technology
Includes compact PWM fan for excellent cooling and low noise
Anti-vibration rubber pads included for additional noise dampening
Intel Socket LGA775/115X/1366/2011 and AMD Socket AM2/AM3/FM1/FM2 compatible
Advanced heatsink with Heat-pipe Direct Contact (HDC) technology
Advertisement

Related Manuals for SilverStone argon series


Summary of Contents for SilverStone argon series
- Page 1 Great balance of silence and performance Unique interweaving diamond edged fins for improved performance Exclusive arrow guides distribute airflow evenly among heat pipes Three heat-pipes and aluminum fins for excellent heat conducting efficiency Heat-pipe direct contact (HDC) technology Includes compact PWM fan for excellent cooling and low noise Anti-vibration rubber pads included for additional noise dampening Intel Socket LGA775/115X/1366/2011 and AMD Socket AM2/AM3/FM1/FM2 compatible Advanced heatsink with Heat-pipe Direct Contact (HDC) technology...
- Page 2 The following manual and guides were carefully prepared by the SilverStone engineering team to help you maximize the potential of your SilverStone product. Please keep this manual for future reference when upgrading or performing maintenance on your system. A copy of this manual can also...
-
Page 3: Specifications
Intr oduction The Argon series coolers are designed to provide the best cooling solution for your CPU. Featuring three thick copper heat pipes connected to the base using heat-pipe direct contact (HDC) technology, this cooler retains the signature Argon series feature. To improve performance even further, unique and exclusive heatsink fin designs such as interweaving diamond edge and arrow guides are included. - Page 4 Installation Guide Before you begin, please make sure that you have all components collected check that all components do not have compatibility problems with each other or with the case if possible, assemble the components outside the case first to make sure they are working keep the motherboard manual ready for reference during installation prepare a Phillips screwdriver.
- Page 5 Выберите резиновую прокладку Place the rubber cushion в соответствии с типом разъема according to the socket type процессора и установите onto the motherboard прокладку на материнскую плату Gummipolster entsprechend dem 將墊片圓孔對準主機板的圓孔, Sockeltyp auf dem Motherboard 並將墊片放置於主機板上 platzieren Placez le coussinet en caoutchouc 将垫片圆孔对准主板的圆孔,...
- Page 6 Заверните винты с накатанной Install the knurled threaded screws головкой в отверстия в through the rubber cushion and прокладке и материнской fasten the screws on the плате motherboard Gerändelte Gewindeschrauben 將等高柱螺絲沿著墊片圓孔與 durch das Gummipolster 主機板鎖固 installieren, Schrauben am Motherboard festziehen Installez les pas de vis moletés 将等高柱螺丝沿着垫片圆孔与...
- Page 7 На очищенную поверхность Please clean the surface of CPU процессора равномерно then apply thermal grease evenly нанесите термапасту on CPU Reinigen Sie bitte die Oberfläche 塗抹導熱膏前,請先清潔CPU der CPU bevor Sie die 表面,取出導熱膏後,並將導 Wärmeleitpaste gleichmäßig 熱膏均勻塗抹在CPU上 auftragen Por favor, limpie la superficie de la 涂抹导热膏前,请先清洁CPU CPU antes de aplicar la masilla 表面,取出导热膏后,并将导...
- Page 8 Закрепите кронштейн на Use screws to secure bracket радиаторе с помощью винтов onto the heatsink Intel Sichern Sie die Halterung mit 使用螺絲將扣具鎖在散熱器上 Schrauben am Kühlkörper Utilisez des vis pour fixer le 使用螺丝将扣具锁在散热器上 crochet au dissipateur thermique Use tornillos para asegurar el ネジでブラケッ...
- Page 9 Снимите пленку с основания Remove the film from the cooler радиатора и установите base and place it on the CPU радиатор на процессор Folie von der Kühlerbasis 將散熱器底部保護貼撕離。 entfernen, diese an der CPU 將散熱器本體放置於CPU上 anbringen Retirez le film de la base de 将散热器底部保护贴撕离。...
- Page 10 На монтажную скобу Install the T-nuts onto the установите носковые mounting-clip гайки T-Muttern an der Montageklemme 將T型螺帽沿著扣具螺絲鎖緊 installieren 扣具 Installez les écrous en T sur le 将T型螺帽沿着扣具螺丝锁紧 clip de montage 扣具 Instale las tuercas en t en el clip Tナッ トをマウントクリップに取 de montaje り付けます...
-
Page 11: Fan Mounting
Fan mounting Before you begin, please make sure that you have all components collected check that all components do not have compatibility problems with each other or with the case if possible, assemble the components outside the case first to make sure they are working keep the motherboard manual ready for reference during installation prepare a Phillips screwdriver. - Page 12 Уложите проволочные Place the metal wire clips into the зажимы в паз на ребрах groove on the heatsink fins радиатора Platzieren Sie die metallischen 將金屬絲扣放入鰭片上的溝槽 Kabelklemmen in der Kerbe an den Kühlkörperlamellen Placez les embouts de câble AR07 将金属丝扣放入鳍片上的沟槽 métalliques sur la rainure des ailettes du dissipateur thermique Coloque los enganches de metal 金属ワイヤクリップをヒートシ...
- Page 13 Зафиксируйте четыре крючка Latch the metal wire clips’ four проволочного зажима в hooks onto the fan’s mounting крепежных отверстиях holes вентилятора Verriegeln Sie die vier Haken der 將金屬絲扣的四個針腳,確實 metallischen Kabelklemmen an 分別勾入風扇孔內 den Montagelöchern des Lüfters AR07 Accrochez les quatre crochets des 将金属丝扣的四个针脚,确实...
-
Page 14: Warranty Terms And Conditions
2. Under warranty, SilverStone Technology’s maximum liability is limited to the current market value for the product (depreciated value, excluding shipping, handling, and other fees). SilverStone Technology is not responsible for other damages or loss associated with the use of product. - Page 15 Replacement product will be warranted for remainder of the warranty period or thirty days, whichever is longer. All products should be sent back to the place of purchase if it is within 30 days of purchase, after 30 days, customers need to initiate RMA procedure with SilverStone Technology in USA by first downloading the “USA RMA form for end-users” form from the below link and follow its instructions.
- Page 16 G11225210...
Need help?
Do you have a question about the argon series and is the answer not in the manual?
Questions and answers