
Subscribe to Our Youtube Channel
Summary of Contents for MOTU 24Ai
- Page 1 24Ai ™ 24Ao ™ User Guide Title Page 1280 Massachusetts Avenue Cambridge, MA 02138 Business voice: (617) 576-2760 Business fax: (617) 576-3609 Web site: www.motu.com Tech support: www.motu.com/support...
- Page 2 The MOTU product is equipped with a three-conductor cord and grounding type plug which has a grounding prong, approved by Underwriters' Laboratories and the Canadian Standards Association. This plug requires a mating three-conductor grounded type outlet as shown in Figure A below. If the outlet you are planning to use for the MOTU product is of the two prong type, DO NOT REMOVE OR ALTER THE GROUNDING PRONG IN ANY MANNER.
-
Page 3: Table Of Contents
Quick Start Guide 24Ai Front Panel 24Ai Rear Panel 24Ao Front Panel 24Ao Rear Panel MOTU AVB Control Web App About Your MOTU AVB Audio Interface Packing List and System Requirements Software Installation Hardware Installation Part 2: Using your MOTU interface Presets... - Page 4 Authorization Number on the outside of the box below the shipping address. That license agreement is a contract, and clicking “Accept” binds you and MOTU to This warranty does not apply if the equipment has been damaged by accident, all its terms and conditions.
-
Page 5: Part 1: Getting Started
Part 1 Getting Started... -
Page 7: Quick Start Guide
Preset Application Audio interface Operate as a standard audio interface. 5 Open the MOTU AVB Control web app by doing one of the following: Stand-alone mixer Operate as a stand-alone mixer, where all inputs are mixed to the main outs and mon- itor outs. -
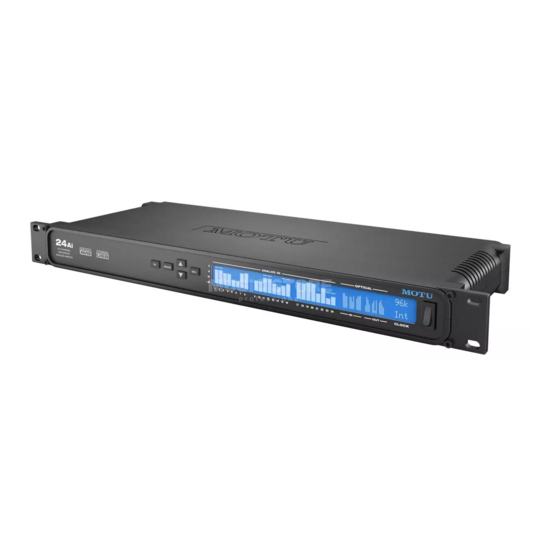
Page 9: 24Ai Front Panel
SELECT a third time. rates (44.1 or 48 kHz), there are twenty-four channels of cols. That means you can turn the 24Ai off and back on Push BACK to return to the previous menu level, and do input and output. -
Page 10: 24Ai Rear Panel
(88.2 or 96 kHz). They are disabled at higher sample rates. The IN and OUT ports on the right provide channels 5. Connect the 24Ai to the computer with this USB 2.0 port A standard AVB Ethernet switch for high-speed, low- ■... -
Page 11: 24Ao Front Panel
24Ao Front Panel 1. ANALOG OUTPUT METERS for the twenty-four analog 3. The CLOCK section displays the current operating sample 5. Push SEL (select) to enter the LCD menu. Push the outputs. rate and clock mode (source) for the unit. ARROW buttons to scroll through menu options. -
Page 12: 24Ao Rear Panel
9. These are the pin-outs for the D-sub connector. slave to the clock supplied by their digital I/O connection interface, such as the 1248, 8M, 16A, 24Ai, 24Ao, 112D, time. You can, however, use different connectors across with the 24Ao. -
Page 13: Motu Avb Control Web App
To launch the web app, do any of the following: IT’S NOT ON YOUR HARD DRIVE The MOTU AVB Control web app is served from If you have a Mac, choose the 24Ai or 24Ao from ■ the 24Ai and 24Ao hardware itself, therefore it is the MOTU AVB Discovery app menu, as shown not an application on your computer’s hard drive. - Page 14 DEVICE TAB 1. If you have two or more MOTU AVB 7. Lets you create, save, recall and 12. If an update is available for your 15. At higher sample rates, the Word interfaces, the Device list lets you manage presets for your MOTU AVB...
- Page 15 WiFi. channels you would like to be able to channels. If you don’t need that 24Ai or 24Ao is connected to a 2nd Updating from the internet is easy stream to and from your computer,...
- Page 16 ROUTING TAB The Routing Tab lets you route inputs to 6. When you make a connection, the the Device tab (page 15) to config- 14. Click the grid to make a connection. outputs. Outputs are listed by row on the source (input) signal is listed by ure how many AVB streams you wish Click a connection to remove it.
-
Page 17: Mixing Tab
6. This column is the Legend. It in with the main mix or aux busses. 19. Reverb and aux sends. the 48-channel mixer in your MOTU AVB provides labels and controls for Disable the reverb processor to use it 20. Solo and mute. On the Monitor bus, interface, which provides a main mix channel strip sections. -
Page 18: Aux Mixing Tab
The Aux Mixing tab provides quick 8. This is the master fader for the 12. Click the View Personal Mix button access to your MOTU AVB interface’s mix control which aux bus or group you current aux bus being viewed (4). -
Page 19: Mixer Input Channel Strips
2. Provides hardware settings for gain) or - ∞ . inputs, if any, on other MOTU AVB interfaces. In the case of the 24Ai and 17. Click the dB scale numbers to make 24Ao, this is grayed out because there the fader jump exactly to that level. -
Page 20: Main Mix And Monitor Channel Strips
MAIN MIX AND MONITOR CHANNEL STRIPS To access the Main Mix and Monitor 6. Indicates that the bus is stereo. channel strips, go to the Mixing tab 7. The four-band parametric EQ for the (page 17) and scroll the display to the Main Mix bus operates the same as right, beyond the inputs and groups. -
Page 21: Aux Bus Channel Strips
AUX BUS CHANNEL STRIPS Aux busses can be used to create sub-mixes. An aux bus can be assigned to any output in the Routing grid (page 16). To access an Aux bus channel strip, go to the Mixing tab (page 17), reveal the side bar (item #3 on page 17), and then show the aux busses you want in the Mixer Outputs section (26). -
Page 22: Group And Reverb Channel Strips
GROUP AND REVERB CHANNEL STRIPS Group busses can be used to create a mix sub- group, which is a set of inputs you wish to control together as a group. Groups differ from aux busses in that they have aux sends, a reverb send, as well as a main mix send. -
Page 23: About Your Motu Avb Audio Interface
192 kHz. Other MOTU AVB interfaces Complementary I/O configurations The 24Ai and 24Ao are part of a larger family of Each interface delivers an exceptional amount of audio interfaces, summarized below, with analog and digital audio. In addition, the interfaces complementary I/O configurations. - Page 24 MOTU interface using any standard CAT-5e Universal connectivity Ethernet cable. You can network up to five MOTU The 24Ai and 24Ao can connect to a computer with interfaces together using a MOTU AVB Switch™ high-speed USB 2.0, which is compatible with USB (sold separately), and then run them as a stand- 3.0).
- Page 25 48 kHz; the 1x equivalence is available as an option computer for word clock output when running at high The 24Ai and 24Ao let you stream up to 24 audio sample rates (from 88.2 to 192 kHz). The word channels in and out, simultaneously, through their clock OUT port can alternately be used as a THRU USB connection to a host computer.
- Page 26 A B O U T Y O U R M O T U A V B A U D I O I N T E R F A C E...
-
Page 27: Packing List And System Requirements
CHAPTER System Requirements PACKING LIST PLEASE REGISTER TODAY! Your MOTU interface ships with the items listed Please register your MOTU interface today. There below. If any of these items are not present in the are two ways to register. box when you first open it, please immediately Visit www.motu.com/register... - Page 28 P A C K I N G L I S T A N D S Y S T E M R E Q U I R E M E N T S...
-
Page 29: Software Installation
Ethernet port on the Mac using a MOTU AVB USB Control Panel ..... . . 30 standard, high-grade (CAT-5e or CAT-6) network AudioDesk workstation software . - Page 30 On Windows, to enable your MOTU interface in your ASIO host software, choose the MOTU AVB USB ASIO driver. Figure 3-2: The MOTU AVB USB Audio Control Panel Buffer Settings tab. USB Streaming Mode USB Streaming Mode (Figure 3-2) determines how frequently the USB driver transfers audio.
- Page 31 PDF document. Figure 3-3: AudioDesk. WORKING WITH HOST AUDIO SOFTWARE For further information about using your MOTU interface with host audio software, see “Working with Host Audio Software” on page 55. S O F T W A R E I N S T A L L A T I O N...
- Page 32 S O F T W A R E I N S T A L L A T I O N...
-
Page 33: Hardware Installation
Syncing an AVB network......42 Use this setup if you want to use your MOTU Syncing multiple AVB audio interfaces connected to a Mac . -
Page 34: Avb Ethernet Audio Interface Setup
MOTU AVB-equipped interfaces, such as the 1248, 8M, 16A and 112D. Use this setup if you want to use the 24Ai or 24Ao as an AVB Ethernet audio interface for a recent- generation Mac (i.e. any Mac with a Thunderbolt port on it). -
Page 35: Setup For Three To Five Interfaces
Use standard CAT-5e Ethernet network cables to ■ Use this setup if you want to connect three to five connect the interfaces to the MOTU AVB Switch MOTU interfaces to your computer using a MOTU using their NETWORK ports. AVB Switch™ (sold separately). -
Page 36: Setup For A Multi-Switch Network
If you have Thunderbolt-equipped MOTU AVB interfaces on the network (such as the 1248, 8M, 16A or 112D), in addition to your the 24Ai or 24Ao, use them for computer connections. The computer then has access to 128 channels of input and output to the network. -
Page 37: Setup For Multiple Interfaces
For example, you could connect an Avid S3 console If you have other MOTU AVB interfaces with to the Mac, and then connect a MOTU interface to Thunderbolt connectivity (1248, 8M, 16A or the S3’s extra network port (which is a built-in 112D) and your host computer has two or more switch). -
Page 38: Setup For Web App Control
SETUP FOR WEB APP CONTROL Mixing and matching web app control scenarios The MOTU AVB Control web app gives you access The web app connection scenarios shown in the to all settings, routing, mixing, and effects following sections are not exclusive from one processing in your audio interface, and each another. - Page 39 Figure 4-3: Web app control through a standard Ethernet hub or network (LAN). (Sold separately) Figure 4-5: Using the Ethernet port on the MOTU AVB Switch. H A R D W A R E I N S T A L L A T I O N...
-
Page 40: Audio Connections
The optical ports are disabled when the interface is Here are a few things to keep in mind as you are operating at a 176.4 or 192 kHz. making audio connections to your 24Ai or 24Ao TOSLink (optical S/PDIF) interface. -
Page 41: Syncing Optical Devices
Figure 4-8: Slaving another digital audio device to your MOTU device trouble-free audio transfers with your MOTU (a 24Ai in this example) via word clock. For the 24Ai clock source, choose any source besides word clock, as it is not advisable to chain hardware. -
Page 42: Syncing An Avb Network
Slave 24Ai Now, all other MOTU AVB devices on the network Figure 4-9: Slaving your MOTU device (a 24Ai in this example) to word clock. For the 24Ai clock source, choose ‘Word Clock In’ . are resolved to this device. -
Page 43: Syncing Multiple Avb Audio Interfaces Connected To A Mac
SYNCING MULTIPLE AVB AUDIO INTERFACES CONNECTED TO A MAC There are several options for clocking multiple AVB audio devices connected to the Mac: You can resolve them to an external clock source ■ (like word clock, if available). You can create an aggregate device, as usual. The ■... - Page 44 H A R D W A R E I N S T A L L A T I O N...
- Page 45 Part 2 Using your MOTU interface...
-
Page 47: Audio Interface
Studio Input expander....... 50 Figure 5-1: Using your MOTU AVB device as an audio interface. -
Page 48: Presets
Main Audio inputs from stage, etc. Mix 1 Mix 2 Figure 5-2: Using your MOTU AVB device as a stand-alone mixer. This example demonstrates how you can control the mixer from several Wi-Fi devices. Audio inputs from stage, studio, etc. -
Page 49: Live Recording With Monitor Mixing
For example, you could have a single Ethernet cable Choose the Live recording with monitor mixing running from a 24Ai on stage to a 24Ao at the Front preset when you are tracking in the studio. The of House (FOH) mixer. -
Page 50: Studio Input Expander
As another example, you could run an Ethernet Use the Studio Input Expander preset when you cable from the stage unit to a MOTU AVB Switch, already have a main system set up, but you want to with a host of other MOTU AVB interfaces and add additional inputs. -
Page 51: Optical Converter
Figure 5-6: Use the Optical converter preset to connect additional audio inputs and outputs to another optical device. This example shows 24Ai interface analog inputs being routed to the other optical device, but you could also do the same thing for outputs, even simul- taneously. - Page 52 P R E S E T S...
-
Page 53: The Front Panel Lcd
Stand-alone operation....... 54 Figure 6-1: Buttons on the 24Ai and 24Ao front panel. - Page 54 This Sample Rate Sets the sample rate for the device. allows you to use your MOTU device as a stand- Word Clock Thru Toggles the Word Clock Output between alone mixer. You can make adjustments to any Mode OUT and THRU.
- Page 55 If you are slaving your MOTU device and your host Choosing the MOTU Audio driver....58 software to word clock, follow the directions in Reducing monitoring latency.
-
Page 56: Working With Host Audio Software
Any audio streams going to and from the AVB ■ network, if you have multiple networked MOTU AVB devices Figure 7-1: An example of routing computer channels (from host audio software) to the analog outputs on a 24Ao. - Page 57 Figure 7-2: An example of routing physical inputs on the 24Ai to computer channels (for host audio software). W O R K I N G W I T H H O S T A U D I O S O F T W A R E...
- Page 58 MOTU AVB audio driver, Reason Preferences > Audio preferences which allows your host software to use the the 24Ai Reaper Preferences > Audio prefs > Devices or 24Ao as an audio interface.
- Page 59 MOTU interface. This is your computer, from when it first enters an input done by opening the Mix In group in the Outputs...
- Page 60 Figure 7-6: In Cubase or Nuendo, choose Devices menu > Device Setup. Select your interface (24Ai or 24Ao), then click the Control Panel button to access the window above and the Buffer Size setting. Adjusting buffer size on Windows To adjust buffer size on Windows, visit the MOTU AVB USB Control Panel.
- Page 61 17. SYNCHRONIZATION You may encounter situations in which you need to synchronize your audio software and your MOTU interface to other components of your system. For details, see “Synchronization” on page 40. Figure 7-7: When adjusting the buffer size to reduce monitoring latency, watch the ‘processor’...
- Page 62 W O R K I N G W I T H H O S T A U D I O S O F T W A R E...
-
Page 63: High Pass Filter
Main Mix and Monitor channel strips ....20 The hardware mixer in your MOTU AVB interface Aux bus channel strips....... 21 provides several major advantages over mixing and Group and Reverb channel strips . -
Page 64: Mixer Effects
GATE Enabling EQ Each band has an enable/disable button All input channel strips provide a Gate module. (Figure 8-3), allowing you to enable as few or as many bands as needed for the channel strip. Figure 8-2: The Gate module. The gate silences the signal when the input signal’s Enable/disable level drops below the Threshold. -
Page 65: Compressor
be flexible enough to cover a broad range of follows a loud passage. Short Release times may applications. By adjusting Gain and Bandwidth cause the attenuation to “pump”, a term used to together, you can emulate the smooth and musical describe the sound of the compressor when the character of classic analog EQ circuits, in which the average input level quickly fluctuates above and... -
Page 66: Leveler
LEVELER form a capacitor. Making one of the electrodes The Leveler™ (Figure 8-5) provides an accurate transparent allows the light to escape. These model of the legendary Teletronix™ LA-2A® devices are essentially glow-in-the-dark paint on a optical compressor, known for its unique and piece of foil covered by metalized glass or plastic, highly sought-after Automatic Gain Control and are the same devices used in low-power night... -
Page 67: Reverb
Enabling or disabling the Leveler Routing inputs and groups to the reverb processor The Leveler models the LA-2A so closely, it also The reverb processor is a single, independent unit models the time it takes for an actual LA-2A to that provides stereo reverb. - Page 68 setting represents the bottom frequency of the Mid band. The Ratio determines the length for each band specified in a percentage of the low frequency reverb time. DSP USAGE The DSP Usage meter (item #26 on page 19) shows how much of the available DSP processing power is currently being used by the mixer for the mix and for effects processing.
-
Page 69: About Avb
Just plug your MOTU AVB interfaces The MOTU AVB Switch ....... 74 into a standard AVB switch and go. -
Page 70: Networking
Depending on the model, some MOTU AVB devices can broadcast Personal studio expansion Let’s say you have a 24Ai mounted in a rack next to sixteen 8-channel network streams and simulta- your computer. You could add an 8M interface and... - Page 71 A studio installation of three to five interfaces can Concert systems must be flexible so they can adapt be handled with a single MOTU AVB Switch. See to each new venue while on tour. Because of its “Setup for three to five interfaces” on page 35.
-
Page 72: A Quick Guide To Networking
Working with AVB switches Networks of three or more interfaces require an ■ AVB-compatible switch. You can use any standard AVB switch on the market. MOTU offers the five- port MOTU AVB Switch™ (sold separately). ☛ A non-AVB compatible switch will not work. -
Page 73: Setting Up A Motu Avb Interface For Networking
If a host computer is connected to an interface (through USB), mapping network input and 1 In the MOTU AVB Control web app, choose the output streams is accomplished as described in the device (item #1 on page 14). -
Page 74: Bridging To Ethernet
Any other standard networking device ■ THE MOTU AVB SWITCH The heart of a MOTU AVB network is the MOTU AVB Switch (sold separately). For a brief overview of the switch and its features, visit: www.motu.com/products/avb/avb-switch. -
Page 75: Part 3: Appendices
Part 3 Appendices... -
Page 77: Troubleshooting
Troubleshooting APPENDIX Some or all of my MOTU interface inputs and The Routing tab (page 16) doesn’t display some of outputs are not available in my host audio the inputs or outputs on my interface. software. The Routing tab only displays input and output... - Page 78 Set your Clock The serial number of your MOTU device. This is Source to Internal and try recording just using the ■...
-
Page 79: Audio Specifications
Audio Specifications APPENDIX 24Ao Line Out Connector Type Panasonic/Tascam format “DB-25” D-Sub AES-59 pin-outs, 4-40 retaining screw Phoenix screw block Pin-outs as indicated by connector labeling Output Impedance 100 ohm Per leg Dynamic Range 123 dB A-weighted THD+N -110 dB (0.0003%) -1 dBFS, Unweighted, 1 kHz Frequency Response +0, -0.1 dB, 20 Hz/20 kHz... - Page 80 24Ai Line In Connector Type Panasonic/Tascam format “DB-25” D-Sub AES-59 pin-outs, 4-40 retaining screw Phoenix screw block Pin-outs as indicated by connector labeling Specification Complies with EBU-R68 / SMPTE RP-155 Impedance Load 10 k ohm Dynamic Range 110 dB A-weighted THD+N -102 dB (0.0008%)
-
Page 81: Mixer Schematics
Mixer Schematics APPENDIX MONO INPUT CHANNEL... - Page 82 STEREO INPUT CHANNEL A P P E N D I X C : M I X E R S C H E M A T I C S...
- Page 83 GROUP BUS A P P E N D I X C : M I X E R S C H E M A T I C S...
- Page 84 MONITOR BUS A P P E N D I X C : M I X E R S C H E M A T I C S...
- Page 85 D-sub Connector Specifications APPENDIX D-SUB CABLE PIN-OUTS Signal The 24Ai and 24Ao follow the Panasonic/Tascam Channel 8 (+) (AES-59) standard specification for a female D-sub SG (Signal Ground) connector with balanced analog input or output. Channel 7 (-) Channel 6 (+)
- Page 86 A P P E N D I X D : D - S U B C O N N E C T O R S P E C I F I C A T I O N S...
-
Page 87: Updating Firmware
An AVB port on a MOTU AVB switch ■ (connected to your office network through the Ethernet port) Figure E-1: The firmware update banner appears automatically at the top of the Device tab when your web host has internet access and MOTU posts an update. - Page 88 (even over Wi-Fi) without having to plug cable connection to your MOTU interface. in directly and without having to download or run 3 Launch the MOTU AVB Control web app on the an updater application. computer, as usual.
-
Page 89: Osc Support
MOTU AVB audio interfaces support OSC, which provides remote control of all device settings and mixer controls from any OSC-enabled controller. For further details about remote control through... - Page 90 A P P E N D I X F : O S C S U P P O R T...
-
Page 91: Index
Index Clock section (LCD) clock source 14, 40 Clock source sample rate 24Ai 17, 64 Cockos Reaper Gate effect expansion 17, 65 Compressor effect GR (gain reduction) front panel Computer Setup installing Connecting multiple interfaces rear panel High pass filter... - Page 92 System requirements Discovery app minimum Ratio Installer recommended computer Compressor USB ASIO driver 55, 58 Reaper WebUI Setup Reason Technical support MOTU AVB WebUI Setup Propellerhead Reason Threshold Record Compressor Registration 69-74 Networking To Computer Release installation 35, 36 TOSLink...
Need help?
Do you have a question about the 24Ai and is the answer not in the manual?
Questions and answers