
Subscribe to Our Youtube Channel
Related Manuals for LANSCHE AUDIO No.7


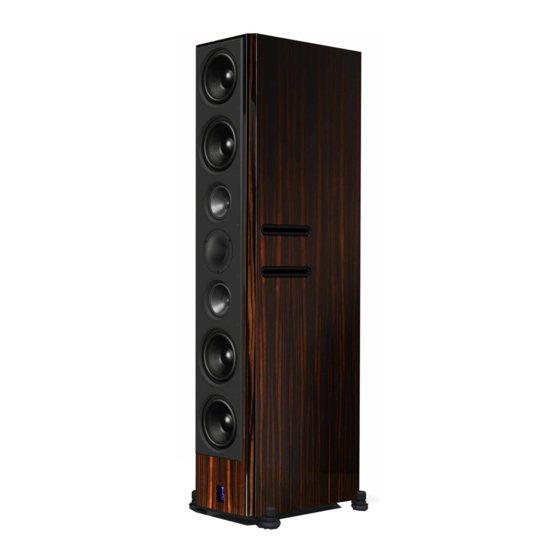
Summary of Contents for LANSCHE AUDIO No.7
- Page 1 OPERATING INSTRUCTION LOUDSPEAKER No.7 L A N SC H E A U DI O L A N S C H E A U D I O ● W a l l h a u s e r s t r . 1 2 ● 7 8 4 6 5 - K o n s t a n z ● G e r m a n y ● w w w . l a n s c h e - a u d i o . c o m...
-
Page 2: Table Of Contents
LANSCHE AUDIO OPERATING INSTRUCTIONS No.7 OPERATING INSTRUCTIONS No.7 Unpacking the Speakers Operating and Connecting Components 2.1. Overview 2.2. Positioning the Speakers 2.2.1 Acoustic alignment of the speakers 2.2.2. Distance between the speakers 2.2.3. Spikes/cones 2.3. Connecting the Speakers 2.3.1 Connecting the amplifier (single) 2.3.2. - Page 3 If you still have any questions, please feel free to consult your dealer or inquire directly with us. We at LANSCHE AUDIO would like to wish you a very enjoyable listening experience. Page 2 / 18...
-
Page 4: Operating Instructions
OPERATING INSTRUCTIONS No.7 Unpacking the Speakers Please exercise care when unpacking LANSCHE AUDIO speakers and accessories. Because of their weight and size, we strongly recommend using the assistance of another person. This will help to avoid damage to the devices or to people when unpacking and setting up your speakers. -
Page 5: Operating And Connecting Components
LANSCHE AUDIO OPERATING INSTRUCTIONS No.7 Operating and Connecting Components 2.1. Overview Cooling „CORONA“ Main power on/off switch Bass reflex port (x2) Rear Terminal Panel Logo (Front) Serial number & Technical sign (Bottom) Page 4 / 18... -
Page 6: Positioning The Speakers
Acoustic alignment of the speakers LANSCHE No.7 speakers should be placed at least 20 cm from the back wall, with a slight inward angle of 5° to 8° to make sure they are not positioned parallel to the wall behind them. -
Page 7: Distance Between The Speakers
LANSCHE AUDIO OPERATING INSTRUCTIONS No.7 2.2.2. Distance between the speakers The distance between the speakers for a stereo setup depends on the given distance from the listening position. The distance between the two speakers should be slightly less than the distance to the listening position. -
Page 8: Connecting The Speakers
Connecting the Speakers CAUTION: Please turn off your amplifier before connecting any speakers. Supply power to your No.7 only after all necessary connections have been made to your audio/video components. The following types of connections are possible: - 4.0-mm banana plugs Plugged directly into the open sockets. -
Page 9: Connecting The Amplifier (Bi-Amping / Bi-Wiring)
LANSCHE AUDIO OPERATING INSTRUCTIONS No.7 There are 2 cable bridges supplied for each speaker. When using a single wire connection use the bridges as shown on the previous page. This method allows for speaker cables terminated with banana plugs or spade lugs to be used. -
Page 10: Operating The Speakers
Operating the Speakers Switch on the speaker system No.7 by activating the power switch (2) located near the top at the rear of the speaker cabinet. The indicator light on the power switch (2) and the logo (5) at the front of the speaker will illuminate light blue and indicate that the control electronics are ready for operation. -
Page 11: Adjusting The Bass Response
Model No.7 can be adjusted to the acoustic properties of the room where it is employed or to particular positioning restrictions. For this purpose there are two jumpers on the rear terminal panel of the speakers for adjusting the bass and treble response. - Page 12 LANSCHE AUDIO OPERATING INSTRUCTIONS No.7 2.5.2. Adjusting the treble response (13) The level of the Corona plasma tweeter can be adjusted in 1dB steps via a jumper. In the 0dB position, the tweeter produces a flat frequency response in an ideal room.
-
Page 13: Corona Plasma Tweeters
LANSCHE AUDIO OPERATING INSTRUCTIONS No.7 CORONA Plasma Tweeters 3.1. Information about CORONA Plasma Tweeters The CORONA plasma tweeter emits a bright light (plasma ball) during the start up operation. As with any bright light source avoid looking directly at it from a short distance (less than 30 cm). -
Page 14: Self-Starting
LANSCHE AUDIO OPERATING INSTRUCTIONS No.7 Tips on using the No.7 The CORONA plasma tweeter is able to reproduce the most finest of details which other tweeters such as: diamond, beryllium, electrostatic and ribbon etc. cannot. The following points should be observed: a. -
Page 15: Removing And Installing A Corona Plasma Tweeter
LANSCHE AUDIO OPERATING INSTRUCTIONS No.7 NOTE: Please be aware the CORONA plasma tweeter operates at 100% power even when no music is being played. It is therefore recommended that when you are not listening to music you turn off the tweeter power by the power switch (2) located near the top rear of the speaker cabinet. - Page 16 LANSCHE AUDIO OPERATING INSTRUCTIONS No.7 Remove the brush and blow out the loose deposits on and around the electrode. Manipulate the cleaning brush bristles by hand until all the electrode„s loose deposits (dust) are removed. Depending on the amount and hardness of the deposits formed on the electrode you may have to repeat the procedure again.
-
Page 17: Miscellaneous Instructions
4.2. Load Rating The load rating of the No.7 is especially high due to its design and the materials used in its construction. The speakers can be subjected to very high volumes without a reduction in sound quality (after the warm-up phase). Because of the efficiency of the No.7 speakers, they are also suitable for use with high-quality but lower-output amplifiers. -
Page 18: General Notes On Safety
Before cleaning, disconnect the AC power plug. Generally speaking, the surface of the cabinet need only to be dusted. Never attempt to clean your No.7 with a solvent, as this could damage its finish. Please use a clean, dry cloth such as one made from microfiber. - Page 19 (6). When lifting the speakers, make sure not to injure yourself on the spikes. When you transport your speakers, be absolutely sure to first remove the AC power cable and any other cables connected to the No.7. Always apply the pulling force to the plug itself and never to the cable.
Need help?
Do you have a question about the No.7 and is the answer not in the manual?
Questions and answers