
Related Manuals for ZyXEL Communications IPC-2605N

Summary of Contents for ZyXEL Communications IPC-2605N
- Page 1 IPC-2605N The First Consumer-Friendly Network Camera Edition 1.1, 10/2012 www.zyxel.com Copyright © 2012 ZyXEL Communications Corporation...
-
Page 3: Table Of Contents
Contents Getting to know your IPC-2605N ................6 Package Contents .................... 6 Features ......................7 Camera Layout ....................8 LED Status Indicator..................9 Installation......................... 10 Connecting Your IPC-2605N ............... 10 Wireless......................11 Wall and Ceiling Mounting ................12 Initial Setup ....................... 13 Accessing your camera ..................... - Page 4 Important Notices Regulatory Notice This device complies with Part 15 of the FCC Rules. Operation is subject to the following two conditions: (1) This device may not cause harmful interference, and (2) This device must accept any interference received, including interference that may cause undesired operation. FCC Interference Statement This equipment has been tested and found to comply with the limits for a Class B digital device, pursuant to Part 15 of the FCC Rules.
- Page 5 About This Manual This manual is indented only for users of the ZyXEL IPC-2605N network camera. Conventions in this Manual While using this manual, pay attention to symbols and notations used to draw attention to special situations, such as: Caution! Information provided with this symbol is critical to prevent damage to the product or injury to the user.
-
Page 6: Getting To Know Your Ipc-2605N
Getting to know your IPC-2605N 2.1 Package Contents Before setup, ensure your package contains all contents. If anything is missing, contact your distributor. Number Contents IPC-2605N Network Camera Ethernet Cable Power Adapter Quick Installation Guide Install Disk Wall/Ceiling Mount Plate... -
Page 7: Features
2.2 Features ZyXEL’s IPC-2605N sports an advanced 340-degree pan and 100-degree tilt mechanical design, ideal for deployment in warehouses, offices, restaurant, lobby area, or anywhere it’s important to have a wide field of view. Pan/Tilt with 10x digital zoom ... -
Page 8: Camera Layout
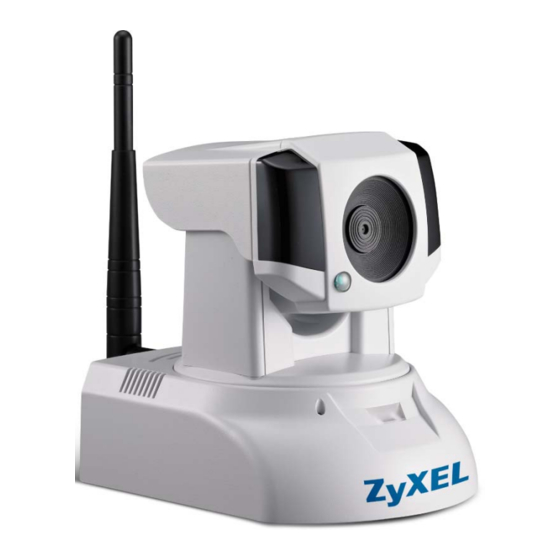
2.3 Camera Layout Number Contents IR LEDs x6 (12 in total) Light Sensor Lens 2.0 mm, F2.8, fixed iris IR LEDs x6 (12 in total) Detachable Wireless Antenna Microphone LED Status Indicator Ethernet Port Reset Button Audio Output Microphone In Power Connector WPS Button... -
Page 9: Led Status Indicator
2.4 LED Status Indicator The LED status indicator consists of a blue status indicator and red IR LEDs. The LEDs appear as follows: Red IR LEDs (Left), Blue Status LED (Right) When the IP camera is turned on, the LEDs will light in the following patterns: Red LEDs Blue LED Indication... -
Page 10: Installation
Installation 3.1 Connecting Your IPC-2605N The picture below illustrates the basic connection of your IPC-2605N camera: The following table describes the numbered items: Number Contents Ethernet cable from PC to hub/router. Ethernet cable from router to camera. Wireless antenna. Attach to connector on the back of the camera. -
Page 11: Wireless
3.2 Wireless While using the ZyXEL Wireless antenna, you’ll be able to connect your camera to your network via WiFi. Keep in mind that you can only have one active connection at any given time – either through LAN or a wireless network. Note: If the wireless connection drops or seems slow, try moving your IP camera closer to the wireless access point for an improved signal. -
Page 12: Wall And Ceiling Mounting
3.3 Wall and Ceiling Mounting Screw the mounting plate into Secure the IP camera to the the mounting surface mounting plate Insert the tips of the fastening Loosen the top screw on the bracket into the IP camera as trapezoid-shaped fastening shown. -
Page 13: Initial Setup
Initial Setup Before running the setup utility, make sure you have the IP Camera properly connected. To begin setup, insert the installation CD supplied with the camera into the CD-ROM drive of the viewing PC, and the eaZy Wizard utility will start and guide you during the installation process of the hardware and software for your IP camera. -
Page 14: Accessing Your Camera
Accessing your camera Your camera’s video feeds can be accessed in a number of ways, as follows. 1) Your camera is CloudEnabled™ and can be viewed from any PC running a modern web browser with the Flash plug-in installed. When you first setup your camera using the included CD, it will register your camera with iSecurity+. -
Page 15: Cloudenabled™ Viewing
5.1 CloudEnabled™ Viewing 5.1.1 Accessing via iSecurity+ Smartphone App iSecurity+ is an iOS/Android App designed to allow you to quickly and easily access, control, and view your camera’s video feeds from anywhere. The iSecurity+ can be located on the App Store and Android Market from your device by searching “iSecurity+,”... - Page 16 This page allows you to easily adjust your camera’s time zone, display and audio settings, and infrared lighting. Sharing options can be accessed from the Sharing tab at the top of the screen.
-
Page 17: Direct Viewing Of Your Camera (For Advanced Users)
Default Password: 1234 4) After entering a valid username and password, your browser will prompt installation of camera software from ZyXEL Communications Corporation. Click on the warning message, and choose to Install ActiveX 5) A confirmation dialogue box will appear. Select [Install] twice to install both USActiveX.cab and IPCamClientActiveX.cab. - Page 18 7) You’re now ready to view and manage your camera from your web browser. Note: If your IP camera is behind a firewall, you will need to enable ports 80 and 554 in your firewall and forward them to the internal IP address of the camera.
- Page 19 The following table describes the labels found on this screen. Number Label Description Left control panel provides control over voice communication, Pan/Tilt, zoom, and snapshot PTZ speed set the pan and tilt speed on a scale of 1 to 10 Top control panel Allows you to adjust Speaker volume, microphone volume, view size, and camera settings...
- Page 20 Icon Label Description Fit browser Resizes the live video pane to fit your browser window Actual size Resizes the live video pane to the original size Microphone Adjust microphone volume. Click the icon to mute the Volume built-in microphone Setup Click the [Setup] button to access the settings for you camera.
- Page 21 5.2.1.3 Digital Zoom To adjust digital zoom, move the slider at the lower left of the screen to the left to zoom out, or to the right to zoom in. To select viewable area, click the image above the slider – highlighted in the picture below.
-
Page 22: Configuration
Configuration 6.1 Video Settings The Video Settings screen consists of all the basic settings options. To access the main setup page, click the setup button at the top right in the live view screen. You can configure detailed settings of your IP camera here. The following table describes the labels found on this screen. -
Page 23: Camera Settings
6.2 Camera Settings To access the Camera Settings screen, click on ‘Camera’ on the navigation bar in the settings menu. From this page, you can control image and color related settings, as well as the IR lights of your camera. The following table describes the labels found on this screen. - Page 24 Label Description Video Properties Brightness Set image brightness Sharpness Set image sharpness Saturation Set image saturation Contrast Set image’s contrast to compensate for different lighting conditions. Flickerless Sets Flickerless mode. 50(default) or 60 Hz Exposure Control Auto Allow the camera to automatically control shutter speed. Can be set to Indoor or Outdoor mode.
-
Page 25: Audio Settings
6.3 Audio Settings The Audio Settings screen allows you to enable or disable audio, as well as adjust volume. To access the Audio Settings screen, go to settings, then select Audio from the sidebar. The following screen will appear. The following table describes the labels found within this screen. Label Description Enable Audio... -
Page 26: User Settings
6.4 User Settings The User Settings pane allows you to add, modify, or remove viewers/administrators. Viewers are only able to view live audio, and can’t change any camera settings. Administrators may control the camera and make changes to settings. To access the user settings pane, navigate to Settings, then select Users from the sidebar. The following screen will appear. -
Page 27: Network Settings
6.5 Network Settings The Network Settings page allows you to check your network settings and make detailed adjustments. To access the Network Settings pane, navigate to settings and select Network from the sidebar. The following screen will appear. 6.5.1 Ethernet Settings The Ethernet Settings page will allow you to choose your IP address configuration. - Page 28 On this page, you can set the camera to obtain an IP address via DHCP (recommended), use a manual IP address, or obtain an IP address via PPPoE, for which a valid user name and password are required. 6.5.2 Wireless Settings If you have installed the wireless antenna, you’ll be able to set up a wireless connection from this page.
- Page 29 6.5.3 Network Diagnostic Here you can run the diagnostic tool for your current network settings, and it will show error messages if any anomaly is detected. For further information on error messages, please refer to the troubleshooting section. 6.5.4 Network Bandwidth This automatic network connection test helps users better define the appropriate video bitrate for their network.
- Page 30 This message indicates that the currently connected network has the capacity to support up to 10 network cameras of identical bit rate settings (either on Stream 1 or Stream 2). If the message shows a less favorable result, go to [Setup] > [Video] to select a lower bitrate.
- Page 31 The following table describes the labels on this screen. Label Description DNS Server Set the DNS server to be found via DHCP, or enter a manual DNS address NTP stands for Network Time Protocol. To synchronize your camera’s Configuration clock with an NTP server, choose to either obtain an NTP server address via DHCP, or use an external NTP server (default address is pool.ntp.org) HTTP Server...
-
Page 32: Ptz Control
To access the UPnP screen, navigate to [Settings] > [Network] > [UPnP]. The following screen will appear. Note: To enable UPnP on Windows, go to Add or Remove Programs in Control Panel, then click Add/Remove Windows Components, double-click “Network Services,” and check “UPnP User Interface.” 6.6 PTZ Control The PTZ control page allows you to manage your camera’s preset positions and configure patrol mode to allow the camera to patrol the preset positions. - Page 33 To add preset points, follow these steps: 1) Use the directional buttons to navigate your IP camera to the desired position 2) Enter a position name into the “Position Name” field. 3) Press the “Add” button. If you would like to designate this as your camera’s ‘Home’ position, check the ‘Use the current position as “home”’...
- Page 34 6.6.1.3 PTZ Position Reset The PTZ Position reset menu allows you to reset the PTZ functionality back to factory defaults. There are two reset buttons: Button Function Calibrate PTZ Back to Factory Default Calibrates Pan/Tilt position back to factory defaults Reset PTZ Home Position Back to Factory Resets the camera’s Home position back to Default...
-
Page 35: Event Setup
6.7 Event Setup From this page, your camera can be programmed to respond to events – such as detected motion, or a triggered I/O device – and send a snapshot directly to your e-mail account, ftp server, image server, notification server, HTTP server, or SMS server in order to warn you about what’s happened. - Page 36 To Address Enter the full e-mail address you wish to receive notifications. Authentication Method Login or Plain. For most e-mail servers, select Login. User Name Enter your full username (ie. xxxx@xxx.com) Password Enter your e-mail account’s password Subject Enter the subject line you want alert e- mails to have.
- Page 37 6.7.1.3 Image Server This page allows you to set the file name that will be used when snapshots are taken. To access this page, navigate to [Setup] > [Event Setup] > [Event Server Setup] > [Image]. The following screen will appear. 6.7.1.4 SMS Server Your IP camera is capable of sending SMS notifications to one or more pre-defined...
- Page 38 Target Cell Phone recipient’s mobile phone Cell phone number of the recipient. number Next Accept settings and move to the next page Reset Reset settings Clear Clear settings Cancel Cancel After you input your settings, click [Next]. The following page will appear. This page allows you to input the message that will be sent when an event is triggered.
- Page 39 This page allows you to create, modify, or delete event triggers. To access the Trigger Setup page, navigate to [Setup] > [Event Setup] > [Trigger Setup]. The following screen will appear. To create an event trigger, click the [Create] button. The following screen will appear. The following table describes the fields in this screen.
- Page 40 Upon clicking [Next], users will be able to define actions to take when an event is triggered. Select the actions to be taken, then click [Finish] to complete trigger setup. 6.7.3 Motion Detection Motion Detection allows you to define regions that will trigger an event if motion is detected.
-
Page 41: Recording Setup
6.8 Recording Setup The recording setup page allows users to store video clips to local or remote storage. To enable, go to [setup] > [recording setup]. The following screen will appear. The following table describes the labels found within this screen: Label Description Dropdown Menu... -
Page 42: Recording Playback
On this screen, you can select the dates and times you want the IPC-2605 to record. 6.8.1 Recording Playback In [Setup], click on [Recording History] located on the left menu, then playback menu will be shown as follows: To play recorded video, first select a video clip on the list (red square shown above). -
Page 43: Recording History
6.9 Recording History The Recording History page allows users to manage video clips that have been recorded by the camera. You’ll see a playback menu as displayed below. .The following table describes the labels found within this screen. Label Description Playback Click to download then play the selected clip... -
Page 44: Event Viewer
Event Viewer The Event Viewer allows you to view detailed logs of events which have been triggered. To access this page, navigate to [Setup], then select [Event Viewer] from the top panel. Select any type of event from the sidebar (Motion, Scheduled Triggers) to view that type’s history, or click on image links to view event-triggered snapshots. -
Page 45: Maintenance
Maintenance The Maintenance screen provides information about your IP camera, access to the history log, and system maintenance functions. 8.1 Information To access the Maintenance Information screen, navigate to [Setup], then select [Maintenance] from the top panel. The following screen will appear. 8.2 Log This page provides a system log for your camera. - Page 46 8.3.1 Reboot Camera Press the [Reboot] button to reboot your camera. 8.3.2 Profile Management Profile Management allows users to easily set up multiple cameras. After one camera is properly configured, users can export that camera’s configuration to a profile on their PC, which can then be loaded onto other cameras.
- Page 47 8.3.3 Reset All Settings to Default This will reset your camera to its factory default settings. All changes you’ve made will be lost. 8.3.4 Firmware Update Firmware updates are available at us.zyxel.com/support. After downloading the latest firmware for your camera, click the [Browse] button to locate the firmware file on your hard drive, then click the [Upgrade] button to update the camera’s firmware.
-
Page 48: Troubleshooting
Troubleshooting During the course of installation, you might encounter various issues. The following section contains some troubleshooting procedures to help you solve these problems. 9.1 Reconfiguring Your Device Anytime you need to re-configure your IP camera, you can simply double-click on the eaZy Wizard icon to launch the eaZy Wizard configuration tool. -
Page 49: Resetting To Factory Defaults
9.3 Resetting to Factory Defaults If you’ve forgotten your password, or your camera’s been acting generally strange, you can follow the steps below to reset the camera to its default settings. To reset the camera: 1) Press and hold the reset button (located on the camera’s rear panel) for approximately 10 seconds. -
Page 51: Trouble With Java
9.4 Trouble with Java After launching your browser and entering your camera’s IP address, you’ll be asked for the username and password combination (Default is admin/admin, case sensitive.) No User Interface in the Browser This issue could have three possible causes. 1) Java Virtual Machine was not installed. - Page 52 3) Browser security settings. Ensure your browsers security settings allow the installation of Java by adding the IP address of the camera to the list of trusted sites in Internet Explorer. If you’ve gone through all above steps but still can’t obtain video/audio on your browser, close all browser windows and delete the ‘IPSurveillance Embedded”...
-
Page 53: Trouble With Remote Viewing On Browser
9.5 Trouble with Remote Viewing on Browser You can view your camera’s video streams remotely over the Internet. If you’re having trouble viewing video remotely, refer to the section below for troubleshooting tips. The above figure depicts a typical setup in which: ... - Page 54 After taking the above steps, you should be able to log into your IP camera from a remote location by entering the DDNS address or the static IP address into the navigation field of your web browser. For example, in this case, you could enter http://61.220.20.16:80 into the location field of Internet Explorer to access your IP camera.
-
Page 55: Symptoms, Causes, And Solutions
9.6 Symptoms, Causes, and Solutions Listed below are some common problems, and their solutions. Symptom Possible Cause/Solution The entered IP address is incorrect. Make sure the IP address you entered matches the IP address of your camera. If you are certain that your camera is configured with the same subnet mask as that of your PC, you can first disconnect other cameras, then run the eaZy Wizard to scan for the camera on your network. - Page 56 Symptom Possible Cause/Solution Scanning and connecting to Too many wireless APs nearby. wireless AP takes a long time The amount of time taken to scan wireless APs depends on the number of wireless APs around the camera. If there are too many wireless APs (30 or more), it may take as long as 3 minutes to complete the scanning process.
- Page 57 Symptom Possible Cause/Solution Network diagnosis shows Network connection error. error icon The network connection test verifies that the camera has successfully connected to the LAN network. When the diagnosis result shows a red exclamation mark icon, it means that the camera fails to connect to the LAN network. Check if the LAN cable is securely connected to the Ethernet port of the camera and to your hub/router, or check if the LAN cable is functioning normally.
- Page 58 Symptom Possible Cause/Solution Network bandwidth is insufficient. Without sufficient bandwidth, video quality will deteriorate and image errors like pixilation or frame-drop may occur. When you view your camera remotely from Internet, your camera needs sufficient upload bandwidth to transmit video stream and you need sufficient download bandwidth to download video stream at the remote location.
- Page 59 In the event of problems that cannot be solved, please contact your vendor. If you cannot contact your vendor, contact a ZyXEL office in the region in which you bought the device. Regional offices are listed at www.zyxel.com/web/contact_us.php ZyXEL communications Corporation – Worldwide Headquarters www.zyxel.com Tel. +866-2-2912-3685 | Fax +866-2-2912-3656...
-
Page 60: Technical Specifications
10 Technical Specifications Category IPC-2605N Image Sensor 1/7” CMOS Progressive Scan Sensor Lens Focal Length: 2.0mm Max Aperture Ratio: F2.8 Fixed Iris Pan Range -170° ~ +170°; total of 340 degrees Tilt Range -10° ~ +90°; total of 100 degrees... - Page 61 Category IPC-2605N Web Browser Internet Explorer Remotely view and configure camera on Internet Explorer (ActiveX) Alarm and event management: FTP, I/O alarm, server notification, SMS/Email alert Supported Devices PC, Laptop, Tablet, Nettop, MID with IE/ActiveX support ...
-
Page 62: Open-Sourced Components
11 Open-Sourced Components Party Software Version License Addgroup V1.13.4 Busybox, GPLv2 Adduser V1.13.4 Busybox, GPLv2 V1.13.4 Busybox, GPLv2 AVN-IPv4LL V1.13.4 Busybox V1.13.4 Busybox, GPLv2 V1.13.4 Busybox, GPLv2 Chattr V1.13.4 Busybox, GPLv2 Chgrp V1.13.4 Busybox, GPLv2 Chmod V1.13.4 Busybox, GPLv2 Chown V1.13.4 Busybox, GPLv2 ComproRTSP... - Page 63 Iwlist Iwpriv Kill V1.13.4 Busybox, GPLv2 V1.13.4 Busybox, GPLv2 Login V1.13.4 Busybox, GPLv2 V1.13.4 Busybox, GPLv2 Lsattr V1.13.4 Busybox, GPLv2 Mini_httpd V1.19 Mkdir V1.13.4 Busybox, GPLv2 Mkdosfs V2.11 Mknod V1.13.4 Busybox, GPLv2 Mktemp V1.13.4 Busybox, GPLv2 More V1.13.4 Busybox, GPLv2 Mount V1.13.4 Busybox, GPLv2...
- Page 64 Libc-2.11.so V2.11 GPLv3 Libcrypt.so V2.11 GPLv3 Libcrypt.so.1 V2.11 GPLv3 Libcrypt-2.11.so V2.11 GPLv3 Libcrypto.so V0.98m Libcrypto.so.0.9.8 V0.98m Libdl.so V2.11 GPLv3 Libdl.so.2 V2.11 GPLv3 Libdl-2.11.so V2.11 GPLv3 Libgcc_s.so V4.4.0 GPLv3 Libgcc_s.so.1 V4.4.0 GPLv3 Libip4tc.a V1.4.10 Libip4tc.la V1.4.10 Libip6tc.a V1.4.10 Libip6tc.la V1.4.10 Libiptc.a V1.4.10 Libiptc.la V1.4.10...
- Page 65 Libsockipc.so.1.2 V2.11 GPLv3 Libssl.so V0.98m Libssl.so.0.9.8 V0.98m Libstdc++.so V4.4.0 GPLv3 Libstdc++.so.6.0.11 V4.4.0 GPLv3 Libthread_db.so V4.4.0 GPLv3 Libthread_db.so.1 V2.11 GPLv3 Libthread_db-1.0.so V2.11 GPLv3 Libthreadutil.so V1.4.1 Libthreadutil.so.2 V1.4.1 Libthreadutil.so.2.0.2 V1.4.1 Libupnp.so V1.4.1 Libupnp.so.2 V1.4.1 Libupnp.so.2.0.2 V1.4.1 Libutil.so V2.11 GPLv3 Libutil.so.1 V2.11 GPLv3 Libutil-2.11.so V2.11 GPLv3...
- Page 66 Pivot_root V1.13.4 Busybox, GPLv2 Poweroff V1.13.4 Busybox, GPLv2 Reboot V1.13.4 Busybox, GPLv2 Rmmod V1.13.4 Busybox, GPLv2 Route V1.13.4 Busybox, GPLv2 Runlevel V1.13.4 Busybox, GPLv2 Start-stop-daemon V1.13.4 Busybox, GPLv2 Sulogin V1.13.4 Busybox, GPLv2 Swapoff V1.13.4 Busybox, GPLv2 Swapon V1.13.4 Busybox, GPLv2 Switch_root V1.13.4 Busybox, GPLv2...
- Page 67 gratis or for a fee, you must give the recipients all the rights that you have. You must make sure that they, too, receive or can get the source code. And you must show them these terms so they know their rights. We protect your rights with two steps: (1) copyright the software, and (2) offer you this license which gives you legal permission to copy, distribute and/or modify the software.
- Page 68 Program, the distribution of the whole must be on the terms of this License, whose permissions for other licensees extend to the entire whole, and thus to each and every part regardless of who wrote it. Thus, it is not the intent of this section to claim rights or contest your rights to work written entirely by you; rather, the intent is to exercise the right to control the distribution of derivative or collective works based on the Program.
- Page 69 refrain entirely from distribution of the Program. If any portion of this section is held invalid or unenforceable under any particular circumstance, the balance of the section is intended to apply and the section as a whole is intended to apply in other circumstances. It is not the purpose of this section to induce you to infringe any patents or other property right claims or to contest validity of any such claims;...
- Page 70 This product contains addgroup, adduser, ash, busybox, cat, chattr, chgrp, chmod, chown, cp, cttyhack, date, dd, delgroup, deluser, df, dmesg, echo, egrep, false, fgrep, grep, gnuzip, gzip, hostname, ip, ipaddr, iplink, iproute, kill, ln, login, ls, lsattr, mkdir, mknod, mktemp, more, mount, mountpoint, mv, netstat, nice, ping, ping6, ps, pwd, rm, sed, sh, sleep, stat, sty, su, sync, tar, touch, true, umount, uname, usleep, vi, watch, zcat, adjtimex, arp, blkid, depmod, devmem, fdisk, freeramdisk, fsck, fsck.minix, getty, hatl, hwclock, ifconfig, ifdown, ifup, init, insmod, klogd, logread, losetup, lsmod, makedevs, mdev, mkds.minix,...
- Page 71 Also, for each distributor's protection, we want to make certain that everyone understands that there is no warranty for this free library. If the library is modified by someone else and passed on, we want its recipients to know that what they have is not the original version, so that any problems introduced by others will not reflect on the original authors' reputations.
- Page 72 The "Library", below, refers to any such software library or work which has been distributed under these terms. A "work based on the Library" means either the Library or any derivative work under copyright law: that is to say, a work containing the Library or a portion of it, either verbatim or with modifications and/or translated straightforwardly into another language.
- Page 73 Thus, it is not the intent of this section to claim rights or contest your rights to work written entirely by you; rather, the intent is to exercise the right to control the distribution of derivative or collective works based on the Library.
- Page 74 Otherwise, if the work is a derivative of the Library, you may distribute the object code for the work under the terms of Section 6. Any executables containing that work also fall under Section 6, whether or not they are linked directly with the Library itself. 6.
- Page 75 8. You may not copy, modify, sublicense, link with, or distribute the Library except as expressly provided under this License. Any attempt otherwise to copy, modify, sublicense, link with, or distribute the Library is void, and will automatically terminate your rights under this License. However, parties who have received copies, or rights, from you under this License will not have their licenses terminated so long as such parties remain in full compliance.
- Page 76 Each version is given a distinguishing version number. If the Library specifies a version number of this License which applies to it and "any later version", you have the option of following the terms and conditions either of that version or of any later version published by the Free Software Foundation. If the Library does not specify a license version number, you may choose any version ever published by the Free Software Foundation.
- Page 77 License as published by the Free Software Foundation; either version 2 of the License, or (at your option) any later version. This library is distributed in the hope that it will be useful, but WITHOUT ANY WARRANTY; without even the implied warranty of MERCHANTABILITY or FITNESS FOR A PARTICULAR PURPOSE.
- Page 78 This product contains ld-2.11.so, ld-linux.so.3, libc.so, libc.so.6, libc-2.11.so, libcrypt.so, libcrypt.so.1, libcrypt-2.11.so, libdl.so, libdl.so.2, libdl-2.11.so, libgcc_s.so, libgcc_s.so.1, libm.so, libm.so.6, libm- 2.11.so, libnsl.so, libnsl.so.1, libnsl-2.11.so, libnss_dns.so, libnss_dns.so.2, libnss_dns-2.11.so, libnss_files.so, libnss_files.so.2, libnss_files-2.11.so, libpthread.so, libpthread.so.0, libpthread-2.11.so, libresolv.so, libresolv.so.2, libresolv-2.11.so, librt.so, librt.so.1, librt-2.11.so, libstdc++.so, libstdc++.so.6, libstdc++.so.6.0.11, libthread_db.so, libthread_db.so.1, libthread_db-1.0.so, libutil.so, libutil.so.1, and libutil-2.11.so under the following license: GNU GENERAL PUBLIC LICENSE...
- Page 79 domains, we stand ready to extend this provision to those domains in future versions of the GPL, as needed to protect the freedom of users. Finally, every program is threatened constantly by software patents. States should not allow patents to restrict development and use of software on general-purpose computers, but in those that do, we wish to avoid the special danger that patents applied to a free program could make it effectively proprietary.
- Page 80 The “System Libraries” of an executable work include anything, other than the work as a whole, that (a) is included in the normal form of packaging a Major Component, but which is not part of that Major Component, and (b) serves only to enable use of the work with that Major Component, or to implement a Standard Interface for which an implementation is available to the public in source code form.
- Page 81 4. Conveying Verbatim Copies. You may convey verbatim copies of the Program's source code as you receive it, in any medium, provided that you conspicuously and appropriately publish on each copy an appropriate copyright notice; keep intact all notices stating that this License and any non-permissive terms added in accord with section 7 apply to the code;...
- Page 82 c) Convey individual copies of the object code with a copy of the written offer to provide the Corresponding Source. This alternative is allowed only occasionally and noncommercially, and only if you received the object code with such an offer, in accord with subsection 6b. ...
- Page 83 7. Additional Terms. “Additional permissions” are terms that supplement the terms of this License by making exceptions from one or more of its conditions. Additional permissions that are applicable to the entire Program shall be treated as though they were included in this License, to the extent that they are valid under applicable law. If additional permissions apply only to part of the Program, that part may be used separately under those permissions, but the entire Program remains governed by this License without regard to the additional permissions.
- Page 84 license, and (b) permanently, if the copyright holder fails to notify you of the violation by some reasonable means prior to 60 days after the cessation. Moreover, your license from a particular copyright holder is reinstated permanently if the copyright holder notifies you of the violation by some reasonable means, this is the first time you have received notice of violation of this License (for any work) from that copyright holder, and you cure the violation prior to 30 days after your receipt of the notice.
- Page 85 Each contributor grants you a non-exclusive, worldwide, royalty-free patent license under the contributor's essential patent claims, to make, use, sell, offer for sale, import and otherwise run, modify and propagate the contents of its contributor version. In the following three paragraphs, a “patent license” is any express agreement or commitment, however denominated, not to enforce a patent (such as an express permission to practice a patent or covenant not to sue for patent infringement).
- Page 86 part which is the covered work, but the special requirements of the GNU Affero General Public License, section 13, concerning interaction through a network will apply to the combination as such. 14. Revised Versions of this License. The Free Software Foundation may publish revised and/or new versions of the GNU General Public License from time to time.
- Page 87 How to Apply These Terms to Your New Programs If you develop a new program, and you want it to be of the greatest possible use to the public, the best way to achieve this is to make it free software which everyone can redistribute and change under these terms. To do so, attach the following notices to the program.
- Page 88 12 Canadian Regulatory Disclaimer English Version: This device complies with Industry Canada licence-exempt RSS standard(s). Operation is subject to the following two conditions: (1) This device may not cause interference, and (2) This device must accept any interference, including interference that may cause undesired operation of the device.
Need help?
Do you have a question about the IPC-2605N and is the answer not in the manual?
Questions and answers