Table of Contents
Advertisement
Advertisement
Table of Contents

Subscribe to Our Youtube Channel
Related Manuals for 360 Systems Instant Replay2

Summary of Contents for 360 Systems Instant Replay2
- Page 1 NETWORKED DIGITAL AUDIO RECORDER-PLAYER WITH EDITING Model DR-600 OWNER'S MANUAL...
- Page 2 Warning Symbols THE FOLLOWING WARNING SYMBOLS ARE USED ON THE PRODUCT IN THIS MANUAL: ENGLISH ATTENTION: REFER TO OWNER’S MANUAL FOR IMPORTANT INFORMATION. FRANÇAIS ATTENTION: VEUILLEZ VOUS RÉFÉRER AU MODE D’EMPLOI POUR UNE INFORMATION IMPORTANTE. ITALIANO ATTENZIONE: FATE RIFERIMENTO AL MANUALE PER INFORMAZIONI IMPORTANTI.
- Page 3 Cet appariel numérique de la classe A respecte toute les exigences du Reglement sur le matériel brouilleur du Canada. Company Address & Shipping Information Freight and mail may be sent to 360 Systems at the following address. Please call for a Returned Material Authorization (RMA) number before returning equipment or parts. 360 Systems...
- Page 4 Warranty Card. Please take a moment now to fill out your Warranty Card and either mail or fax it to 360 Systems. You may also register your warranty with us by telephone.
-
Page 5: Table Of Contents
TABLE OF CONTENTS INTRODUCTION ....................7 CHAPTER 1 – OVERVIEW................8 ..................8 RONT ANEL ONTROLS Hot-Keys ....................9 Transport Control Buttons..............9 STOP....................9 PLAY ....................9 RECORD ................... 9 LOOP ....................9 PAUSE ....................9 Metering and Level Controls ............... 10 Function Buttons.................. - Page 6 CHAPTER 5 – USING THE NETWORK............29 Introduction ..................29 About WAV files ................... 29 File Naming Conventions ..............30 Supported FTP Clients................. 31 Initial FTP Setup.................. 32 Connecting to Instant Replay using FTP ..........33 Connecting to Instant Replay using a DOS Client....... 34 Downloading a file from Instant Replay to your host:......
-
Page 7: Introduction
INTRODUCTION Thank you for purchasing Instant Replay. The system provides a unique combination of mass storage, direct access to stored audio, network access and ease of operation, all in a professional quality package. Key features include: Storage of up to 1000 Audio Cuts At least 100 Hours of Storage Assignment of Cuts to 50 front panel Hot Keys Playlists that play a sequence of cuts manually or automatically... -
Page 8: Chapter 1 - Overview
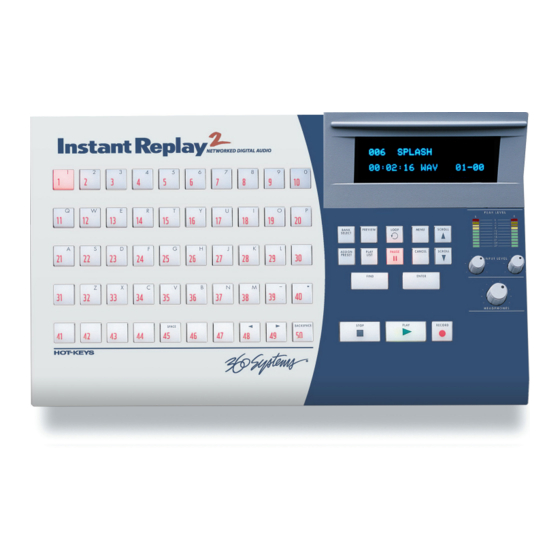
CHAPTER 1 – OVERVIEW 1 - F IGURE RONT ANEL AYOUT FRONT PANEL CONTROLS Instant Replay's front panel controls are shown in Figure 1. Most of the buttons include an indicator light to show when they are in use. They are functionally grouped as follows: Hot-Keys Transport Control Metering and Level Control... -
Page 9: Hot-Keys
Hot-Keys There are three primary uses for Hot-Keys: 1. Triggering playback of assigned Cuts 2. As an alphanumeric keyboard 3. Bank selection, using the top row of keys The main array of 50 buttons are Hot-Keys numbered 1 through 50. A Hot-Key's primary function is to trigger playback of a Cut assigned to it. -
Page 10: Metering And Level Controls
Metering and Level Controls Level Meters The L show the current record or playback level. EVEL ETERS Input Level Controls The Left and Right I Controls set the levels for recording. Set the levels so that the NPUT EVEL loudest part of your recording causes the first red segment of the meter to light. When turned all the way down, the input will be muted. -
Page 11: Cancel
CANCEL This button is used to end operations, exit menus, or to answer "no" to display prompts. In Playlist mode, CANCEL deletes the currently selected Step of the Playlist. Scroll Up/Down Arrows Used to select Cuts, Banks, Menus, Playlist Steps and adjust parameter values. Cuts can be selected during playback of other Cuts. -
Page 12: Chapter 2 - Basic Operation
CHAPTER 2 – BASIC OPERATION Instant Replay is an extensively featured, high quality professional audio workstation. However, it is also very simple and intuitive to use. The following sections cover Instant Replay’s basic operation. Powering on Instant Replay CAUTION! CONNECT THIS PRODUCT ONLY TO AN AC POWER SOURCE WITHIN THE VOLTAGE AND FREQUENCY RANGE INDICATED ON THE REAR PANEL. -
Page 13: Connecting Instant Replay To External Audio Equipment
Connecting Instant Replay to External Audio Equipment The rear panel of the Instant Replay is shown in Figure 3. Connecting Input Sources Connect Balanced stereo analog sources to the BALANCED INPUT stereo pair. Connect Un-balanced stereo analog sources to the UNBALANCED IN stereo pair. Note: These inputs are mixed together internally and are both active whenever the AUDIO Input is set to ANALOG. -
Page 14: Recording A Cut
Recording a Cut The Model DR-600 stores at least 130 hours of stereo audio. Total storage capacity varies according to the type of cuts you create. Individual Cuts can be from about 4 hours to about 7 hours long depending on the Recording Format you select. Table 1 indicates the types of Cuts you can create and their associated durations in hours, minutes and seconds ( HHH:MM:SS ). -
Page 15: Limiting The Record Time Of A Cut
To Record A Cut: Disable the RECORD ERASE LOCKOUT if necessary Press MENU->RECORD SETUP->RECORD/ERASE LOCKOUT then ENTER The parameter should be set to OFF. Select an Input Source Press MENU->RECORD SETUP->AUDIO INPUT then ENTER Select ANALOG to use the BALANCED inputs or UNBALANCED I/O inputs. Select AES/EBU XLR-3 To use the digital AES/EBU inputs. -
Page 16: Playing A Cut
Playing a Cut There are a number of ways to play a cut. Play a Cut Using a Hot Key If the cut has been assigned to a Hot Key, simply press the hot key to play the cut. Refer to Assigning A Cut To a Hot Key on Page 10 for instructions on assigning a cut to a Hot Key. -
Page 17: Erasing A Cut
Erasing a Cut Erasing a cut will permanently delete the cut from the disk. There are two ways to erase a cut. 1. From the Display Module Menu Front Panel 2. Using FTP with the network connection. The Display Module method works fine for most cases. If you need to erase a lot of cuts, it may be easier to use the network connection. -
Page 18: Using Hot-Key Banks
Using Hot-Key Banks There are ten Banks numbered 1 to 10. Each Bank is like a separate “page”; changing Banks is equivalent to flipping a page, and presents a different set of Hot-Key Assignments. Note that the ten Banks all have access to all the Cuts recorded in Instant Replay. Banks are a convenient way to organize Instant Replay’s audio collection. -
Page 19: Looping A Cut
Looping a Cut causes a Cut to repeat endlessly until either S or L is pressed. S ends playback immediately. Pressing L exits from the Loop mode, and allows the current Cut to continue playing to its end. While a Cut is looping, another Cut can be selected for playback. A different Hot-Key can also be played. -
Page 20: Converting 24 Bit Material To 16 Bits ( Dither )
To Enable the Sample Rate Converter: Press MENU->RECORD SETUP->DIG INPUT PROCESS ->SAMPLE RATE CONVERT Then Press ENTER. Converting 24 bit material to 16 bits ( Dither ) If you are recording material using the digital ( AES/EBU or IEC958 II ) inputs, you can convert 24 bit material to 16 bit material using the dither option. -
Page 21: Using The Playback Sample Rate Converter
Using the Playback Sample Rate Converter There are three ways to set the sample rate of a Cut being played. 1. At the same sample rate it was recorded 2. At a specified sample rate ( 44.1K or 48K ) 3. -
Page 22: Chapter 3 - Editing Cuts
CHAPTER 3 – EDITING CUTS Instant Replay features the following cut editing operations. 1. Adjustable Head Trim 2. Adjustable Tail Trim 3. Variable length Fade In 4. Variable length fade out Using Head and Tail Trim You can perform precise Head and Tail Trims on an existing file or immediately after recording a new cut. -
Page 23: Setting The Tail Trim
Or… Hit the PLAY key to begin playing the cut. Hit ENTER or STOP to pause playback. Hit ENTER again to accept the trim at the paused location or manually type a value and hit ENTER. The display will look like this as the cut is playing in edit mode. The top set of counters will indicate your current position in the clip. -
Page 24: Fade In
00:00:22.60 TAIL ENTER/ADJUST OR PLAY Hit ENTER to leave tail trim unchanged. Or…Type in the amount of time you want to trim off the tail of the cut using the alphanumeric keypad. The value is in hours, minutes, seconds and hundredths of a second. Hit ENTER once you have entered the tail trim value you want. - Page 25 Press the E key to make an adjustment. Fade values are expressed in duration of the fade. NTER Fades are limited to a maximum of 40 seconds. Press the E key, then use the C keys to move the cursor to the digit to be adjusted. Then NTER URSOR use the N...
-
Page 26: Chapter 4 - Using Playlists
CHAPTER 4 – USING PLAYLISTS Playlists allow you to create and playback a sequence of Cuts that are assigned to Hot-Keys. You can set Playlists for Follow-On or Manual-Step playback. Refer to the section Creating a New Playlist, immediately below. In Manual-Step mode, the playlist will pause after each cut until you press PLAY. -
Page 27: Editing A Playlist
Assign Cuts to the Playlist Press PLAYLIST The Display Indicates: LIST IS EMPTY SELECT HOT KEY Press the HOT-KEYs you want to assign to the playlist in sequence. Press PLAYLIST to complete the operation. Set the Playlist to MANUAL STEP or FOLLOW-ON The Playlist will be MANUAL STEP by default. -
Page 28: Playing A Playlist
Playing a Playlist Select the BANK if necessary. Press PLAYLIST, then press PLAY. To Halt the Playlist, Press PLAYLIST again. The current cut will play to completion, then play will stop. Looping a Playlist Press LOOP at any time to cause a playlist to loop. The playlist will continue to loop until you press LOOP again to deactivate looping. -
Page 29: Chapter 5 - Using The Network
CHAPTER 5 – USING THE NETWORK Introduction Instant Replay offers 10/100 ethernet connectivity using an RFC-1359 compliant FTP server. This allows you to connect to Instant Replay from a host computer using most commercially available FTP clients. Using FTP, you can do the following. Rapidly Download Cuts, including WAV cuts, from Instant Replay to your computer. -
Page 30: File Naming Conventions
Note: Many “stock” WAV files on Personal Computers are recorded at a sample rates other than 44.1K or 48KHz. These cannot be uploaded or played. The following message will be displayed if you upload a WAV file that is not 44.1 or 48KHz. SAMPLE RATE UNAVAIL File Naming Conventions Instant Replay filenames must be 15 characters or less, not counting the file suffix ( e.g. -
Page 31: Supported Ftp Clients
Note: Uploading groups of files with long but similar file names may result in many cuts having the same name. This is the only case in which identical file names are allowed. For Example: Upload the following three files. 123456789abcdef_01.wav 123456789abcdef_02.wav 123456789abcdef_03.wav They will all be named 123456789abcde~.wav. -
Page 32: Initial Ftp Setup
Initial FTP Setup Connect the ethernet cable Connect a Standard RJ45 Ethernet cable between to the rear panel connector marked NETWORK. Connect the other end to your network. If the cable is connected correctly, the green LINK LED directly above the cable port will turn ON. If the green LED is not ON, check the cable polarity, cable continuity or network connection. -
Page 33: Connecting To Instant Replay Using Ftp
Set the Subnet Mask Optionally enter a new FTP Subnet mask. The default subnet mask is 255.255.255.0. Networking->FTP Subnet Mask Hit <ENTER> then type in a new subnet mask. ’ ’ ’ Note: If you don’t know what a subnet mask is, don’t change it. Chances are, the default will work on your network. -
Page 34: Connecting To Instant Replay Using A Dos Client
Connecting to Instant Replay using a DOS Client. 1. From a Windows XP or Windows 2K environment, open a DOS Shell as follows. START->All Programs->Accessories->Command Prompt From the command prompt, type ftp <IP ADDRESS> …where the IP ADDRESS is the address you set your Instant Replay to in the Initial Setup step. For example 192.168.1.120 would be a valid entry. -
Page 35: Uploading A File From Your Host Computer To Instant Replay
Uploading a file from your host computer to Instant Replay Log in per the example above. Type: put <FILENAME> At the FTP prompt: Deleting a file from Instant Replay Log in per the example above. Type: Del <FILENAME> At the FTP prompt: Instant Replay 2 Owners Manual Page 35... -
Page 36: Renaming A File On Instant Replay
Renaming a file on Instant Replay Log in per the example above. Type: rename <CURRENT FILENAME> < NEW FILENAME > At the FTP prompt: Page 36 Instant Replay 2 Owners Manual... -
Page 37: Transferring Files With Flash Fxp
Transferring Files with Flash FXP Flash FXP™ is a popular FTP client that is available online for a very modest sum. Flash FXP™ can be obtained at www.inicom.net. Instant Replay has been tested with Flash FXP™ version 3.2.0. Connect to Instant Replay Start up Flash FXP. -
Page 38: Upload/Download Files
The login dialog box appears. Set the IP address, User ID and Password fields to the values you configured your Instant Replay to under the Networking menu. Upload/Download files You can move files from Instant Replay to your computer simply by dragging them across to the listing on the right side of the screen. -
Page 39: Renaming Or Deleting A File Using Flash Fxp
Renaming or Deleting a File using Flash FXP Right click on the file. Select RENAME or DELETE from the pull-down menu. Rename or delete the file. Instant Replay 2 Owners Manual Page 39... -
Page 40: Chapter 6 - Machine Setup Menu's
CHAPTER 6 – MACHINE SETUP MENU’S Default values are UNDERLINED. All settings are saved on disk and restored on power up. EDIT Menu Menu Item Values 0.00 Adjust Head Point Adjust Tail Point end of file Set Fade In Length Range is 0.00 to 40.00 Set Fade Out Length Range is 0.00 to 40.00... -
Page 41: Hot-Keys Menu
HOT-KEYS Menu Menu Item Values Assign HOT-KEYS HOT-KEY Protect OFF,ON Assign Bank Clear HOT-KEY PLAYLIST Menu Menu Item Values Clear Playlist Playlist Protection OFF,ON CONFIGURATION Menu Menu Item Values Time Display TIME REMAINING, ELAPSED TIME Sort Directory By INDEX, NAME Select Language ENGLISH, SPANISH Digital Output... -
Page 42: Chapter 7 - The Rear Panel
Fuses The fuses in this product are not user replaceable. Failure of a fuse is an indication of other component failure, and will require service by a qualified repair technician. Contact 360 Systems, or your 360 Systems distributor. Page 42... -
Page 43: Audio Connections
AUDIO CONNECTIONS Audio Inputs The A are a pair of female XLR-3 connectors marked L and R . The inputs are NALOG NPUTS IGHT electronically balanced, with an impedance of 40k ohms. With the I controls up full, a NPUT EVEL 6.75dBu tone will produce a full scale output, approximately 15dBu with the O UTPUT... -
Page 44: Digital Audio Interfacing
capacitance 75Ω coaxial cable, such as those made for video connection between VCRs and television video inputs. Do not use audio cables with RCA connectors. Digital Audio Interfacing Should Instant Replay detect a mismatch at its digital audio ports when preparing to record, the P button is disabled and an error message, INTERFACE MISMATCH, appears in the display. -
Page 45: Iec 958 Type Ii Output
IEC 958 Type II Output An RCA "phono" connector provides a digital audio output to consumer or semi-pro equipment. Most equipment with input connectors marked "S/P DIF" can also be connected to this output. Always set the DIGITAL AUDIO OUTPUT parameter in the CONFIGURATION Menu to CONSUMER or COPY PROT. -
Page 46: Chapter 8 - Maintenance And Disk Operations
CHAPTER 8 – MAINTENANCE AND DISK OPERATIONS FORMATTING THE INTERNAL HARD DISK The Format Disk option for the internal drive is only available through a special "power-on" sequence. This option will erase the entire contents of Instant Replay's internal hard disk It is essential to back up the contents of your hard drive using the FTP Network Port. -
Page 47: Index
INDEX 24->16 Bit Conversion, 20 overwritng, 10 Audio Connections reassigning audio, 18 analog, 43–45 Hot-Keys, 17, 18 digital, 43–45 Input Level Controls, 10 Banks, 10 Level Meters, 10 Cancel, 11 Loop, 9, 19 Compliance Menu emissions and immunity, 2, 3 configuration, 41 safety, 2 editing, 40...
Need help?
Do you have a question about the Instant Replay2 and is the answer not in the manual?
Questions and answers