Table of Contents
Advertisement
Quick Links
P7680
Please keep this instruction sheet for future reference, as it contains important information.
This product emits flashing lights at 5-30 cycles per second.
Requires three "AA" (LR6) alkaline batteries (not included) for operation.
Adult assembly is required.
Tool required for assembly: Phillips screwdriver (not included).
www.fisher-price.com
1
Advertisement
Table of Contents

Related Manuals for Fisher-Price P7680


Summary of Contents for Fisher-Price P7680
- Page 1 P7680 Please keep this instruction sheet for future reference, as it contains important information. This product emits flashing lights at 5-30 cycles per second. Requires three "AA" (LR6) alkaline batteries (not included) for operation. Adult assembly is required. Tool required for assembly: Phillips screwdriver (not included).
- Page 2 However, there is no guarantee that interference will not occur in a particular Fisher-Price, Inc., 636 Girard Avenue, East Aurora, NY 14052. Hearing-impaired consumers: 1-800-382-7470. installation. If this equipment does cause harmful interference to...
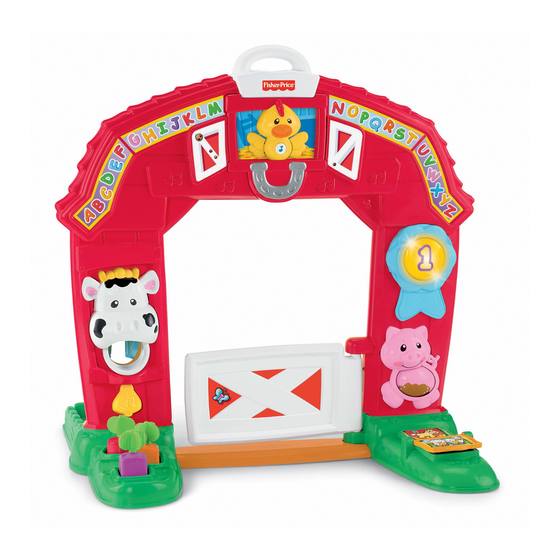
- Page 3 Assembled Parts Handle (2 Pieces) 2 Walls Window Gate Bird Base Connector #8 x ¾” Screw – 23 Tighten or loosen all screws with a Phillips screwdriver. Do not over-tighten. 2 Bases 2 Bases...
- Page 4 Assembly CAUTION This package contains small parts in its unassembled state. Adult assembly is required. Base Connector Gate Notched Edge Wall with Radio Bottom Peg Bases • Turn over both bases on a flat surface. • Fit the base connector onto the bases. Hint: The base connector is designed to fit on the bases one way.
- Page 5 Assembly IMPORTANT! You must complete this assembly step for proper function of this toy. Bird Socket Wire Connector FRONT VIEW • Fit the bird onto the wall assembly, as shown. 2 Screws • Fit the connector on one wall into the slot on the other wall. Push firmly to secure in place.
- Page 6 Assembly Handle Pieces Shutter Window • Fit the window onto the wall assembly. Hint: Slide the shutter on the window all the way to the right, • Fit the handle pieces onto the top of the assembly. as shown, before attaching the window. Hint: The handle pieces are designed to only fit one way.
- Page 7 Battery Installation Battery Safety Information In exceptional circumstances, batteries may leak fluids that can cause a chemical burn injury or ruin your product. To avoid 1,5V x 3 battery leakage: “AA” (LR6) • Do not mix old and new batteries or batteries of different types: alkaline, standard (carbon-zinc) or rechargeable (nickel-cadmium).
- Page 8 Two Sides of Learning Fun! Press the baby rooster for music & sounds Slide the ribbon for a surprise and watch the lights Feed the cow veggie shapes Spin the roller to change pig from muddy to clean Flip the book pages Swing the gate Sort the veggie shapes Slide the window...
Need help?
Do you have a question about the P7680 and is the answer not in the manual?
Questions and answers