Table of Contents

Related Manuals for Ega Master Ega Tronic


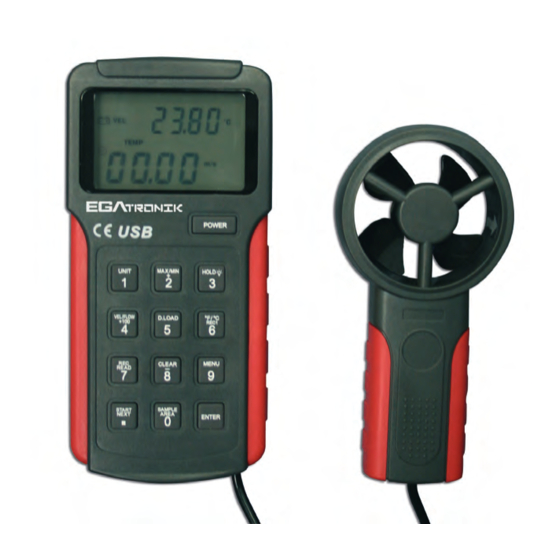
Summary of Contents for Ega Master Ega Tronic
- Page 1 MANUAL DE INSTRUCCIONES OPERATING INSTRUCTIONS ANEMÓMETRO / ANEMOSCOPE COD. 51264 ESPAÑOL ....... 2 ENGLISH ......12 GARANTIA/GUARANTEE ..21...
-
Page 2: Especificaciones Técnicas
ESPAÑOL ESPECIFICACIONES TÉCNICAS Es un aparato de alta durabilidad que proporciona mediciones precisas y estables. Dispone de una pantalla doble; pantalla principal y secundaría (velocidad + temperatura, flujo + área). Ofrece la posibilidad de hacer mediciones de la velocidad y mediciones del flujo del viento a tiempo real en m / s, km / h, ft / min, MPH, KNOT, CFM y CMM. -
Page 3: Reglas Para Una Operación Segura
REGLAS PARA UNA OPERACIÓN SEGURA ¡Advertencia! Antes de utilizar el anemómetro, asegúrese de que la carcasa (o alguna de sus partes) no está dañada. Inspeccione posibles roturas o faltas de material y compruebe el aislamiento de las conexiones. Para evitar posibles daños personales, y para evitar posibles daños al medidor o al equipo bajo prueba, siga las siguientes reglas: - No utilice las manos para tocar el ventilador. - Page 4 SÍMBOLOS DE LA PANTALLA (ver figura 2) Figura 2 1. Pantalla de valor máximo obtenido 2. Pantalla de valor mínimo obtenido 3. Retención de datos activos 4. Pantalla de valores medios obtenidos 5. Visualización de los valores almacenados 6. Indicador de almacenamiento de datos 7.
- Page 5 Función Descripción botón de encendido/apagado 1UNIT: Botón nº 1 - En la función de la medición de la velocidad del viento Este botón nos cambiará las unidades m/s→ ft/min →KNOTS→ Km/h→MPH y viceversa - En la función de la medición del flujo de viento Este botón nos cambiará...
- Page 6 AJUSTES DEL ANEMÓMETRO Mantener pulsado el botón 9 (menú) para poder seleccionar las siguientes especificaciones del sistema. Pulsar este mismo botón para pasar de una especificación a la siguiente: A. USB Pulsar el botón 8 desde la posición USB0 hasta USB1. El sistema cogerá el valor seleccionado como predeterminado.
- Page 7 3. Seleccionar la unidad de medida-flujo del viento. Entonces pulsar el botón “Sample” para dar entrada al área. La pantalla LCD visualizará KEYIN con un espacio en blanco en la parte superior. 4. Insertar el dato con cuatro dígitos; dicho dato aparecerá en pantalla. Ejemplo: Introducir 1, 0, 0, 0 Significado 1000 pantalla LCD “...
- Page 8 MEDICIÓN DE LA VELOCIDAD DEL VIENTO (ver figura 4) Figura 4 Screw = tornillo / Wind = viento Nota: antes de su uso, la velocidad del viento debe estar mayor de 10m/s durante 1 – 2 minutos de duración. Siga las siguientes instrucciones: 1.
-
Page 9: Mantenimiento
CONEXIÓN AL ORDENADOR (Ver figura 5) Conexión al ordenador por medio del cable USB. Conectar el cable USB al aparato y al ordenador como se indica en la figura 5. Figura 5 MANTENIMIENTO A. Reemplazar la batería Para evitar falsas lecturas, cambiar las pilas cuando se visualice el indicador 1. -
Page 10: Requerimientos Ambientales
REQUERIMIENTOS AMBIENTALES 0ºC ~50ºC ( 32ºF ~ 122ºF ) Rango de temperatura de trabajo 0 ~75%, no condensación Humedad relativa Temperatura de almacenaje - 20ºC ~ 65ºC ( - 4ºF ~ 149ºF ) Presión 500mB ~ 2 Bar Certificación: CE Seguridad / Conformidad EN61326: 2006 EN55022: 1998+A1+A2... -
Page 12: Technical Specification
ENGLISH TECHNICAL SPECIFICATION It is a high durability device that provides accurate and stable measurements. It has a dual screen: primary display and secondary display (speed + temperature, flow + area). The anemoscope come with the real time wind speed measurement, including m/s, km/h, ft/min, MPH, KNOT, CFM and CMM as measuring units. - Page 13 RULES FOR SAFETY OPERATION Warning! Before using the anemometer, ensure that housing (or any part thereof) is not damaged. Inspect any breakages or shortages of material and check the insulation of the connections. To avoid possible injury and to prevent damage to the meter or the equipment under test, keep the following rules: - Do not use your hands to touch the fan.
- Page 14 DISPLAY SYMBOLS (see figure 2) Figure 2 Display of maximum reading Display of minimum reading Data Hold is on Display of Average Reading Display of Data Storage Measurement Reading Display of Data Storage USB is on Wind Speed Measurement The battery is Low Secondary Display Primary Display Wind Speed Unit - Foot Per Minute...
- Page 15 Function Description Power on / Power off Button Button 1: UNIT 1 In the function of measuring wind velocity this button will change the units: m / s → ft / min → KNOTS → Km / h → MPH and vice versa In function of the measurement of wind flow this button will change →...
- Page 16 ANEMOSCOPE SETTINGS Hold the button 9 (menu) to select : A. USB Press the button 8 from the position USB0 to USB1. The system will take the value selected as the default value. B. AUTO off mode Press the 8 button to move from the position AP00 (power) to the AP01 (auto off) and maintained after the shutdown.
- Page 17 Enter ., 0, 0, 1 Mean . 001 LCD display “0.001” ..In one area, it will probably to have different input methods but finally it has one display: Data Input Range: 0.000~9999. • Unit of measure of temperature: before the wind speed measurement, press the button “°F / °...
- Page 18 MEASURING WIND SPEED (see Figure 4) Figure 4 Note: Before use, the wind speed must be greater than 10 m/s for 1 to 2 minutes. Follow the instructions below: 1. Press the “Power” button to turn on the device. 2. Press “VEC / FLOW” (Figure 4). Will be displayed on screen both “VEL” and “FLOW”. 3.
-
Page 19: Maintenance
Figure 5 MAINTENANCE A. Replace the battery To avoid false readings, replace the batteries when viewing the indicator 1. Turned off and disconnect all inputs. 2. Turn the anemometer. 3. Remove the screw from the battery compartment and remove the battery. 4. - Page 20 TECHNICAL SPECIFICATION Wind Speed Measurement Range Accuracy ±(3%+0.5) ±(3%+0.5) 2 ~10 m/s 10~30 m/s ±(3%+0.8) ±(3%+0.8) Medición de temperatura Temperature Range Accuracy ±3ºC 0ºC ~ 40ºC Temperature Range 32ºF ~ 104ºF ±4ºF NOTES IMPORTANT! The maker will not take responsibility for damage or malfunction as a result of the device being incorrectly used or, applied for a purpose for whith it was not intended.
Need help?
Do you have a question about the Ega Tronic and is the answer not in the manual?
Questions and answers