Table of Contents
Advertisement
Quick Links
Physical
Assessment
Trainer
Heart Auscultation / Percussion / Palpation
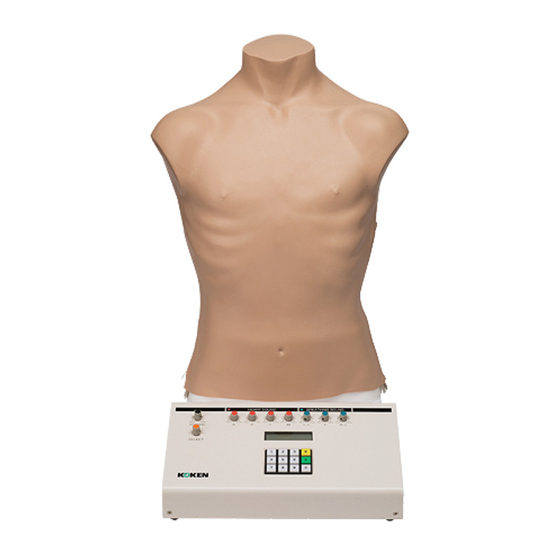
LM-084
Instruction Manual
Thank you for purchasing the LM-084 Physical Assessment Trainer.
Please read this instruction manual carefully to ensure correct use of the product,
and store it in a safe place for easy access.
KOKEN CO., LTD.
1-4-14 Koraku, Bunkyo-ku, Tokyo 112-0004 JAPAN
URL:http://www.kokenmpc.co.jp
E-mail:customer@kokenmpc.co.jp
© 2008-2020 KOKEN CO., LTD. C-1-960-1-02-03
Advertisement
Table of Contents

Summary of Contents for KOKEN LM-084
- Page 1 Heart Auscultation / Percussion / Palpation LM-084 Instruction Manual Thank you for purchasing the LM-084 Physical Assessment Trainer. Please read this instruction manual carefully to ensure correct use of the product, and store it in a safe place for easy access.
- Page 2 Handling and Safety Precautions These precautions should be strictly observed in order to ensure safe, long-term use of the product. The following precautions should be observed particularly strictly: The default voltage setting for the heart and breathing sound source included with this product is 110 V.
-
Page 3: Table Of Contents
Table of Contents 1. Outline & Characteristics 2. Composition and Name 3. How to Handle Model Disposition of speaker Case Data 4. How to Perform Percussion 5. Physical Assessment 6. Others 7. Specification... -
Page 4: Outline & Characteristics
1. Outline & Characteristics Outline This is a Torso model to acquire four basic techniques for physical assessment (inspection / palpation / percussion / auscultation). Characteristics The following four basic skills regarding physical assessment can be exercised. 1. Inspection: Inspection of cervix and chest 2. -
Page 5: Composition And Name
2. Composition and name Composition Name Torso 1 Skin 1 Main body 1 Model base 1 ... - Page 6 Name ※ HS:HEART SOUND ※ BS:BREATHING SOUND Thyroid gland Speaker:BS −T ※ Lymph node Speaker:HS −A ※ Main body sponge Simulation lungs (Right, Left) Speaker:HS −P ※ Speaker:HS −M ※ Speaker:HS −T ※ Connector for heart/ breathing sound source Speaker cable Sponge pant for lumbus Base plate for speaker Silicone part for lumbus Model base Speaker:BS −RL ※...
-
Page 7: How To Handle Model
3. How to Handle Model 3-1. Preparation for Torso Part ① Get through the female connector of the cord for connecting the model with the heart and breathing sound source into the hole on the right back side of main body. ②... - Page 8 3-2. Heart and Breathing Sound Source Front Breathing Sound Volume Outside Speaker Volume, Select Switch (Left and Right Lungs, Respiratory Tract) Heart Sound Volume (A, P, T, M) Keys to Input Cases Back Input cord terminal for connecting model with heart Power Switch and breathing sound source. Fuse Outside speaker terminal Power Supply plug Specification: Output functions for cases: Heart sound cases - 20, breathing sound cases - 12 Case selection: Case sound can be selected with the switch on the operation panel. Settings of heart rate: Heart rate can be set with the switch on the operation panel.
- Page 9 本器は1 1 0 又は2 2 0 切り 替え方式になっ ており 、 使用場所の電圧に設定可能です。 本器は1 1 0 又は2 2 0 切り 替え方式になっ ており 、 使用場所の電圧に設定可能です。 (初期設定 : 1 1 0 ) The voltage of this unit can be switched between 110 V and 220 V to match the voltage (初期設定...
- Page 10 3-3. Preparation for Sound Source ① After connecting the male connector of the cord for connecting the model with the heart and breathing sound source, with the heart and breathing sound source, fix with the screw. ② Connect the plug cord with the heart and breathing sound source. ③...
- Page 11 ② "Heart Rate" is displayed on the LCD display. Enter the heart rate (see page 11: “Case data”) and press the "E" key. * If a value outside the settable range is entered, the output will not be correct. ③ When the liquid crystal display shows “L-Breath Sound” input a case number of breathing sounds for the left lung and then press the “E”...
-
Page 12: Disposition Of Speaker
Disposition of speaker Heart Sounds ① HEART SOUND : A ② HEART SOUND : P ③ HEART SOUND : T ④ HEART SOUND : M Breathing Sounds ⑤ BREATHING SOUND : LL ※ ⑥ BREATHING SOUND : T ⑦ BREATHING SOUND : RL ※... -
Page 13: Case Data
Case data Case data Settable heart rate range Heart sounds Normal ( without splitting of S2 ) 60-255 Normal (splitting of S2 ) 60-146 Abnormal splitting of S2 60-106 Hypertension increased intensity of S2 at apex 60-118 S4 apex 60-136 Innocent murmur 60-84 Ejection sound aortic site 60-151 Midsystolic click sound 60-110 Midsystolic click murmur 60-129 Tricuspid regurgitation 60-75 Mitral stenosis 60-89 Mitral regurgitation 60-68 Aortic stenosis 60-75 Aortic regurgitation Subaortic stenosis 60-70 Atria septal defect 60-64 Ventricular septal 60-79 Pulmonic stenosis 60-120 Pulmonic steno-regurgitation 60-72... -
Page 14: How To Perform Percussion
4. How to Perform Percussion Percussion can be performed by injecting air into simulation lungs. 4-1. About Settings ① Abnormal / normal percussion can be set, corresponding the breathing sound cases chosen. ② The normality and abnormality of left and right lungs are set by connecting the simulation lung pump with the air-inflating connector. - Page 15 4-2. Setting Procedure ○ For Normal ① Put the pump for inflating the simulation lungs with the connector for inflating, which is on the side of lung you set for normal. Connector for inflating Pump for inflating simulation lungs ② Grasp the rubber ball of the pump for inflating simulation lungs and then put air into the simulation lungs to be inflated around 40mmHg, measuring with manometer.
- Page 16 ③ Pushing the button, remove the pump for inflating the simulation lungs. Button Before inflating the left lung After inflating the left lung (For abnormal breathing sound) (For normal breathing sound) ○ For Abnormal ① Connect the pump for inflating the simulation lungs with the connector for injecting air into the lung you choose as abnormal.
-
Page 17: Physical Assessment
5. Physical Assessment 5. Physical Assessment 5. Physical Assessment 5-1. Palpation of Chest Frame 5-1. Palpation of Chest Frame 5-1. Palpation of Chest Frame The above frame is installed inside the model. The above frame is installed inside the model. The above frame is installed inside the model. -
Page 18: Others
Palpation of Lymph Node on Upper Clavicle It is possible to palpate Lymph Node on Upper Clavicle Lymph node on upper Darcie 6. Others If you would like to use the model with lying position, the base can be disconnected using attached hexagonal wrench.
Need help?
Do you have a question about the LM-084 and is the answer not in the manual?
Questions and answers