
Subscribe to Our Youtube Channel
Related Manuals for Apollo av Series

Summary of Contents for Apollo av Series
- Page 1 Underwater vehicle instruction manual riding manual av-2 EVOLUTION Nippon Sensuiki Co., Ltd. 905 Shake, Ebina-City, Kanagawa-Pref, 243-0424, Japan TEL 046-233-4111 FAX 046-233-5886 2018.09.14 3954500002...
- Page 2 Thank you for purchasing an apollo underwater vehicle. The apollo underwater vehicle is revolutionary new underwater vehicle equipped with functions and features that set it apart from previous models and other brands. Hands-free riding with the scooter saddle (PATENTED) Hands-free is an innovative riding style that allows an operator to steer the scooter with body movement; much like a seal.
-
Page 3: Table Of Contents
Instruction manual Introduction Contents Before reading the manual Main warnings and notes Specification (avx) The avx name of each part Specification (avx) Exclusive battery/charger Preparation (avx) Charging the battery Specification (av-2 series) Each part name/spec Specification (av-2 series) Exclusive battery/charger Preparation (av-2 series) Charging the battery Preparation (all DPV) - Page 4 Diving alone could lead to serious injury and death. Due to the speed of the apollo underwater vehicle depth & pressure change may happen faster than usual. The diver must be aware at all times with regards the status of his depth and direction and carefully monitor his ascent rate as rapid surfacing and collisions could cause serious injury or death.
- Page 5 Please only use our purpose-built battery and purpose-built CAUTION Otherwise there is a danger of an explosion and fire. charger. There are dangers of the explosions and of fire if the electric Please do not change, remodel or disassemble. circuit is tampered with. There are dangers of damage and CAUTION water leaks in the body and circuits.
-
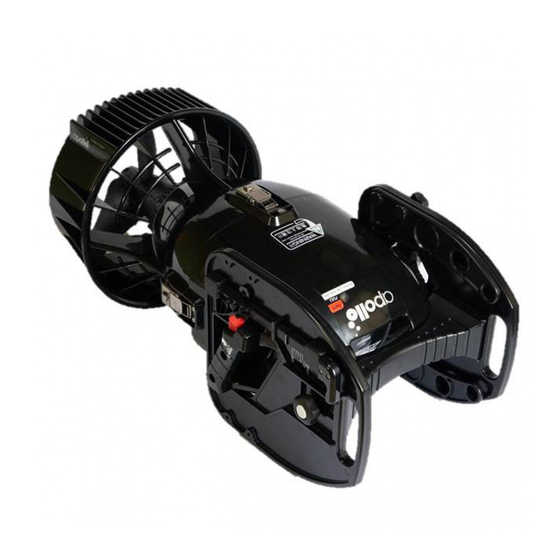
Page 6: Specification (Avx)
(avx) The avx name of each part ● Propeller cover ● Pitch control dial ● Propeller screen ● Clamp ring ● Propeller Assy ● Body Assy ● Locking buckle ● Head Assy ● Starter switch ● Main switch ● Grips ●... - Page 7 CAUTION ● Please never use other batteries than those supplied by Nippon Sensuiki. (Supplied separately) ● Please never use other chargers than those supplied by Nippon Sensuiki. (Supplied separately) ● Please charge the battery in the room Battery (avx) ● Grip ●...
-
Page 8: Charging The Battery
(avx) Charging the battery (avx) CAUTION ● Li-ion battery is deployed on the avx. Please charge by the exclusive charger. ■STEP1 Preparation for charging. ● Please stand the scooter vertically on the propeller cover. Make sure it's on a flat stable surface so that it cannot fall over and cause damage to the propeller cover and blades. - Page 9 ■STEP4 Releasing the battery connector plug. ● Hold and squeeze the release levers on both sides of the battery connector plug and pull upwards. CAUTION ● Altering the battery connector plug in any way is very dangerous and should not be done. Any alterations will cause unexpected trouble. ■STEP5 Removal of the battery.
- Page 10 (av-2 series) The av-2 EVOLUTION name of each part ● Propeller cover ● Propeller screen ● Clamp ring ● Pitch control dial ● Propeller Assy ● Propellers ● Clamp ring lock lever ● Body Assy ● Head Assy ● Locking buckle ●...
- Page 11 Separately purchased accessories (av-2 series) ● Lithium ion Battery 27Ah for av-2 (Use only batteries supplied by Nippon Sensuiki) ● Charger for Lithium ion Battery for av-2 (Use only the specific charger supplied by Nippon Sensuiki) CAUTION ● Please never use other batteries than those supplied by Nippon Sensuiki. (Supplied separately) ●...
- Page 12 (av-2 series) Charging the battery (av-2 series) CAUTION ● In this page, it explains only the Lithium ion battery and av-2E as an example. ■STEP1 Preparation for charging. ● Please stand the scooter vertically on the propeller cover. Make sure it's on a flat stable surface so that it cannot fall over and cause damage to the propeller cover and blades.
- Page 13 Remove the connector ■STEP4 Releasing the battery connector plug. ● Hold and squeeze the release levers on both sides of the battery connector plug and pull upwards. CAUTION ● Altering the battery connector plug in any way is very dangerous and should not ...
- Page 14 (all apollo DPV) Usage of batteries except Lithium ion battery (av-2 series) In case of using with exclusive battery for av-2 sold in the past ● except lithium-ion battery, please set a battery changeover switch to Lead-Acid/Ni-MH as illustrated. Lead-Acid/Ni-MH...
- Page 15 (All apollo DPV) Placement for the single hand unit Picture for avx ■STEP1 Preparation for placement Use Super Knob and M6 screw of the scooter saddle. ■STEP2 Placement to the body 1. Put the Stay of the Propeller Cover; place the Handle ASSY to the Propeller Cover.
- Page 16 (All apollo DPV) Checking before use. (setting) ■STEP1 Set the battery. ① Please set the fully charged battery in the body housing in the correct position. WARNING ● Please only use a fully charged battery otherwise damage will be caused. Also check again that the correct charger was used with the correct battery.
-
Page 17: Check Before Use (Confirming Operations)
Check before use. (confirming operations) ■STEP1 Turning on the main switch. ① Check your surroundings. Always confirm that nothing can obstruct or become entangled in the propeller. ② Place the scooter vertically on a level surface. ③ Turn on the main switch. It is located on the right hand grip. ■STEP2 Checking the battery indicator light. - Page 18 Low speed purpose ● All apollo DPV: Confirm that pitch operation moves smoothly through the three stages. ● All apollo DPV: Recommended position is Pitch 2 or 3 because of law consumed power. Pull the pitch dial Choose the speed level...
-
Page 19: Entry Method Exit
(All apollo DPV) Entry method ■STEP1 Entry from shore. The scooter is very light when in the water - just slightly negative. While hands free riding it's very easy to use the scooter in shallow water even up to waist deep. You don't need to stay on the bottom in shallow water. -
Page 20: How To Operate
How to operate. ■STEP1 Accelerator operation apollo underwater scooter speed is controlled by the rotational speed of the propeller with the accelerator unit and by adjustment of the propellers pitch. The rotational speed of the propeller rises when the accelerator lever is pulled up. -
Page 21: Maintenance After Use
(All apollo DPV) Maintenance after use. Please wash with tap water after use. Make sure to flush sand and other debris from around the propeller, switch, accelerator unit, and locking buckles. ■STEP1 Avoid salt build-up - desalt after use. ● Stand the scooter upright, and flush with tap water from your hose all salt, sand and debris. -
Page 22: Note On Maintenance And Storage
(All apollo DPV) Note on Maintenance and storage. ■STEP1 The main sealing O-rings. There are four main sealing O-rings. Two large O-rings between the top cover (head Assy) and ●O-rings for propeller Assy body Assy, and two smaller ones between the body Assy and propeller Assy. - Page 23 (All apollo DPV) Symptoms : The propeller doesn't rotate even though the accelerator lever is activated. Check1 : The scooter won't activate. ● Please confirm the battery indicator lights are on. ● Action when trouble is found. Please turn the main switch on.
- Page 24 Having to stop each time to change the speed was difficult and inconvenient. ● To overcome this problem, the apollo underwater scooter is now equipped with a mechanism that changes the revolution speed of the motor. Now the gears can be shifted while running, eliminating the need to stop each time.
- Page 25 ■ Scooter saddle ● Handle The Grips on either side of your scooter can be used for take off, stopping and turns. The Grips should NOT be used for carrying the scooter on land. To carry vehicle on land, grasp both saddle handles or with one hand grasp handle bar of Single Hand Unit (see below).
-
Page 26: Stopping
1. Positioning for hands-free riding The diver positions the scooter between the legs so the scooters propeller shaft and the axis of the diver's body are lined up. As the scooter moves forward, the body will naturally be pushed from behind. The diver does not need to grip or force oneself to sit on the scooter. - Page 27 ■ Moving to hovering mode. ① Reduce speed by shifting the accelerator lever to the low-speed position. ② Once the speed is reduced and the weight of the scooter can be felt, adjust buoyancy. SPEED 4~5 Turn to Pitch 4 or 5 Adjust buoyancy Turn to minimum speed ③...
-
Page 28: Take Off
3. Take off ● Learning to be pushed by the scooter. The key to successful takeoff is to learn to be pushed by the scooter. If the diver is too eager to move forward, the diver and the scooter will not be able to move as one, which will throw the diver off balance and prevent a smooth takeoff. - Page 29 ■ Taking off from a hovering position. ① Take hold of the accelerator unit and bring the scooter directly below the body. ② Pull the scooter up to a riding position. Bring the scooter directly below the body Pull the scooter up ③...
-
Page 30: Riding
Riding ■ Surface riding Riding at the water's surface is also possible with the scooter. By wearing equipment designed for skin diving (mask, snorkel, and fins, and appropriate amount of weight on the hips), the diver can easily move around the water's surface. - Page 31 ■ Normal-speed riding (propeller pitch = 2 ; accelerator position = 6 - MAX) There is increased stability in the forward motion when riding at a normal speed, and therefore, the scooter will not sink even when there is a certain level of negative buoyancy. Because the diver's entire body is being hit with an appropriate amount of water current, using the body as a rudder for steering and hands as breaks is very effective thus providing a high level of freedom in underwater movement.
-
Page 32: Turning
Turning Steering with your body. (Using your upper body as a rudder) The diver's entire body, from the top of one's head to the tips of one's fins, is used as a rudder. It is especially effective to use the upper body, as you will be propelled in the direction to which your body is bent. ■... -
Page 33: Advanced Operations
Advanced operations ■ Drifting A resistant brake using the diver's upper body in the same manner as with a closed turn Running at high speed Gradually adjusts the position ... The diver enters a turning point without slowing down and applies a resistant brake using one's upper body in the same manner as with a closed turn. - Page 34 Advanced operations ■ Tandem (two-persons ride) The pilot diver boards the scooter at the regular position. The guest diver takes hold of the grip located on the backside of the scooter. In doing so, it is not necessary to hold on tightly. It is enough to hook on a few fingers. If the guest diver holds the grip too tightly, he will constrain the movement of the scooter, making it difficult for the pilot diver to steer.
-
Page 35: Advanced Operations (Carrying)
Advanced operations (Carrying) The wing arms of the scooter are used to carry underwater equipment. The diver opens both the left and right wing arms of the accelerator unit. Karabiners attached to any equipment you want to carry are hooked onto the holes in the wing arms. ■... - Page 36 Diving for the future INTERNATIONAL DISTRIBUTOR U.S.A. AUSTRALIA & SOUTH PACIFIC ISLANDS NEW ZEALAND TAIWAN Apollo Sports USA. Inc. Apollo Australia P/L Reef Sports LTD Apollo Sports Taiwan Inc. 12310 Hwy 99, #107, Everett, Unit 1, 20 Artisan Road, 4C Atlas Place, Mairangi Bay, No.
Need help?
Do you have a question about the av Series and is the answer not in the manual?
Questions and answers