barkman oasis Assembly, Operation And Maintenance Manual
Compact fireplace
Hide thumbs
Also See for oasis:
- Assembly operation maintenance manual (17 pages) ,
- Assembly, operation and maintenance manual (17 pages)
Advertisement
Quick Links
Advertisement

Related Manuals for barkman oasis

Summary of Contents for barkman oasis
- Page 1 fireplace assembly, operation and maintenance guide...
-
Page 2: Installation And Use
3. Read the installation, operation and maintenance instructions thoroughly before installing or servicing this equipment. Barkman Concrete Ltd. is not liable for any property damage or bodily injury caused by failure to follow the installation instructions, improper use of the product or any negligence or carelessness of the consumer. -
Page 3: Fire Warning
11. Never leave the fireplace unattended when in use. 12. We strongly recommend the installation of a steel fireplace grate on the floor of the fireplace before starting to make fires. This makes it easier to ignite the fire, directing heat away from the floor which extends the life of the floor by inhibiting the formation of small cracks from excess heat.These grates are available at hardware and building supply outlets. - Page 4 4 x 2.25 firebrick 2 tubes of landscape glue 2 tubes of high temperature silicone gloves instruction guide Note: If installing your oasis compact fireplace on an unstructured base, please ensure to follow these steps: • Excavate area approx. 9” below grade •...
- Page 5 9 x 2.75 firebrick 9 x 4 firebrick hearth mantle 1 mantle 2 (front) mantle 2 (back) mantle 4 mantle 3 (front) mantle 3 (back) plastic and steel shims firecap spark arrestor...
- Page 6 1. On your prepared level base, lay out the first layer as in the diagram. 8”x8” 8”x12” 8 x 12 (14) 8 x 8 8 x 4 IMPORTANT: Periodic checks must be made to ensure that the horizontal 8”x4” and vertical layers remain level. If layers are not level, use the included shims to adjust as necessary.
- Page 7 8”x 8” 4. Lay out the fourth layer of the wall 8”x4” surround as indicated in the diagram. 8”x12” 8 x 12 8 x 8 8 x 4 IMPORTANT: Periodic checks must be made to ensure that the horizontal and vertical layers remain level. If layers are not level, use the included shims to adjust as necessary.
- Page 8 8”x12” 8”x4” 8”x8” 7. Lay out the ninth layer of the wall surround as indicated in the diagram. 8 x 12 8 x 8 8 x 4 IMPORTANT: ONLY USE SILICONE IN SECURING THE FIREBRICK. 8. Place the mantle into the ninth layer as indicated in the diagram.
- Page 9 8”x12” 8”x8” 10. Lay out the eleventh layer as indicated in the diagram. Glue the 8”x4” accent 8x12 to the quarry stone using the included landscape adhesive. 8 x 12 8 x 8 8 x 4 8”x4” 8”x12” 11. Lay out the twelfth layer as indicated 8”x8”...
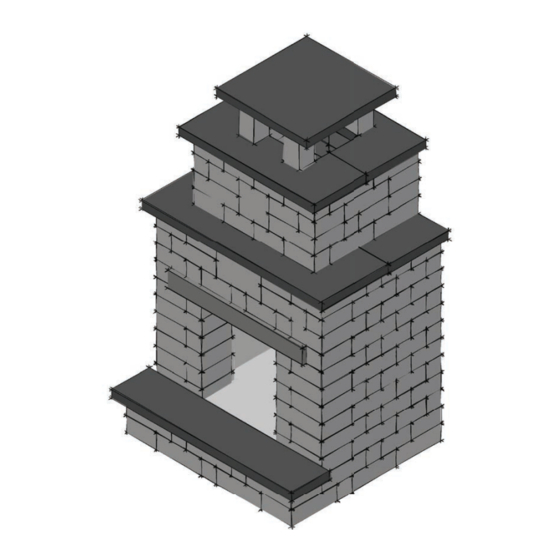
- Page 10 IMPORTANT: ONLY USE SILICONE IN SECURING THE FIREBRICK. ALLOW SILICONE TO SET 2 HOURS BEFORE INSTALLING THE FIRECAP. This shows how the fireplace will look including all the firebricks installed. 13. Install the firecap on top of firebrick as indicated in the diagram. Apply high temperature silicone to the tops of the firebrick as well as to the quarry stone supports on the front.
- Page 11 15. Install the mantle (2pcs) as indicated in the diagram. This is best done with two people. Adjust the mantle as needed to ensure that it is centered and has a 2” overhang on both sides and the front. 8”x8” 8”x12”...
- Page 12 8”x8” 8”x4” 8”x12” 18. Lay out the fifteenth layer as indicated in the diagram. 8 x 12 8 x 8 8 x 4 8”x8” 8”x8” 19. Lay out the sixteenth layer as 8”x4” 8”x12” indicated in the diagram. 8 x 12 8 x 8 8 x 4 IMPORTANT:...
- Page 13 21. Lay out the 4 pieces of 8”x4” quarry stone as indicated. Glue pieces to the mantle using included landscape adhesive. Allow glue to set for at least 2 HOURS before installing cap. 22. Install cap on top of the 4 pieces of 8”x4”...
-
Page 14: After Installation
AFTER INSTALLATION: CURING INSTRUCTIONS: Upon installation of your new fireplace, there are still small amounts of moisture needing to work their way out of the firebox. If you immediately begin to build large fires in your fireplace, you will compromise its longevity and can ultimately cause damage, including cracking. -
Page 15: Maintenance Instructions
Size of fire should never be bigger than the back of the firebox. DO NOT BUILD THE FIRE WHERE FLAMES EXIT THE FIREBOX OPENING. See illustration below: Fire should be limited to within the firebox, as the shaded circle shows. MAINTENANCE INSTRUCTIONS: 1. - Page 16 BARKMAN CONCRETE LIMITED Steinbach Office Calgary Office 152 Brandt Street, 813 McCool Street, Box 1136, Steinbach, MB R5G 0R2 Crossfield, AB T0M 0S0 T 204 326 3445 or 1 800 461 2278 T 403 946 4630 F 204 326 5915 F 403 946 4631 steinbach@barkmanconcrete.com...
Need help?
Do you have a question about the oasis and is the answer not in the manual?
Questions and answers