Escient Fireball E-2 User Manual
Escient fireball e-2: user guide
Hide thumbs
Also See for Fireball E-2:
- Quick setup (2 pages) ,
- User manual (106 pages) ,
- User manual (369 pages)
Table of Contents
Advertisement
Quick Links
Download this manual
See also:
User Manual
Advertisement
Table of Contents

Related Manuals for Escient Fireball E-2


Summary of Contents for Escient Fireball E-2
- Page 1 E2 USER’S MANUAL P/N: M22004-01A5...
-
Page 2: Table Of Contents
THANK YOU The team at Escient would like to take this opportunity to thank you for purchasing an Escient FireBall product. Escient is committed to providing our customers the most technologically advanced, yet easier- than-ever to use products that converge the power of the Internet with home entertainment. - Page 3 ADDITIONAL CONNECTION AND HOOKUP INFORMATION DIGITAL AUDIO INPUTS AUDIO OUTPUTS VIDEO OUTPUTS RS-232 CONNECTIONS EXTERNAL MODEM CONNECTIONS IR CONNECTIONS ETHERNET CONNECTIONS EXTERNAL CHANGER CONNECTIONS Changer Types Control Connections Digital Audio Connections Analog Audio Connections Sony CD Mega Changer Hookup Sony DVD/CD Changer Hookup Kenwood DVD/CD Changer Hookup REGISTRATION TESTING A BROADBAND CONNECTION...
- Page 4 Selecting an Existing Cover EDITING RADIO INFORMATION EDITING PLAYLISTS EDITING GROUPS DELETING MUSIC DELETING PLAYLISTS DELETING GROUPS CREATING CDS CREATING A CUSTOM MIX CD DUPLICATING A CD RECORDING FROM AN EXTERNAL SOURCE SETTING USER PREFERENCES SETTING THE SCREEN SAVER PREFERENCES Activation Idle Time Other Modes Retail Demo Mode...
- Page 5 SERVERS CLIENTS LOCATING THE FIREBALL CLIENTS AND SERVERS Central Distributed CONFIGURING A FIREBALL SERVER CONFIGURING A FIREBALL CLIENT Networking Server Selection ESCIENT TECHNICAL SUPPORT TROUBLESHOOTING NETWORK PROBLEMS SOFTWARE UPDATE PROBLEMS RECORDING PROBLEMS ADDITIONAL INFORMATION SPECIFICATIONS Video Specifications Audio Specifications Physical Specifications...
-
Page 6: Product Introduction
ABOUT THIS MANUAL This FireBall User’s Manual is intended to provide the reader with an overview of the main features and benefits of the Escient FireBall Media Management Systems. For more information, please refer to the Escient web site (www.escient.com) or contact your Escient dealer. -
Page 7: Warnings And Precautions
• A three prong grounded outlet is required. • You are cautioned that any change or modification not expressly approved in this manual or approved in writing by an authorized representative of Escient could void your warranty and/ or your authority to operate this equipment. -
Page 8: Trademarks & Service Marks
TRADEMARKS & SERVICE MARKS Escient®, the Escient logo, and FireBall® are trademarks of Digital Networks North America. FireBall and Physital are trademarks of Escient®. Other product names mentioned herein are used for identification purposes only and may be trademarks of their respective companies. -
Page 9: Warranty Information
What is Covered - The goal of this warranty is to cover operational problems that might arise with your product during normal use. This includes failure to start, improper operation, or intermittent failures. As part of the warranty, Escient will pay for all labor and materials used in the repair of the system. - Page 10 Escient shall not be liable for damage or loss of data including but not limited to music recorded to storage devices. It is the customer’s responsibility to maintain the original media and/or appropriate backup copies within the specific rights of the media’s copyright holder.
-
Page 11: Escient Privacy Policy
ESCIENT PRIVACY POLICY Escient is committed to providing you with a product that you enjoy and are confident in using, and are committed to providing services in a private and secure environment. We recognize and respect each individual user’s privacy and have created this Privacy Policy to demonstrate our commitment to your privacy. -
Page 12: Terms And Definitions
TERMS AND DEFINITIONS Following are terms used throughout this manual: • Button - refers to a graphic item on the display screen. • Group - a collection of similar music titles. Standard genre groups are provided and custom groups can be created by the user. •... -
Page 13: Setup
SETUP This manual assumes that you followed the printed “Quick Setup Guide” that came with your FireBall. If you have not properly connected your FireBall to your audio/video system, please go back and follow the “Quick Setup Guide” guide before continuing with this User Manual. POWER STATES After the FireBall unit is plugged in, the Standby LED located next to the power button will flash red until the startup process is complete. -
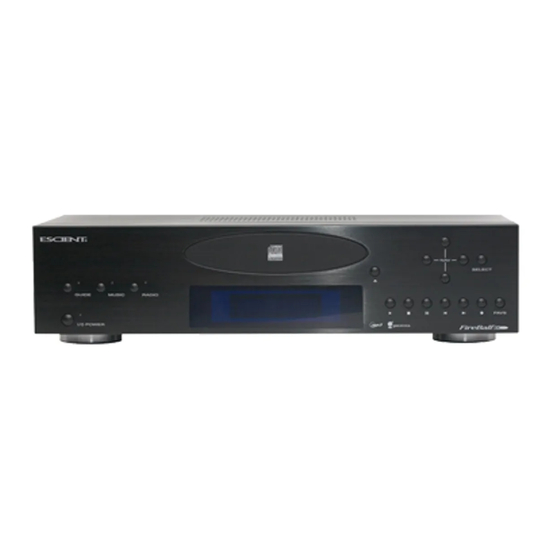
Page 14: Front Panel Overview
FRONT PANEL OVERVIEW 1 - POWER 2 - GUIDE 3 - MUSIC SOURCE 4 - RADIO SOURCE 5 - CD-RW DRIVE 6 - TEXT DISPLAY & IR RECEIVER 7 - OPEN/CLOSE DRIVE 8 - NAVIGATION 9 - SELECT 10 - TRANSPORT CONTROLS PAGE 14... -
Page 15: Rear Panel Overview
REAR PANEL OVERVIEW 1 - POWER 2 - ANALOG AUDIO IN 3 - IR IN / S-LINK/IR OUT 4 - DIGITAL AUDIO COAX OUT 5 - DIGITAL AUDIO OPTICAL OUT 6 - DIGITAL AUDIO OPTICAL IN 7 - DIGITAL AUDIO COAX IN 8 - ANALOG AUDIO OUT 9 - VIDEO OUT 10 - COMMUNICATION PORTS... -
Page 16: Remote Overview
REMOTE OVERVIEW PAGE 16... -
Page 17: Entering Text With The Remote Control
ENTERING TEXT WITH THE REMOTE CONTROL The remote control can be used to enter text in all text fields. This text entry capability is provided to allow you to fill out short text fields – such as those that occur in the setup and edit screens. FireBall’s wireless keyboard should be used when extended typing is required. - Page 18 display a “C”. The fourth key press displays a lower case “a”, the fifth key press displays a lower case “b”, and the sixth key press displays a lower case “c”. Lastly, pressing the “2” key a seventh time displays the number “2”. When entering the second character in a text field or the second character following a space, FireBall assumes that lower case is preferred and the character entry cycles in the following pattern –...
-
Page 19: Connecting External Disc Changers
The following changers are currently supported. This list may change from time to time as new changers are released by third party manufacturers. Please check the Escient web site for a list of any new supported changers. • Sony CD Changers (CDP-CX 200, 300, 400 series with S-Link support) •... -
Page 20: Connecting Sony Dvp-Cx777Es Cd/Dvd Changers (Cds Only)
Connecting Sony DVP-CX777ES CD/DVD Changers (CDs Only) FireBall requires that you connect each changer to the back panel using audio and control cables. Follow these steps to connect your Sony CD/DVD changers to your FireBall: 1. An RS-232 serial null modem cable with female DB-9 connectors on each end is required for connecting a Sony CD/DVD Changer. -
Page 21: Connecting Sony Cd Changers
Connecting Sony CD Changers FireBall requires that you connect each changer to the back panel using audio and control cables. Follow these steps to connect your Sony CD changers to your FireBall: 1. Locate the included S-Link cable. This is the 10’ black cable with 1/8” male plugs on each end. 2. -
Page 22: Connecting Kenwood Cd/Dvd Changers (Cds Only)
Connecting Kenwood CD/DVD Changers (CDs Only) FireBall requires that you connect each changer to the back panel using audio and control cables. Follow these steps to connect your Kenwood DVD/CD changers to your FireBall: 1. Locate the RS-232 serial cable that came with your Kenwood changer. This is the black cable with female DB-9 connectors on each end. -
Page 23: Connecting Pioneer Cd/Dvd Changers (Cds Only)
1. A custom RS-232 serial cable with 9 pin and 15 pin connectors is required to connect the DV-F07 changer to the FireBall. These can be purchased from your Escient dealer. 2. Connect one end of the RS-232 serial cable into Communication Port number 1, on the back of your FireBall. -
Page 24: Loading Discs Into Changers
The artist name, album name, and track list are provided by the Gracenote® Music Recognition Service. The album cover are provided by the Escient service. This information is downloaded from the Escients servers to your FireBall using your Internet connection. This process is referred to as “Looking up Disc Information”. -
Page 25: Automatically Getting Disc Information
PAGE 25 Automatically Getting Disc Information Once your changers are connected to FireBall and loaded with CDs, all you have to do is close the changer door and in a few seconds FireBall will begin looking up the disc information from each disc in each changer. -
Page 26: Getting Disc Information For A Range Of Discs
PAGE 26 Getting Disc Information for a Range of Discs If you want to lookup the disc information for a specific range of slots in a changer, you can use the Lookup Range feature. Follow these steps to lookup a range of changer slots: 1. -
Page 27: Getting Disc Information For All Discs
PAGE 27 Getting Disc Information for All Discs If you want to lookup the disc information for all discs in all changers, you can use the Lookup All feature. Follow these steps to lookup all discs in all changers: 1. Press the SETUP key on the remote to display the Setup menu. 2. -
Page 28: Additional Connection And Hookup Information
PAGE 28 ADDITIONAL CONNECTION AND HOOKUP INFORMATION DIGITAL AUDIO INPUTS The FireBall defaults to the optical inputs for changer audio. If you are using the coax inputs it is necessary to manually change the digital inputs from optical to coax using the Setup / Audio / Digital Input Preferences screen. -
Page 29: Video Outputs
One of the S-Video outputs is typically used for the optional Escient ETP-1500 touch panel to provide the user interface directly on the touch panel. The other S-Video output can be used if the installation has an available S-Video input or for a distributed multi-room installation. -
Page 30: Rs-232 Connections
COM port 4 is to be used for connecting an Escient ETP-1500 wired touch panel, external modem or to interface with a third party control system such as AMX or Crestron. If you are using both an Escient ETP-1500 touch panel and an external modem, connect the Escient ETP-1500 to COM port 3 and use COM port 4 for the external modem. -
Page 31: Ethernet Connections
ETHERNET CONNECTIONS The Ethernet jack on the back panel of the FireBall accepts any standard twisted pair CAT5 Ethernet cable. If you are connecting FireBall to a home network, you typically connect a standard Ethernet cable from your Ethernet router or hub to the FireBall. There are different grades, or categories, of twisted-pair cabling. - Page 32 CAT5 cabling should not exceed 100 meters. The following drawing depicts the typical wiring scheme for CAT5. For more information about wiring an Ethernet network, please refer to the Linksys web site (www.linksys.com). PAGE 32...
-
Page 33: External Changer Connections
EXTERNAL CHANGER CONNECTIONS There are a few general rules to follow when connecting changers to your FireBall... Changer Types • Changers from different Manufacturers can not be mixed • Sony CD and DVD/CD changers can not be mixed • Different models of Sony CD changers may be mixed •... -
Page 34: Sony Dvd/Cd Changer Hookup
Sony DVD/CD Changer Hookup • Up to three Sony DVP-CX777ES 400 disc changers may be connected via individual RS-232 cables. • An RS-232 cable is standard a DB9 null modem cable (not included with the changer) • All audio outputs from changers should be connected to the FireBall •... -
Page 35: Registration
Registering your FireBall is accomplished automatically when you go through the Quick Start process described in the User’s Manual. Registration includes properly configuring your FireBall for Internet access and then connecting to the Escient servers to register your serial number and download the latest Internet Radio stations. -
Page 36: Testing A Dialup Connection
PAGE 36 TESTING A DIALUP CONNECTION • An external Hayes compatible serial modem is required. • An analog phone line is required. Multiplexed digital phone lines are not supported. • An existing Internet Service Provider (ISP) account is also required – or you can sign up for a new AOL account by following the on-screen instructions. - Page 37 6. Once you have verified all of the Dialing Preferences, you should test the dialup modem connection to the Escient servers. From the Dialing Preferences Quick Start screen, select the “Test Connection” button. This will start the Dialup Modem Test which will test the following network settings: a.
-
Page 38: Getting Music Into Fireball
GETTING MUSIC INTO FIREBALL Before you can enjoy the Music features of your FireBall Media Management system, you will want to get your music collection into the FireBall. The process of getting music into FireBall is called “Recording” or sometimes “Ripping”. There are several ways to get your music into FireBall: •... -
Page 39: Recording From The Internal Cd
PAGE 39 RECORDING FROM THE INTERNAL CD The easiest way to get music into your FireBall is to record CDs using the built-in internal CD-RW drive. This method requires no additional equipment and is very fast, as the internal CD drive can rip audio at several times the speed of normal playback. -
Page 40: Recording From External Changers
RECORDING FROM EXTERNAL CHANGERS In addition to manually loading and recording CDs one by one using the front panel CD drive, you can record as many CD as you want directly from your external changers. The advantage of recording multiple discs from your changers is that you don’t have to sit there and unload/load each disc after it’s recorded, however there is the disadvantage that external recording must occur in real-time, at 1x record speeds, taking up to several weeks to complete for large music collections. -
Page 41: Automatically Recording Cds
PAGE 41 Automatically Recording CDs You can easily record changer based CDs to your FireBall’s internal hard drive using the Quick Record feature. Quick Record will record all tracks from newly added CDs which are NOT already record to your FireBall, in one easy step. Follow these steps to automatically record changer CDs to your FireBall: 1. -
Page 42: Recording A Range Of Cds
PAGE 42 Recording a Range of CDs If you want to record a specific range of slots in a changer, you can use the Record Range feature. Follow these steps to record a range of changer slots: 1. Press the SETUP key on the remote to display the Setup menu. 2. -
Page 43: Recording All Cds
PAGE 43 Recording All CDs If you want to record all discs in all changers, you can use the Record All feature. Follow these steps to record each disc in all changers: 1. Press the SETUP key on the remote to display the Setup menu. 2. -
Page 44: Importing Music Files
IMPORTING MUSIC FILES If you have digital audio files already recorded on your PC or Mac, you can transfer the files directly to your FireBall using an Ethernet network. This is a fast and convenient way to load up your FireBall with your favorite Music without having to re-record everything. FireBall will import each audio file, extract the song information, and add it to your Music Library. -
Page 45: Importing From A Pc
Importing from a PC Make sure your PC is connected to the same network as your FireBall and follow these steps to mount, transfer, and import music files from your PC to your FireBall. On the FireBall (Note: This step only needs to be done once.) 1. -
Page 46: Importing From A Mac
Importing from a Mac FireBall’s File Server acts like a Windows File Server on your network, therefore you will need to connect using the MacOS X’s built-in Windows networking client. Make sure your Mac is connected to the same network as your FireBall and follow these steps to mount, transfer, and import music files from your PC to your FireBall. - Page 47 4. Click on the Content pop-up menu and select the Import directory. 5. Next, an authentication dialog will appear. You can ignore this dialog and just click the OK button. 6. You will then have a new drive mounted on your desktop called “Import”. 7.
-
Page 48: Recording From Other External Sources
PAGE 48 RECORDING FROM OTHER EXTERNAL SOURCES In addition to recording from external changers, FireBall allows you to record directly from it’s analog inputs to the internal hard drive. Follow these steps to record from an external source: 1. Press the RECORD key on the remote control to display the Recording Options Menu. -
Page 49: Erasing A Cd-Rw Disc
PAGE 49 ERASING A CD-RW DISC You can use FireBall’s built-in CD burner to erase the contents of a re-writable CD. Follow these steps to erase a re-writeable CD: 1. Press the RECORD key on the remote to display the Record menu. 2. -
Page 50: Listening To Music
LISTENING TO MUSIC BROWSING YOUR MUSIC LIBRARY Now that you have gotten your music into your FireBall, it’s time to enjoy it! The Music Guide allows you to browse, locate, and play all of your music in one easy to use on-screen guide. The Music Guide displays a scrolling list of all your Music Titles. -
Page 51: Playing The Current Title
PLAYING THE CURRENT TITLE Playing the currently highlighted Title is the same as playing a CD in a conventional CD player. Simply press the PLAY key on the remote control and it begins to play from track 1. Note: If you press SELECT with a Track highlighted, you will start playback from the selected Track. -
Page 52: Changing The Guide View
PAGE 52 CHANGING THE GUIDE VIEW The GUIDE button on the remote control is used to switch between the Music Guide and Music Player screens. When you are viewing the Music Player screen, press the GUIDE button to return to the Music Guide. The Music Guide provides you with several ways to view the contents of your Music Library. -
Page 53: Changing The Current Play Mode
PAGE 53 CHANGING THE CURRENT PLAY MODE The default Play Mode will play the current Title from Track 1 to the last track in order, then stop. If you want to change the order of how tracks are played, there are six different Play Modes to choose from: •... -
Page 54: Viewing By Genre
VIEWING BY GENRE In addition to the current Guide View, the Music Guide automatically organizes your Music into default “Genres” also called “Groups”. The Group Bar displays a horizontal scrolling list of Genres corresponding to the music in your library. Five Genres or Groups are visible at one time. The “All” genre is the default, which displays all Titles in your Music Library. -
Page 55: Listening To Internet Radio
LISTENING TO INTERNET RADIO BROWSING INTERNET RADIO STATIONS The Radio Guide displays a scrolling list of Internet Radio Stations. Using the remote control, you can navigate up and down the list. As each Station is highlighted, you will notice that the Information Area and Cover Art changes to reflect the currently highlighted Station. -
Page 56: Playing The Current Station
Internet access problems, busy networks, etc... • Internet Radio Stations are not hosted by Escient and may not be available at all times. You can update your Internet Radio Stations list by running Tune Stations. -
Page 57: Managing Your Media
PAGE 57 MANAGING YOUR MEDIA CREATING PLAYLISTS FireBall allows you to organize your favorite songs into custom “Playlists”. A Playlist is simply a group of songs that you choose from your Music Library. Common uses for Playlists are: • Collections of your favorite songs •... -
Page 58: Creating Groups
PAGE 58 CREATING GROUPS In addition to Playlists, FireBall allows you to create custom “Groups” of Music Titles or Radio Stations. User created Groups appear in the Group Bar along with the automatically created Genre Groups and System Groups (All, CDs, Internal, and Playlists). Some uses for custom Group are: •... -
Page 59: Adding Internet Radio Stations
PAGE 59 ADDING INTERNET RADIO STATIONS FireBall comes preloaded with several high quality streaming Internet Radio Stations from around the world, but that may not be enough for you, so FireBall also let’s you add your own Internet Radio Stations. Internet Radio stations must conform to these specifications: •... -
Page 60: Updating The Internet Radio Stations List
UPDATING THE INTERNET RADIO STATIONS LIST Escient makes every attempt to insure that the preloaded Internet Radio Stations are alive and well, but due to the dynamic nature of the Internet and the third parties who actually serve up these radio streams, sometimes you will not be able to play a station. -
Page 61: Editing Music Information
PAGE 61 EDITING MUSIC INFORMATION FireBall has access to over 2.5 million CD titles, but you may still encounter a CD that does not return a custom cover or the correct disc information. You can edit the disc information for any Music Title using the Edit Disc and Edit Tracks screens. -
Page 62: Editing Track Names
PAGE 62 Editing Track Names You can also manually edit the Track/Song names of the currently highlighted Title in the Music Guide. Follow these steps to edit the track information for the current Music Title: 1. Highlight the Music Title you want to edit in the Music Guide. 2. -
Page 63: Automatically Lookup Information For This Disc
PAGE 63 Automatically Lookup Information for This Disc The “Lookup This Disc” button will initiate a disc lookup for only this disc. FireBall will connect to the Gracenote® Music Recognition Service to locate and download the disc information. Follow these steps to lookup information for the current disc: 1. -
Page 64: Searching For The Original Cover
“Search for Cover” feature. This is a powerful tool that allows you to search the Escient servers for an exact or partial match using the artist name and/or album name. -
Page 65: Selecting An Existing Cover
PAGE 65 Selecting an Existing Cover If for some reason you can not download the original cover, you can choose one of the existing covers for the current Title. Follow these steps to select an existing cover to assign to the current Title: 1. -
Page 66: Editing Radio Information
PAGE 66 EDITING RADIO INFORMATION Similar to editing Music Information, you can also Edit the Radio Information. Follow these steps to edit the station information for the currently highlighted Internet Radio Station: 1. Make sure you are in the Radio source mode by pressing the RADIO key on the remote. -
Page 67: Editing Playlists
PAGE 67 EDITING PLAYLISTS You can change the name and add or remove tracks from any Playlist you created. Follow these steps to edit a Playlist: 1. Press the MUSIC key to make sure you are in the Music source mode. 2. -
Page 68: Editing Groups
PAGE 68 EDITING GROUPS As with Playlists, you can also edit the name of a Group, add Music Titles or Radio Stations to the Group, or remove Music Titles or Radio Stations from the Group. Follow these steps to edit a Group: 1. -
Page 69: Deleting Music
PAGE 69 DELETING MUSIC You can remove any music you have recorded to the FireBall by using the Delete Music feature. You may want to do this if you have filled up your FireBall and you can not record any more music or if you want to remove songs that you just don’t listen to. -
Page 70: Deleting Playlists
PAGE 70 DELETING PLAYLISTS You may delete entire Playlists from the Music Guide. Follow these steps to permanently delete one or more Playlists from the Music Guide: 1. Press the MUSIC key to make sure you are in the Music source mode. 2. -
Page 71: Deleting Groups
PAGE 71 DELETING GROUPS Deleting Groups from the Group Bar is very similar to deleting Playlists. The contents of the Group (the Music Titles, or Radio Stations) are not deleted. They are still available in any other Groups they may be assigned to and in the All Group. Follow these steps to delete Groups. -
Page 72: Creating Cds
PAGE 72 CREATING CDS FireBall is a complete media solution for storing, managing, and listening to your music, but what if you want to get your music out of your FireBall and take it with you? FireBall has that covered as well. - Page 73 PAGE 73 8. When FireBall has added all of your songs and finished creating the new CD image, it will eject the CD tray and ask you to insert a blank CD. 9. Insert a blank CD-R or CD-RW disc and close the CD tray by pressing the Eject button on the front panel.
-
Page 74: Duplicating A Cd
PAGE 74 DUPLICATING A CD You can duplicate any physical disc located in the internal drive or any external changer. These discs are for backup purposes only. Follow these steps to duplicate a CD: 1. Press the MUSIC key to make sure you are in the Music source mode. 2. -
Page 75: Recording From An External Source
PAGE 75 RECORDING FROM AN EXTERNAL SOURCE FireBall also allows you to record from the external inputs to a blank CD. This allows you to record live performances or any other analog source to a blank CD which can then be played on almost any standard CD Player.. -
Page 76: Setting User Preferences
PAGE 76 SETTING USER PREFERENCES User preferences are available to specify global configuration options and preferred system settings. Press the SETUP key on the remote control to display the Setup Menu. Use the navigation keys on the remote control (up, down, left, and right) to highlight and select any menu item. SETTING THE SCREEN SAVER PREFERENCES Screen Savers are provided for each source mode. -
Page 77: Retail Demo Mode
PAGE 77 Retail Demo Mode FireBall has a Retail Demo Mode for use in retail display environments. The Retail Demo Mode (RDM) is a special screen saver that is activated during idle time. The RDM continuously displays key features and benefits of the FireBall product on the attached TV. Pressing any button on the remote will temporarily disable the RDM and allow the user to demo the product. -
Page 78: Photo Screen Saver Mode
PAGE 78 Photo Screen Saver Mode FireBall has a Photo Screen Saver Mode for displaying your own photos whenever FireBall is idle for a specified period of time. You can import your own photos into the Photos shared directory using Windows Networking. Photos should be 720x480 for 4:3 NTSC TVs and 640x360 for 16:9 widescreen TVs. -
Page 79: Setting Your Time Zone
PAGE 79 SETTING YOUR TIME ZONE Specify which US time zone your FireBall is located in. Follow these steps to set your Time Zone: 1. Press the SETUP key on the remote to display the Setup menu. 2. Select the GENERAL Menu 3. -
Page 80: Customizable User Interface
PAGE 80 CUSTOMIZABLE USER INTERFACE In addition to the Escient Classic user interface theme, the FireBall allows you to select a custom theme and select your own background images for each Guide, Player, Options, Setup, and Message screens. You can import your own background images into the Backgrounds shared directory using Windows Networking. -
Page 81: Enabling Password Protection
PAGE 81 ENABLING PASSWORD PROTECTION Optional Password Protection enables you to limit user access to the Setup Menus. This is useful to lockout the ability to change the global user settings and preferences. Setting a System Password – Follow these steps to setup a new system password: 1. -
Page 82: Choosing Your Network Connection
If you have a broadband Internet connection such as a cable modem, DSL, or ISDN line, select Ethernet and connect FireBall to your Ethernet network. You may need additional networking hardware(like an Ethernet hub) to join your FireBall to your Ethernet network. See your Escient dealer for more information about home networking. -
Page 83: Testing The Your Connection
PAGE 83 Testing the Your Connection It is a good idea to verify that your selected network connection is functioning properly before exiting the Network Connections screen. Follow these steps to test your selected network connection: 1. Select the TEST CONNECTION button on the Network Connections screen. 2. -
Page 84: Ethernet Settings
PAGE 84 Ethernet Settings Ethernet is the preferred networking choice which provides you with the best network performance and allows your FireBall to act as a “server” to deliver your music collection throughout your home network using the optional FireBall Music Players. Ethernet networks require that you configure each device on the network with a valid “address”. -
Page 85: Dialup Settings
PAGE 85 Dialup Settings If you are going to use a dialup ISP to connect your FireBall to the Internet, you must provide information for your selected ISP. This information can be obtained by contacting your ISP or from your PC, if you already use it to connect to the Internet. Connect you phone line to a Hayes compatible modem and connect the modem to COM PORT 4 on the back of your FireBall, then follow these steps to specify your Dialup Modem settings:... -
Page 86: Setting The Fireball Server Settings
PAGE 86 SETTING THE FIREBALL SERVER SETTINGS Your FireBall can act as a “server” delivering audio to optional FireBall “clients” over the network. FireBall’s server also allows you to control it remotely using a web browser on your PC and allows Network File Sharing for backup and import features. -
Page 87: Peer To Peer Music Sharing
PAGE 87 PEER TO PEER MUSIC SHARING FireBall contains a special music sharing feature that allows two FireBall Music Servers located on the same network to share their music library into two independent zones. The Music Guide from the second FireBall is merged into the Music Guide of the first FireBall to create one seamless Music Guide for browsing and playing all of your music. -
Page 88: Selecting The Audio Encoder Type
PAGE 88 SELECTING THE AUDIO ENCODER TYPE You can specify which audio encoder (MP3 or FLAC) you want to use for recording audio in to your FireBall. The MP3 format allows the most flexibility and compatibility for efficiently storing many audio files while the FLAC format uses considerably more space than MP3 files, but preserves an exact bit-for-bit recording of the original, using half the space of the original CD. -
Page 89: Setting The Disc Insert Preferences
PAGE 89 SETTING THE DISC INSERT PREFERENCES You can specify what to do with new discs inserted into FireBall’s front panel CD drive. “Display and Play” will display the information for the disc and then play the disc. Record and Eject assists in bulk recording, allowing you to insert disc after disc, automatically recording then ejecting each one. -
Page 90: Digital Input Preferences
PAGE 90 DIGITAL INPUT PREFERENCES You must specify which of the digital audio inputs you are using to connect the digital audio outputs from your external changers. The optical connectors are the small square connectors with a red light shining from the center. The coaxial connectors are the round connectors which look like analog audio connectors or “RCA”... -
Page 91: Video Output Preferences
PAGE 91 VIDEO OUTPUT PREFERENCES Video Format Allows you to select 4:3 or 16:9 aspect ratios on your TV screen. Follow these steps to center the FireBall screen: 1. Press the SETUP key on the remote to display the Setup menu. 2. -
Page 92: Centering The Fireball Screen
PAGE 92 Centering the FireBall Screen Allows you to center the FireBall user interface horizontally on your TV screen. Follow these steps to center the FireBall screen: 1. Press the SETUP key on the remote to display the Setup menu. 2. -
Page 93: Adjusting Your Tv's Brightness
PAGE 93 Adjusting your TV’s Brightness Follow these steps to adjust the brightness on your TV: 1. Press the SETUP key on the remote to display the Setup menu. 2. Select the VIDEO menu. 3. Select the BRIGHTNESS menu. 4. Turn your TV’s brightness control all the way up then lower it to the point where the vertical black bar on the left just disappears. -
Page 94: Adjusting Your Tv's Contrast
PAGE 94 Adjusting your TV’s Contrast The Contrast or Picture Adjustment control allows you to optimize the contrast (which is sometimes called Picture) of their TV, using the TV’s Contrast or Picture controls. This setting helps reduce video “blooming” and create a clearer, more readable user interface. Follow these steps to adjust the contrast on your TV: 1. -
Page 95: Adjusting Your Tv's Sharpness
PAGE 95 Adjusting your TV’s Sharpness The Sharpness adjustment allows you the set the Sharpness or Detail control of their TV so that onscreen text is as readable as possible. Proper adjustment of the Sharpness control (sometimes called the Detail control) on your TV, allows you to see video and on screen menus more accurately. Follow these steps to adjust the sharpness on your TV: 1. -
Page 96: Adjusting Your Tv's Color And Tint
PAGE 96 Adjusting your TV’s Color and Tint Color Bars are used to test the TV monitor’s ability to reproduce the proper color values. Follow these steps to adjust the Color and Tint on your TV: 1. Press the SETUP key on the remote to display the Setup menu. 2. -
Page 97: External Control
EXTERNAL CONTROL INSTALLING THE ETP TOUCH PANEL The optional Escient Touch Panel is an external 15” flat LCD color display that offers full control of a FireBall via it’s integrated touch sensitive surface. Follow these steps to connect the ETP-1500 to a FireBall: 1. -
Page 98: Calibrating The Touch Panel
When the calibration procedure is complete, you can operate the FireBall by touching the buttons around the perimeter of the screen. Although these buttons duplicate the functionality of the FireBall remote, you can still use the wireless IR remote and Escient keyboard even when the ETP- 1500 is in use. -
Page 99: Changing The Touch Panel Button Overlay
Overlay The Button Overlay feature places button controls onto the FireBall user interface for use with the Escient ETP-1500 touch screen and third-party touch panels. The ETP-1500 is automatically detected on the FireBall serial ports and the select overlay is enabled. -
Page 100: Ir Remote Control
PAGE 100 IR REMOTE CONTROL FireBall is preset from the factory to operate from the FB1 source button, however, the FireBall can be configured to use any one of the four source buttons using the on screen Setup menus. This is useful when there are multiple FireBalls installed at the same location, so all FireBalls don’t respond to the same IR commands. -
Page 101: Direct Access Codes
PAGE 101 DIRECT ACCESS CODES Direct Access Codes are used in conjunction with the MACRO key on the remote control to provide an IR code sequence to access just about any media in your FireBall server. This is useful for programming third-party external control systems and programmable IR remote controls such as the Marantz RC9500. - Page 102 The following table is used to determine the button sequence for direct access code sequences from the Escient IR remote and IR keyboard. Direct Media Access IR Remote Definitions Function Multi-Key Combinations Direct Play Mode Macro, 1, [play mode number], Enter...
- Page 103 The following table is used to determine the button sequence for direct access code sequences from the Escient IR remote and IR keyboard. Direct Media Access IR Remote Definitions Function Multi-Key Combinations Direct Play Mode Macro, M, [play mode number], Enterr...
-
Page 104: Playlist Hot Keys
PAGE 104 PLAYLIST HOT KEYS Playlist Hot Keys provides a Keyboard Macro sequence to directly access any five Playlists in your Music collection from any of these five keyboard combinations: • Control + Backspace • Control + Insert • Control + Delete •... -
Page 105: Serial Com Ports
PAGE 105 SERIAL COM PORTS The Serial Control COM Port setting is used to specify which RS-232 serial COM port is to be used for two-way external control communications with a third party control system. If there are no available COM ports, you must use the Ethernet based external control for two-way external control communications with a third party control system. -
Page 106: Controlling Fireball From Other Devices
CONTROLLING FIREBALL FROM OTHER DEVICES In addition to the Escient ETP-1500 wired touch panel, FireBall provides the user and custom A/V installer with many options for control and integration into any home theater or home automation system using direct IR codes, two-way RS-232 serial control, two-way Ethernet control, and wireless web pad control. -
Page 107: Fireball Utilities
PAGE 107 FIREBALL UTILITIES GETTING INFORMATION ABOUT YOUR FIREBALL Information about your FireBall hardware and software is available under the Utilities menu. This information is useful for troubleshooting any problems you may encounter with your network connection or verifying the current software versions. Follow these steps to view the FireBall system information: 1. -
Page 108: Restarting The System
PAGE 108 RESTARTING THE SYSTEM There are two ways of manually performing a full restart or reboot of the FireBall system, one using the front panel power button and the other using the Restart System menu. Follow these steps to restart the system using the front panel Power Button: 1. -
Page 109: Updating The Software
PAGE 109 UPDATING THE SOFTWARE FireBall will automatically check the Escient server once a week for any FireBall software updates, and automatically install them. You can also manually check for a software update. Follow these steps to manually update the software: 1. -
Page 110: Controlling Fireball From A Web Browser
(Mac OSX) using TCP/IP addressing over your home network. You can use a wireless or wired Ethernet network, as long as you have a DHCP router or if you have assigned static IP addresses. Please contact your Escient dealer if you need assistance with setup a home network. -
Page 111: Using The Web Browser As A Music Client
PAGE 111 USING THE WEB BROWSER AS A MUSIC CLIENT In addition to remotely controlling your FireBall, the built-in web server also functions as a streaming MP3 music files to the web browser, providing an easy way to add multiple streaming music clients to your FireBall. -
Page 112: Backup And Restore
BACKUP AND RESTORE FIREBALL MUSIC BACKUP It is possible to backup and restore the music contents of a FireBall using the CIFS or “Windows” Networking feature. Backup is accomplished by mounting the FireBall onto your PC or Mac desktop and using your computer’s backup software. You can also backup the music files to any standard media which your PC supports, such as: DVD+/-R/W, CD-R/RW, or external hard drive. -
Page 113: Fireball Music Restore
FIREBALL MUSIC RESTORE You can restore music to a FireBall using the same method used for importing audio files into a FireBall. Restore and Import both use the CIFS Networking feature to add audio files to a FireBall. Simply drag your music files to the Import directory and let FireBall import the audio files. Note: This may take several days for a large music collection! Upon Import, FireBall will rebuild the internal database based on the music file’s ID3 tag information. -
Page 114: Networked Audio Using Fireball Music Clients
NETWORKED AUDIO USING FIREBALL MUSIC CLIENTS SERVERS A FireBall Server is a Fireball media management system that is capable of “serving” media to other FireBalls over a network. The FireBall is a considered a “server” product. CLIENTS A FireBall Client is a FireBall that can play media from a FireBall Server over a network. Currently there are three different FireBall products that can play media from FireBall servers: •... -
Page 115: Locating The Fireball Clients And Servers
LOCATING THE FIREBALL CLIENTS AND SERVERS Central If you locate your FireBall clients and servers in a central location such as an equipment or utility room, you will need to use a third party audio/ video distribution system to deliver sound and picture to each room. -
Page 116: Distributed
Distributed A distributed FireBall installation means that your FireBall Servers and Clients are physically distributed or located in different rooms. Distributed FireBalls communicate over a wired or wireless network to share access to your media. The biggest advantage of a distributed client- server system over a central system is that everything you need is built into FireBall. -
Page 117: Configuring A Fireball Server
Each FireBall client must be on the same network as the server. This document will assume that you have properly connected your FireBall client to the same network as your FireBall server. Please refer to the HomeNetworkingPrimer support document on the Escient web site for more information about home networking. -
Page 118: Escient Technical Support
Phone: 800-372-4368 Press “2” for Sales, or “3” for Support Fax: 317-616-6790 Internet: www.escient.com Email: support@escient.com Please have the following information ready for the Escient Customer Support technician: • Product Serial Number • Model Number • Date of Registration or Purchase •... -
Page 119: Troubleshooting
If you experience problems registering a FireBall or connecting to the Internet to lookup disc information, try these possible fixes before calling Escient Tech Support: • Make sure that your FireBall is properly connected to your home network and that all cables are in working order. -
Page 120: Additional Information Specifications
ADDITIONAL INFORMATION SPECIFICATIONS Specifications are subject to change without notice. Please check the Escient web site for any changes to the specifications. Video Specifications • NTSC • 10 bit Video DACs • Frequency Response: • Composite: -2 dB @ 5MHz •... -
Page 121: Gracenote® End-User License Agreement
GRACENOTE® END-USER LICENSE AGREEMENT USE OF THIS PRODUCT IMPLIES ACCEPTANCE OF THE TERMS BELOW. This product contains technology and data from Gracenote of Emeryville, California (“Gracenote”). The technology from Gracenote (the “Gracenote Embedded Software”) enables this product to do disc identification and obtain music-related information, including name, artist, track, and title information (“Gracenote Data”), which is included on the Gracenote Database (the “Gracenote Database”).
Need help?
Do you have a question about the Fireball E-2 and is the answer not in the manual?
Questions and answers