
Related Manuals for CaterChef 680.311 Series


Summary of Contents for CaterChef 680.311 Series
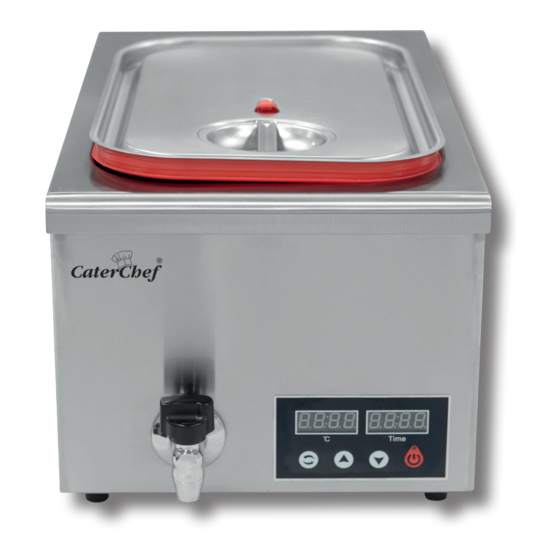
- Page 1 P rofe s si o nal Supp lies SOUS VIDE BAIN MARIE 1/1GN Modelnr.: *680.311 GEBRUIKERSHANDLEIDING USER GUIDE...
-
Page 2: Table Of Contents
Schade als gevolg van het niet volgen van de instructies vermeld in deze handleiding, maakt de garantie te allen tijde ongeldig. Het CaterChef sous vide apparaat heeft een modern ontwerp en is geproduceerd volgens de nieuwste standen van techniek. Het heeft daardoor een stevige constructie, is gemakkelijk te bedienen, warmt snel op naar een gelijkmatige temperatuur en gaat zuinig met energie om. -
Page 3: Veiligheidsvoorzorgen En Gebruiksomgeving
3. Plaats uitsluitend voedsel en geen non food artikelen in het apparaat. Denk hierbij aan gereedschap, bakschalen, papier of folie; etc. Er geldt in dit geval een uitzondering voor professionele vacuumzakken zoals artikelnummers 688133 en 688134 van CaterChef. 4. Bedek het apparaat nooit met folie. Dit kan oververhitting en daarom gevaar opleveren. -
Page 4: Elektrisch Schema
ELEKTRISCH SCHEMA: GEBRUIKERSINSTRUCTIES: TEMPERATUURSCHERM TIJDSCHERM — A- TEMPERATUUR- B- SCHAKELAAR EN TIJDREGELAAR Let op! Controleer het apparaat voortijdig op schade. Indien dit het geval is dient u het apparaat niet in werking te stellen. Neem gerust contact op met uw horecaleverancier om tot een oplossing te komen. Demonteer of repareer het apparaat nooit zelf. -
Page 5: Schoonmaken En Onderhoud
4. Druk 1 maal op B; het apparaat is AAN. 5. Druk daarna 1 maal op A; stel de temperatuur in met + en − (houdt de + of − ingedrukt om dit proces te versnellen) 6. Druk nogmaals op A om de temperatuur te bevestigen en vervolgens de tijd in te stellen. 7. - Page 6 It’s therefore mainly suitable for professional usage in hotels, markets, super-markets and other events. CaterChef wants to emphasize that this instruction manual needs to be readed carefully before usuge and should be stored for later use.
- Page 7 3. Only fill the pan with water and vacuum sealed food; only use professional vacuum bags such as items nr’s 688133 and 688134 of CaterChef. 4. Do never cover the appliance with foil; this could cause overheating and therefore danger.
- Page 8 CIRCUIT DIAGRAM: USERS INSTRUCTIONS: TEMPERATURE DISPLAY TIMER-DISPLAY — A- TEMPERATURE B- SWITCH AND TIME CONTROLLER Note! Before usage you should always check whether the device is damaged. If this is the case, do not operate the device and feel free to contact your catering supplier to work towards a solution. Never repair of dismantle the device by yourself.
- Page 9 4. Then press A once; set the temperature with + and −. (press hold the + or − to speed up this process). 5. Press A again to confirm the temperature and to reset the timer. 6. Press + and − again to reset the time as required. (press hold the + or − to speed up this process). First set the minutes (right side of the timer) and then the hours (left side of the timer).
Need help?
Do you have a question about the 680.311 Series and is the answer not in the manual?
Questions and answers