Table of Contents
Advertisement
Quick Links
Advertisement
Table of Contents

Summary of Contents for KYK Higen1+ Premium
- Page 1 K Y K H y d r o g e n W a t e r G e n e r a t o r USER MANUAL Higen1+ Premium...
- Page 2 The feedback will help us improve our product offering. Again, I thank you from the bottom of my hearts for your choosing the KYK Higen1+, we know you will enjoy it. I hope it will help you be healthier and happier and bring your precious family all the riches you deserve.
-
Page 3: Table Of Contents
Table of Contents 1. Major Components ………………………………………… 2. Parts and Features …………………………………………. 3. Before installation ………………………………………….. 4. Installation ……………………………...……………………… 5. How to measure your tap’s aerator..……..………… 6. Flow diverter installation ……..……………….……… 7. Installation checklist ……………………………………..8. How to use the Higen 1+ ..……………...….………….. -
Page 4: Major Components
Major Components Body [ Front ] [ Rear ] Faucet Filter Lifespan Indicator Lights (Green LEDs) Speaker (Spout) Filter Cover Control Panel (6 buttons) Tap Water Power Cable Water ON/OFF Valve Overflow (Leave open) Bottom Accessories Tap Water IN Overflow Drain Water OUT Adaptor Rings Accessories... -
Page 5: Parts And Features
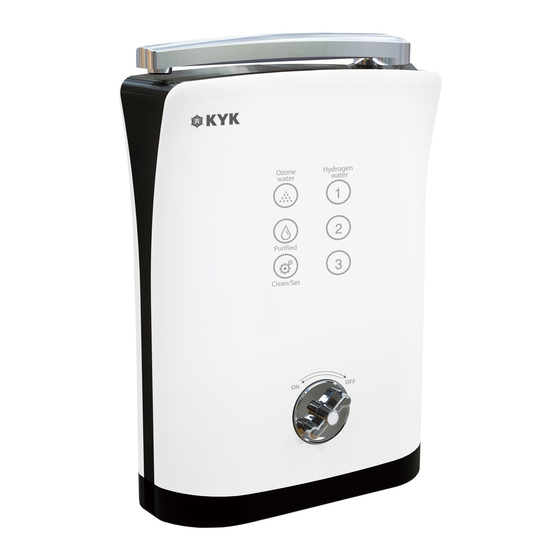
Parts and Features Control Panel Filter Lifespan Indicator Lights (Green LED’s) Ozone Water Level 1 Hydrogen Water (Not for drinking) Purified Water Level 2 Hydrogen Water Level 3 Hydrogen Water Cleaning / Settings Water ON/OFF Valve Cleaning / Setting ◼ Cleaning cycle starts automatically every 30 litres of continuous use to protect the electrolysis chamber. - Page 6 Parts and Features Changing Setting - Volume Filter Lifespan Indicator Lights (Green LEDs) Adjust Up Adjust Down Cleaning / Settings Clean/Set Button - Volume Setting ◼ To access the volume setting: Press the Clean/Set button for 3-4 secs, until the unit beeps. ◼...
- Page 7 Parts and Features Changing Setting - Input pH level Filter Lifespan Indicator Lights (Green LEDs) Adjust Lights Left Adjust Lights Right Cleaning / Settings Clean/Set Button — Input pH Level Setting ◼ To access the input pH level: Press the Clean/Set button for 7-8 secs, until the unit beeps twice.
-
Page 8: Before Installation
Before Installation Read the recommendations below before installing your Higen 1+ unit Install the product at least Do not tilt the product. 100mm away from any walls. Keep the product dry, and avoid high Damage can result from running moisture areas or direct sunlight. hot water through the unit and will void any warranty. -
Page 9: Installation
Installation Back Faucet / Spout Filter Cover Tap Water Water Power Cable Overflow Installation Connecting to the end of a tap ◼ Unscrew and remove the aerator from your tap. ◼ Screw the Adaptor Ring that fits your tap if required. ◼... - Page 10 Installation How to Cut the Tubing for Connection ◼ Use a very sharp knife or razor blade to get a clean right angle cut. ◼ Check to make sure you have a clean and even end. Caution ◼ All threaded connections to the cold water supply should be covered with Teflon tape to avoid the chance of leaks.
- Page 11 Installation Turn OFF the water control valve before connecting the water Turn to the supply tubing to the machine. position OFF Attach the 90° elbow connectors to water input and output ports on the back of the machine. Connect water supply tubing to the elbow connector.
-
Page 12: How To Measure Your Tap's Aerator
Installation Please place the water Pressure Reducing Valve (PRV) between the tap flow diverter valve and the unit. Water flow from tap Unit Water Inlet Diverter Valve Water Pressure Reducing Valve (PRV). Note: Please be aware the water flow direction when installing the PRV. The arrow indicates the flow direction of the water. -
Page 13: Flow Diverter Installation
Installation Flow Diverter Installation Removing aerator from your tap ◼ Most modern mixer taps have an aerator that can be unscrewed counter-clockwise (make sure you keep this in a safe place, as often they are unique to each tap and hard to replace). Attaching the flow diverter to your tap ◼... - Page 14 Installation Connect drain tubing to the elbow connector. Read Caution below. Caution ◼ The water drain hose MUST be less than 600mm long. Shorter is better. A longer drain hose will cause an increase in back pressure. This will cause the unit to produce lower concentrations of hydrogen and potentially cause it to fail.
-
Page 15: Installation Checklist
Installation Checklist How to check the water pressure and flow rate If the water pressure is too low or high, a warning buzzer will sound, when the ON/OFF valve is turned on. The warning buzzer will sound if the water flow is lower than 0.5 liters/min or higher than 3.5 liters/min. -
Page 16: How To Use The Higen 1
How to Use the Higen 1+ Once you touch the button, the LED lights will be turned on Hydrogen Ozone Water Water Ozone Water Level 1 Hydrogen Water (Not for drinking) Purified Water Level 2 Hydrogen Water Purified Level 3 Hydrogen Water Cleaning / Settings Clean/Set How to operate the Higen 1+... - Page 17 How to Use the Higen 1+ Once you turn the ON/OFF valve The optimized amount of flow is to the On position the water will 0.7-0.8 Liters per minute flow and the green LED lights (including Ozone water). will start blinking. The water flow can be DO NOT DRINK OZONE WATER controlled by the ON/OFF Valve.
-
Page 18: When To Change The Filter
When to Change the Filter LED filter lifetime indicator lights Water treatment capacity and service life of filter: ◼ Filter life time will be effected by the quality of the source water. Filter replacement time: ◼ Filter life is 3000 litres or 12 months. -
Page 19: How To Change The Filter
How to Change the Filter How to change the filter Turn off the water. Turn off the power to the unit and unplug it. Remove the filter cover by Gently tilt the filter forward. gently pushing down on the on the locking hock. - Page 20 How to Change the filter Disconnect the electric connection to Turn the filter 90° (¼ turn) the filter monitoring sensor (PCB) counter-clock-wise. Then pull located on the top of the water filter. the filter free. NOTE: DO NOT PULL ON THE WIRES. Please remove the plastic cover from the new filter.
- Page 21 How to Change the filter Reconnect the electric Gently push the filter into connector to the filter position (vertically inside the monitoring sensor (PCB). Please unit) refer to the above image, be Close the filter cover. Plug the careful with the electrical wire power in and open the valve when you push the filter back to flush water for 3-5 minutes.
-
Page 22: Summary Of Operation Notices
Summary of Operation and Notices ◼ When you use this product for the first time, run water through it for 3-5 minutes to remove any loose particles from the filter. ◼ If you do not use this product for more than two days, run water (flush) through it for 1-2 minutes before reusing. -
Page 23: Notices For Safety
◼ Keep the Higen 1+ unit out of direct sunlight and away from heat sources. To avoid impure water and the KYK unit malfunctioning ◼ Be sure to only supply clean, quality water to the Higen 1+ unit. Do not hook up directly to a lake, river, ionized water, groundwater, rain water, contaminated water, high mineral water, hard water and water contained with heavy metals, etc. -
Page 24: Product Specifications
- Filter expires by time (12 months) or capaci- indication ty, whichever comes first. Filter - Use KYK genuine filter only. KYK is not responsible for any damage caused by non-genuine filter use or user’s mis-use. Filter Change Filtering Material... - Page 25 Warranty Registration Terms of War- Purchased Retain proof of Two year parts and labour ranty date: purchase Name: Address: Customer Phone No.: Email address: Company: AlkaWay Contact Seller for warranty Email: info@alkaway.com.au queries Phone No.: 1800268469 Our company will pay for repair, labour and shipping for a two-year period on performance and operations.
- Page 26 Notes ________________________________________________________________ ________________________________________________________________ ________________________________________________________________ ________________________________________________________________ ________________________________________________________________ ________________________________________________________________ ________________________________________________________________ ________________________________________________________________ ________________________________________________________________ ________________________________________________________________ ________________________________________________________________ ________________________________________________________________ ________________________________________________________________ ________________________________________________________________ ________________________________________________________________ ________________________________________________________________ ________________________________________________________________ ________________________________________________________________...
- Page 27 Notes ________________________________________________________________ ________________________________________________________________ ________________________________________________________________ ________________________________________________________________ ________________________________________________________________ ________________________________________________________________ ________________________________________________________________ ________________________________________________________________ ________________________________________________________________ ________________________________________________________________ ________________________________________________________________ ________________________________________________________________ ________________________________________________________________ ________________________________________________________________ ________________________________________________________________ ________________________________________________________________ ________________________________________________________________ ________________________________________________________________...
- Page 28 KYK Co., Ltd promises to treat every customer fairly and respectfully with their health and happiness our number one priority. The head office address / Manufacturing Company #407~410 Sun-il technopia, 555 Dunchon road, Joongwon-Gu, Sungnam City, Kyunggi-Do, KOREA Made in Korea TEL.
Need help?
Do you have a question about the Higen1+ Premium and is the answer not in the manual?
Questions and answers