Table of Contents
Advertisement
Advertisement
Table of Contents

Related Manuals for Falcon FLO

Summary of Contents for Falcon FLO
- Page 1 ELECTRIC BIKE OWNER’S MANUAL...
-
Page 2: Table Of Contents
TABLE OF CONTENTS • About this manual 1. Why you should read this manual 2. Warning, Important safety information • Diagrams 1. Parts diagram with part names 2. Wiring diagram • Operating instructions 1. Important notices 2. Riding mode 3. Riding safely 4. - Page 3 TABLE OF CONTENTS • Maintenance and cleaning 24-26 • • Service & maintenance schedule 28-32 • Troubleshooting 33-37 • About seller and information card Please note, this is a basic overview of your new bike and its service requirements. For more detailed information please contact your retailer or e-mail; support@tgc.bike Page 3...
-
Page 4: About This Manual
ABOUT THIS MANUAL WHY YOU SHOULD READ THIS MANUAL This manual is written to help you to get the best performance, comfort, enjoyment and safety when riding your new E-bike. The manual describes specific care and maintenance procedures that help protect your warranty and ensure years of trouble free use. Please pay particular attention to the section on battery charging and maintenance. It is important for you to understand the features and operation of your new E-bike so that you can get maximum enjoyment with maximum safety. By reading this manual before you go on your first ride, you’ll know how to get the most from your new E-bike. -
Page 5: Warning, Important Safety Information
ABOUT THIS MANUAL IMPORTANT SAFETY INFORMATION Your E-Bike can provide many years of service, fun and fitness-if you take good care of it. Understand the features of your E-Bike and become aware of the challenges that you will meet on the road. There are many things you can do to protect yourself while riding. We will offer many recommendations and safety tips throughout this manual. The following are those we believe the most important. Always Wear A Helmet! Helmets significantly reduce the possibility and severity of head injuries. Always wear a helmet that complies with BS EN 1078:1997. - Page 6 ABOUT THIS MANUAL Ride Within Your Limits! Take it slow until you are familiar with conditions that you encounter. Be especially careful in wet conditions as traction can be greatly reduced and brakes less effective. Never ride faster than conditions warrant or beyond your riding abilities. Remember that alcohol, drugs, fatigue and inattention can significantly reduce your ability to make good judgments and ride safely. Keep Your E-Bike In Safe Condition Follow the inspection and maintenance guidelines beginning on page 25. Check critical safety equipment before each and every ride.
-
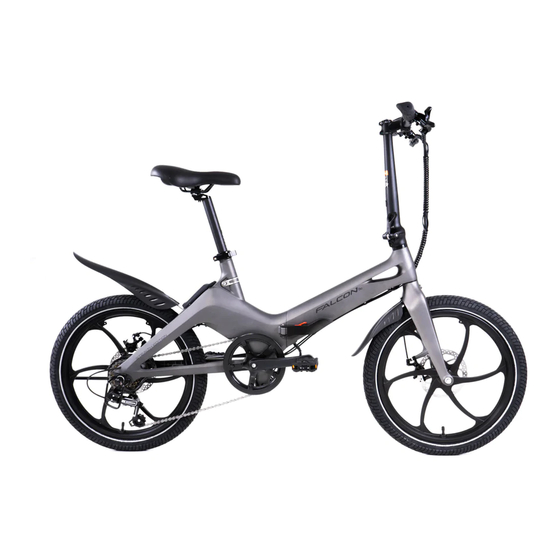
Page 7: Parts Diagram With Part Names
FOLDING E-BIKE DIAGRAM Handlebar Bike frame folder Brake lever Saddle Stem Safe lock Seat post Stem folder Seat post clamp Bike frame Front fork Motor Kickstand Rear Derailleur Disc brake rotor Pedal Chain wheel Chain wheel protection wheel Page 7... -
Page 8: Wiring Diagram
PACKING LIST Seat Post Charger Owners Manual Initial Use Always wear a helmet! This E-Bike is designed for urban use and should not be used for any serious off-roading Page 8... -
Page 9: Operating Instructions
OPERATING INSTRUCTIONS Please read and understand these instructions completely before operating your E-bike to prvent serious injury to yourself and others, and to prevent damage to the bike also. IMPORTANT NOTICES • Always recharge the battery immediately after each use. Failure to do so may damage the battery. •... -
Page 10: Riding Mode
RIDING METHOD Riding method Be familiar with all the component parts of the e-bike and test all the electric functions before riding. Make sure all the components of the bicycle are in good condition, the battery is charged and the tyres are correctly inflated. The detail operation as following: START UP: Your bike is supplied with a set of keys which are to lock your battery in place. They are not ignition keys. Once the battery is in place, turn the key to lock and remove when in use to avoid them falling out/being lost. -
Page 11: Riding Safely
RIDING SAFELY General Rules When riding, please follow the road laws as all other road vehicles, including giving way to pedestrains, stopping at rea lights and stop signs. For further information, contact the road traffic authority, police department or department of motor vehicles in your state. Ride predicatably and in a straight line. Never ride against traffic laws. Use correct hand signals to indicate turning or stopping. Ride defensively. To other use users, you may be hard to see. Concentrate on the path ahead. -
Page 12: Battery Charging
BATTERY CHARGING Battery charging When the ride is over or the battery is running out, charge battery immediately. This will help maximise it’s useable life. Charging methods can be divided into two kinds: 1. Take off the battery to charge (Fig.1) 2. Charge the E-bike directly (Fig.2) Fig.1 Fig.2 • Attach the charger connector to the bike and the AC connector to a 230V power source with the supplied UK plug. • There is an LED indicator on the battery charger unit. • The LED is red when the power is connected and the battery is charging. •... -
Page 13: Check The Battery Pack Before Using For The First Time
BATTERY CHARGING Check the battery Pack before using for the first time • The battery pack is applied partially charged.To ensure fully battery pack capacity,completely charge the battery pack overnight before using for the first time. • The distributor should charge the batteries as soon as receiving the e bike from supplier. Battery Care Even with proper care,rechargeable batteries do not last forever.Every time the battery is discharged and subsequently recharged.Its relative capacity decreases by a small percentage.You can maximize the life of your battery by following the... -
Page 14: Inserting, Removing, Locking The Battery
BATTERY CHARGING Inserting, unlocking and removing the battery: • To fit the battery simply press into place until you hear a click. Remove the key from the keyhole for safe keeping (Fig.1) • To remove the battery, insert key into keyhole and turn anti-clockwise into unlock position, the battery can now be removed (Fig.2) Please note: your keys are simply to lock your battery into place for security. They do not switch the power on and off. Fig.1 Fig.2 When installing battery, lock the battery with key and... -
Page 15: Pas (Pedal Assist System)
The bikes have an electric pedal assisted driving system. In EU countries, it is known legally as “PAS” cycle or Pedal Assisted System. The driving assisted system consists of a driving unit, a battery, a controller, and various electronic components (harness wires, sensors and switches). It is important to know that when the assistant system is turned on, the driving unit engages to provide power only while you are pedaling. - Page 16 PEDAL ASSIST SYSTEM Battery percentage Battery level + button Speed M button - button Speed mode Button functions: Speed modes: Icons’ meaning: M: The multifunctional button, long Indicates the front light is o n Speed mode 0 : no assistance , pure pedaling mode press for 3 seconds to switch on/ Indicates the brake is working off; short press to switch the display...
-
Page 17: Fitting Pedals
FITTING PEDALS Pedal installation Pedals are a pair with “R” & “L” (Fig.1), “R” for right, “L” for left. Tighten the pedals with the directive turnings (Fig.2). Fig.1 Fig.2 NON-DRIVE SIDE DRIVE SIDE ANTI-CLOCKWISE CLOCKWISE Page 17... -
Page 18: Folding Instructions
FOLDING INSTRUCTIONS How to fold the bike (Only for folding bike) 1. Unlock the handlebar quick release lever (Fig.1(A)) and push down down the handlebar to the lowest position, then lock the handlebar quick release lever. 2. Unlock the handlebar quick release lever (Fig.2(A)) and rollover The handle bar. -
Page 19: Shifter
SHIFTER Your E-Bike is equipped with a Shimano drivetrain, with multiple gears. This consists of: • A rear sprocket called a freewheel • A rear derailleur • Handlebar shifter (Revoshift or Thumbshift; Fig.2) There are many different types of shifter mechanisms, each preferred for specific applications because of its ergonomic, performance and price characteristics. A downshift is a shift to a lower or lower gear, one which is easier to pedal. An Fig.1 upshift is a shift to a higher or faster gear, one which is harder to pedal. -
Page 20: Derailleur System
DERAILEUR SYSTEM Derailleur System The derailleur system includes a rear derailleur, the shift levers, and the derailleur control cables, all of which must function properly for smooth gear shifting to occur. Rear Derailleur Begin by shifting the rear shifter to largest number indicated, loosen the cable from the rear derailleur cable anchor bolt, and place the chain on the smallest sprocket. -
Page 21: Unfolding The Bike
UNFOLDING THE BIKE Fig.1 Fig.2 Hold the bike firmly, release locking mechanism and To unfold frame, position frame as pictured and fold press the large lever flush against the frame and ensure lock is engaged √ Fig.3 Ensure fastener is as pictured above Page 21... -
Page 22: Saddle Position
SADDLE POSITION Saddle position Correct saddle adjustment is an important factor to get the best performance and comfort from your E-Bike. Up and down adjustment: Your leg length determines the correct saddle height. The saddle is at the correct height if you can just reach the “down” pedal with one heel when you are seated on the saddle and the crank arms are parallel to the seat tube. To check for correct saddle height, perform the following: 1. - Page 23 SADDLE POSITION 4.Seat post assembling Fig.1 Fig.2 Loosen the seat post clamp, keep the bike Adjust the screw (Fig.2) until tight, then press in steady, insert the seat post in the frame lever (Fig.1) until flush with clamp 5.Adjustment of saddle height Height limit screw Safety height limit line Fig.3...
- Page 24 MAINTENANCE AND CLEANING NOTE: Technological advances have made the E-Bike and the components more complex than ever before.And the pace of innovation is increasing.This on-going evolution makes it impossible for this manual to provide all the information required to properly repair and/or maintain your E-Bike.In order to help minimize the chances of an accident and possible injury,it is recommended that you have any repair or maintenance performed by your local cycle store. Equally important is that your individual maintenance requirements will be determined by everything from your riding style to geographic location.Consult your dealer for help in determining your maintenance requirements.How much of your E-Bike service and maintenance you can do yourself depends upon your level of skill,experience,and special tool availa-...
- Page 25 MAINTENANCE AND CLEANING INSPECTION AND MAINTENANCE For your safety and enjoyment and to insure a long life for your E-Bike,inspect and maintain your E-Bike regularly.Use the table below for guidance.It is very important that you check certain systems and components before each and every ride.The proper condition and function of these systems is critically important for your safety.
- Page 26 MAINTENANCE AND CLEANING Battery Storage • When storing your batteries for a long period of time: • Charge your batteries every 30 days to avoid capacity loss.Batteries slowly self-discharge when left unused for a long period of time;if the battery cells are allowed to reach a critically low voltage,their lifespan and capacity will be perma- nently reduced. • Always disconnect your charge from the wall outlet and battery before storing the battery. •...
- Page 27 Q: Is it normal that the batteries get warm when recharging? A: Yes,it is normal that the batteries will become warm to the touch during the recharging process.This is because the increase of internal resistance and less energy conversion efficiency from electric energy to chemical energy. Q: How long will my batteries last before needing replacement? A: Average battery life depends on use and conditions.Even with proper care,rechargeable batteries do not last forever.
- Page 28 SERVICE & MAINTENANCE SCHEDULE Some service and maintenance can and should be performed by the owner,and requires no special tools or knowledge beyond what is presented in this manual. The following are examples of the type of service you should perform yourself. All other service,maintenance and repair should be performed in a properly equipped facility by a qualified E-Bike mechanic using the correct tools and proce- dures specified by the manufacturer.
- Page 29 SERVICE & MAINTENANCE SCHEDULE After every long or hard ride or after every 10 to 20 hours of riding: • Squeeze the front brake and rock the E-Bike forward and back. Does everything feel solid? If you feel a clunk with each forward or backward movement of the E-Bike,you probably have a loose headset. • Lift the front wheel off the ground and swing it from side. Feel smooth? If you feel any binding or roughness in the steering,you may have a tight headset. Have your dealer check it. •...
- Page 30 SERVICE & MAINTENANCE SCHEDULE Either patch the tube (Follow the instructions in your patch kit),or use a new tube. Reinstall the tire and tube. Slip one tyre bead over the rim. Insert the tube valve through its hole in the rim. Feed the tube carefully into the cavity of the tyre. Inflate the tube just enough to give it some shape. Starting at the valve stem use your thumbs to seat the tire bead inside the rim.
- Page 31 SERVICE & MAINTENANCE SCHEDULE Twist the broken spoke around the spoke next to it keep if from flopping around and getting caught between the wheel and the frame. Spin the wheel to see if the rim clears the brake pads. If the wheel will not turn because it is rubbing against a brake pad,try turning the brake cable adjusting barrel(s) clockwise to slacken the cable and open up the brakes. If the wheel still won’t turn,open the brake’s quick release and secure any loose as best you can. Walk the E-Bike,or if you must,ride it with extreme caution,because you now have only one working brake.
- Page 32 SERVICE & MAINTENANCE SCHEDULE Storage Keep your bicycle in a dry location which is away from the weather and sun. Direct sunlight may cause paint to fade or rubber and plastic parts to crack. Before storing your bicycle for along period of time,clean and lubricate all components and polish the frame. Deflate the tires to half pressure and hang the bicycle off the ground. Charge your batteries and make sure they are protected from water. Batteries should be charged every 30 days to avoid capacity loss. Don’t cover the bicycle with plastic as damp / condensation will result and it may cause rusting. Please notice that your bicycle warranty does not cover paint damage (except as outlined in the warranty section of this manual), rust, corrosion, or theft.
- Page 33 TROUBLESHOOTING PROBLEM POSSIBLE CAUSE SOLUTION Gear shifter not working properly Page 33...
- Page 34 TROUBLESHOOTING PROBLEM POSSIBLE CAUSE SOLUTION Page 34...
- Page 35 TROUBLESHOOTING PROBLEM POSSIBLE CAUSE SOLUTION Page 35...
- Page 36 TROUBLESHOOTING PROBLEM POSSIBLE CAUSE SOLUTION Page 36...
- Page 37 TROUBLESHOOTING PROBLEM POSSIBLE CAUSE SOLUTION Page 37...
- Page 38 INFORMATION CARD & ABOUT THE SELLER Purchase record card Your new bicycle is supplied by: Fill in immediately and retain as a record of your purchase: MV Sports & Leisure Ltd * Please retain your sales receipt for any possible warranty claims 35 Tameside Drive Castle Bromwich Your name:...
- Page 39 NOTES...
- Page 40 Tandem Group PLC 35 Tameside Drive, Birmingham, West Midlands, B35 7AG...
Need help?
Do you have a question about the FLO and is the answer not in the manual?
Questions and answers
how do you access and remove the controller
How do i change a faulty controller on Falcon Flo foldable e-bike