Advertisement
Quick Links
Advertisement

Related Manuals for Futura EG2

Summary of Contents for Futura EG2
- Page 1 E G 2 Ma c h i n e C o n t r o l S y s t e m...
- Page 2 Table of Contents System Description ..................1 System Components ..................2 Control Box Controls and Connections ............3 - 4 Menu Instructions & Display Screens ............5 - 9 Valve Set-up ....................7 - 10 System Options .....................11 System Installation ..................12 Cable and Wiring Installation ...............12 - 14 System Description The EconoGrade Machine Control Systems were designed to let you achieve maximum control of your grading system, at an economical price.
-
Page 3: System Components
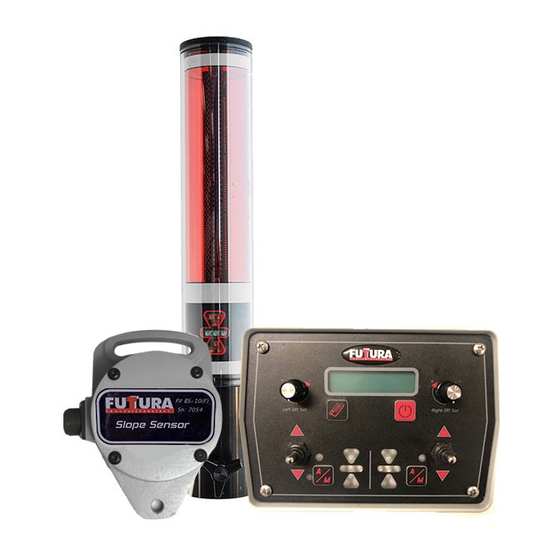
System Components Control System Control Box P# CB-EG2 (F) Receiver Slope Sensor P# BS-10(F) P# RC-EG1(F) Optional Telescoping Mechanical Mast P# EG-Mast(F) Cable Set Power Cable P# 102198 Com. Node Cable P# 102765 Receiver cable Valve cable P# 102440 P# 102196... - Page 4 EG Series Control Box Controls (fig 1) 1) Left On-grade Offset - 12) Right On-grade Offset - These knobs control the offset of the on-grade of each receiver. They allow the operator to move the on-grade position of each receiver up or down by 54mm (2.13 inches) 2) Menu Button - These keys are used to step through the menus to setup all of the controls in the system.
- Page 5 6) Left LED Grade Display - 7) Right LED Grade Display - These LED’s display whether you are above grade, below grade or on grade. The red arrows tell the user which direction the blade must move to achieve grade, while the single up or down red LED will flash when the receiver is within 10mm (0.39”) of the desired grade.
- Page 6 EG Series Control Box Display Screens and Menus Splash Screen -The EG Series has many menu screens for setting the system parameters. The first to show up after pow- E G- 2 e Co n tro l er up is the splash screen displaying system type and version. The version and version date may change as features and ver 9 27 Jan 2020 program modifications are implemented.
- Page 7 System Lockout Screen - When entering the menu screens, if there is a lockout code enabled this screen will appear. You P as s | E F F F | 0 0 0 0 must enter the system password to be able to go any further ->...
-
Page 8: Valve Settings
Valve Settings Valve1 Types (Left Side) - EG Series can control proportional time (‘bang-bang’) valves, proportional valves with integrated electronics (Danfoss), Selective Control Valve (SCV) and propor- tional current (variable flow) valves. There are three Proportional current settings: 50 Hz., 100 Hz., and 200 Hz.; Consult the valve manufacturer to find the proper type and dither frequency for your Val v e1 ty p e valve. - Page 9 Note: that either the “Stop” button, or the Power button will turn off the valve drive, and return you to the Minimum PW window. Also, the valve will shut off automatically after 20 seconds without any buttons being pushed. Valve Cycle Time - This screen will only be displayed as part V al v e c y c le ti me...
- Page 10 Derivative Gain - To stabilize some machine control applica- D eri v a t i v e g a i n tions, it is necessary for the control box to know not only whether the machine is at the desired slope or not, but how fast the slope Medium Next is changing and in what direction.
- Page 11 Factory Settings: All of the EG Series variables can be re- stored to their default values by pushing the Restore button. F ac t or y s e ttin g s The values saved will be: Restore Next Filtering --I--- On-grade dead band 10mm Horn...
- Page 12 EG Series Remote Switch Assy: This enables you to switch your EG2 from auto to manual mode, or raise and lower the valves from the lever in your cab. The switch on the bottom changes the EG Series between Automatic and Manual mode. The switches on the top raise and lower the valves.
- Page 13 The control box can now be adjusted for optimal viewing. Receiver: The receiver can be mounted with any 1 3/4” pipe or with the optional EG2 Manual Mast. It should be mounted so that the receiver can receive a laser hit from 360˚.
- Page 14 Page 13...
- Page 15 Page 14...
- Page 17 Notes...
-
Page 18: Warranty
Warranty This EG Series system is warranted to the original purchaser to be free from defects in workmanship and material. Inteq Distributors will repair or replace any defective part which may malfunction under normal and proper use within a period of ONE YEAR from the date of purchase without charge for parts and labour, once delivered and shipped prepaid to Inteq Distributors together with proof of date and place of purchase.
Need help?
Do you have a question about the EG2 and is the answer not in the manual?
Questions and answers