Table of Contents
Advertisement
Quick Links
Advertisement
Table of Contents

Summary of Contents for Silex technology ST-700
- Page 1 ST-700 User's Manual...
- Page 2 Copyright© 2021 Silex Technology, Inc. All rights reserved. WA106960XX...
-
Page 3: Table Of Contents
Index 1. Introduction ................1 1-1. Introduction ............................2 1-1-1. Introduction ...........................2 About the Notation ..........................2 Disclaimers ..............................2 Trademarks .............................2 1-1-2. Glossary ............................3 1-1-3. Notes on Use ..........................3 1-2. Safety Instructions ..........................4 1-3. Product Information and Customer Services ................8 Product Information ..........................8 Customer Support Center .........................8 2. - Page 4 3-4. Bulk Setup ............................37 3-4-1. Creating Configuration File ....................37 3-4-2. Configuring ST-700 in Bulk ....................40 3-5. Setup Using ST-700 Web Page ...................... 46 3-5-1. Connecting ST-700 to PC ......................46 3-5-2. ST-700 Web Page ........................46 How to Access the Web Page ......................46 Web Page Structure ..........................
- Page 5 6. Security Functions ..............67 6-1. Password Setting ..........................68 6-2. Device Access Permission ....................... 70 6-2-1. Allowing Wireless LAN Devices to Connect to ST-700 ..........70 6-2-2. Allowing Wired LAN Devices to Connect to ST-700 ............73 7. Maintenance Functions ............75 7-1.
- Page 6 A-2-4. Wired LAN ..........................111 A-2-5. Time Configuration ........................112 A-3. Security Setting Items ........................114 A-3-1. Password ............................114 A-4. Video/Audio Setting Items ......................115 A-4-1. Video ............................115 A-4-2. Audio ............................115 A-4-3. Monitor synchronization ......................116 A-5. Broadcast Setting Items ........................117 A-5-1. Movie............................117 A-6. Device Management Setting Items ..................118 A-6-1.
-
Page 7: Introduction
1. Introduction Introduction Thank you for purchasing the ST-700. -
Page 8: Introduction
700. Be sure to carefully review before using ST-700. : This symbol indicates important information that needs to be observed when operating ST-700. Make sure to read this information for safe and proper use. : This symbol indicates information that is useful when using ST-700. If you experience difficulties operating ST-700, please refer to this information first. -
Page 9: Glossary
This section provides a glossary of terms used in this manual. Refer to the following terms as you read this manual. Content Files which ST-700 shows and plays such as videos, images, closed captions, HTML, and audio. Layer An area that shows content. There are two layer formats: one shows content on a single layer without splitting the screen of a monitor, and the other divides the screen into multiple layers and shows content on each of them. -
Page 10: Safety Instructions
ST-700 User's Manual 1-2. Safety Instructions This page provides the safety instructions for safe use of ST-700. To ensure safe and proper use, please read the following information carefully before using ST-700. <Indication of the warning> "Warning" indicates the existence of a hazard that... - Page 11 1. Introduction Caution - Do not use or store the product under the following conditions. It may cause malfunction. - Locations subject to vibration or shock - Shaky, uneven or tilted surfaces - Locations exposed to direct sunlight - Humid or dusty places - Wet places (kitchen, bathroom, etc.) - Near a heater or stove - Locations subject to extreme changes in temperature...
- Page 12 ST-700 User's Manual <Handling of malfunctioned units> Warning - In the following cases, turn off the connected devices and unplug the AC plug of the product from a power outlet. Failure to follow these instructions may cause fire or an electrical shock.
- Page 13 1. Introduction <Use of AC adaptor and AC cord> Warning - Do not place any objects on top of AC adaptor, and do not cover it up with anything. Also, do not use the AC adaptor on top of the heat/moisture retaining materials (carpet, sponge, cardboard, styrofoam, etc.).
-
Page 14: Product Information And Customer Services
Customer Support Center. Contact Information support@silexamerica.com Europe support@silexeurope.com - Refer to the Silex Technology's website ( https://www.silextechnology.com/ ) for the latest FAQ and product information. Note... -
Page 15: Product Specifications
2. Product Specifications Product Specifications... -
Page 16: Features
ST-700 HDMI Cable HDMI Cable - This is just an example. You can confi gure a system to broadcast programs without connecting ST-700 to your network environment. For more details, see 4-3. Installing ST-700 without NTP Server. Note 2-1-2. Features ST-700 has the following features. -
Page 17: Used Tools
- AMC Manager® Free allows up to 10 devices to be configured at once. - To use AMC Manager® (non-free license), you need to purchase a license key. - Please contact Silex Technology, Inc. to purchase the license key. For the contact information, see 1-3. Product Information and Customer Services. -
Page 18: Sx Sign Control Software
ST-700 User's Manual SX Sign Control Software SX Sign Control Software is content management software that creates programs for ST-700. The software can create programs, set up play schedules, and distribute programs to multiple units of ST- 700 in a network. -
Page 19: Parts And Functions
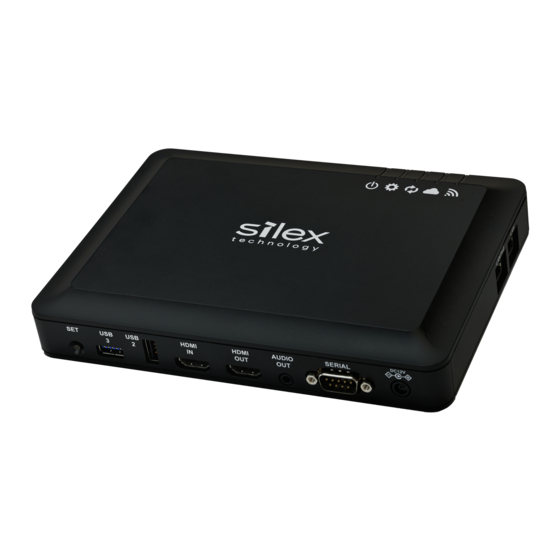
2. Product Specifications 2-2. Parts and Functions This chapter describes names and functions of ST-700 parts. (1) POWER LED Color Light Description ST-700 is powered on. Green Blink The USB file link function is operating. Orange Blink The USB file link function has been completed. (1,000-millisecond cycle) Factory reset (When the RESET switch is pushed for a long time while ST-700 is booting.) - Page 20 This is not used. (5) WLAN LED Color Light Description ST-700 is operating in Access Point mode or is making wireless connection in Station mode in 2.4 GHz. Green Blink ST-700 is operating in Access Point mode or is making wireless connection in Station mode in 5 GHz.
- Page 21 2. Product Specifications E/A : XXXXXXXXXXXX (6) Product Label Shows MAC address of ST-700 (E/A: XXXXXXXXXXXX). Example) MAC address 84:25:3F:00:11:22 is written as E/A: 84253F001122...
- Page 22 (12) (13) (14) (7) SET switch (SET) Push to remove a USB storage from ST-700. (8) USB 3.0 Port (USB 3) USB 3.0 port. (9) USB 2.0 Port (USB 2) Connect to an HID device or a small storage to change programs.
- Page 23 (18) LAN Port 2 (LAN/PoE) Connect a LAN cable. This can be connected to a hub supporting PoE+ power feeding. - If you are using ST-700 (EU), only the AC adapter can be used. (19) LINK LED 1000BASE Link Status:...
-
Page 24: Specifications
ST-700 User's Manual 2-3. Specifications 2-3-1. Hardware Specifications 2 ports: 100Base-TX/1000Base-T Auto-MDI/MDI-X Wired LAN Interface Note: One is PoE+ (IEEE802.3at) power supply port. Wireless LAN Interface IEEE 802.11a/b/g/n/ac (US) 2.4 GHz: Ch1 - Ch11 5 GHz: (W52) 36,40,44,48 (W53) 52,56,60,64... - Page 25 Humidity: 20%RH to 90%RH (No condensation) Temperature: -10 °C to +50 °C Storage Condition Humidity: 20%RH to 90%RH (No condensation) Regulatory Compliance VCCI Class-A / FCC Class A / CE - If you are using ST-700 (EU), only the AC adapter can be used.
- Page 26 ST-700 User's Manual FCC Notice ST-700 Contains FCC ID : N6C-SDMAC Fcc Rules Part 15 FCC CAUTION Changes or modifications not expressly approved by the party responsible for compliance could void the user's authority to operate the equipment. FCC Rules, Part 15 §15.19(a)(3) This device complies with part 15 of the FCC Rules.
- Page 27 2. Product Specifications CE Notice...
-
Page 28: Software Specifications
HTTP (TCP #80) / HTTPS (TCP #443) NTP (UDP #123) Application layer SNMP (UDP #161) Syslog (UDP#514) SXSMP Original time synchronization protocol Microsoft Edge Recommended Web Browsers for ST-700 Internet Explorer 11 or later Web pages Google Chrome Firefox 2.0.0 or later... - Page 29 2. Product Specifications H.264 License THIS PRODUCT IS LICENSED UNDER THE AVC PATENT PORTFOLIO LICENSE FOR THE PERSONAL USE OF A CONSUMER OR OTHER USES IN WHICH IT DOES NOT RECEIVE REMUNERATION TO (i) ENCODE VIDEO IN COMPLIANCE WITH THE AVC STANDARD ("AVC VIDEO") AND/OR (ii) DECODE AVC VIDEO THAT WAS ENCODED BY A CONSUMER ENGAGED IN A PERSONAL ACTIVITY AND/OR WAS OBTAINED FROM A VIDEO PROVIDER LICENSED TO PROVIDE AVC VIDEO.
-
Page 30: Video/Audio Specifications
ST-700 User's Manual 2-3-3. Video/Audio Specifications ST-700 supports HDMI 1.4b for video/audio output. HDMI CEC and HDCP are not supported. The following sections show supported resolutions and audio specifications. Video/Audio Specifications Resolutions Resolution Aspect Ratio Refresh Rate 3840 x 2160 (2160p) - Page 31 2. Product Specifications Still Image Format Extension .bmp .jpg JPEG .jpeg .jpe .png Audio Format Extension .aac HTML Format Extension .htm HTML .html - HTML does not support non-split screen programs. Note...
-
Page 32: Power Supply
- Use the AC adapter. - Use a LAN cable. ST-700 can receive power from a power supply device conforming to IEEE 802.3at via a LAN cable. For more details, see instruction manuals of power supply devices such as hubs with PoE+ power supply function (PoE hub). - Page 33 Connect to LAN/PoE on the left. PoE HUB LAN/PoE ST-700 LAN Cable - If you are using ST-700 (EU), only the AC adapter can be used. Sample Connection 3: When using a PoE+ power supply unit Electrical Outlet Connect to LAN/PoE on the left LAN/PoE...
-
Page 34: Usage Notes
- Specified low power radio station (A non-licensed radio station) The above equipment uses the same radio frequency band as ones used in wireless LANs. Radio interference can occur if ST-700 is used near these devices. This can result in a communication failure or slower communication speed. -
Page 35: Radio Security
When wireless products are used after the security settings are configured, these problems barely occur. You should fully understand the risk of using ST-700 without setting the security. It is recommended that you set the security at your own discretion and responsibility before using ST-700. -
Page 36: Restrictions
ST-700 User's Manual 2-6. Restrictions ST-700 has the following restrictions. - The performance of Resolution Auto or 3840 x 2160 is not guaranteed to play a split-screen program. Set the resolution to 1920 x 1080 or less to play a split-screen program. -
Page 37: Settings And Installation
3. ST-700 Settings and Installation ST-700 Settings and Installation... -
Page 38: Settings
The same file can be used when the similar configuration is required. Use ST-700's web page. Access the web page to configure ST-700. If you know the IP address, you can use your PC without AMC Manager®. - When you use AMC Manager Free, up to 10 devices can be configured at once. -
Page 39: Downloading Application Software
3. ST-700 Settings and Installation 3-2. Downloading Application Software This section describes how to download AMC Manager® from Silex's web site to use for ST-700 setting. Access the Silex Technology's website (https://www.silextechnology.com/). When the website is displayed, click Support from the top menu. -
Page 40: Individual Setup
AC Adapter LAN Cable - Assign IP address that can communicate with ST-700 to the PC (to use for the setup). To make the initial settings, choose Obtain an IP address automatically for the IP address of the PC. - When you set up ST-700 in a network without DHCP server, specify a link-local address (169.254.xxx.xxx) for the IP address of the PC. - Page 41 - Network Configuration - Time Zone (Region/City) - Choose Enable for NTP client. - You need NTP server to play programs with ST-700. When there is no NTP server, specify the IP address Note of PC with SX Sign Control Software. After SX Sign Control Software is installed, the PC will work as NTP server.
- Page 42 After changing the setting items to apply, tick Restart the device after this configuration (1) at the bottom and click Execute (2). ST-700 will restart and the new settings will take effect. Click Close on the following window. The individual setup is now completed.
-
Page 43: Bulk Setup
You need to get the setting information of one ST-700 unit to create the confi guration fi le. Connect your PC (to use for the setup) to ST-700 to get the setting information using a LAN cable, and power on ST-700 (1 - 3). - Page 44 - Network Configuration - Time Zone (Region/City) - Choose Enable for NTP client. - You need NTP server to play programs with ST-700. When there is no NTP server, specify the IP address Note of PC with SX Sign Control Software. After SX Sign Control Software is installed, the PC will work as NTP server.
- Page 45 In the save dialog for the configuration file, give any file name and save it. After the configuration file is saved, the window in Step 3 will appear. To create the configuration files for multiple ST-700, repeat Step 3 through Step 5 to create as many configuration files as you need.
-
Page 46: Configuring St-700 In Bulk
- When you use AMC Manager Free, up to 10 devices can be confi gured at once. To obtain and set IP addresses in bulk using AMC Manager® function, the IP address of the PC needs to be changed temporarily. Set an IP address that can communicate with ST-700 to the PC. Setting Example) - Page 47 3. ST-700 Settings and Installation Run AMC Manager® on the PC. Select ST-700 units (multiple choices allowed) to configure in bulk (1) and click the Configure multiple devices in bulk icon ( ) (2). The bulk configuration window will be displayed.
- Page 48 Repeat Step 4 through Step 5 to specify the configuration file for each ST-700. After specifying the configuration file for all the ST-700 units (1), click IP Configuration (2). When IP addresses are obtained from DHCP server, skip this step and go to Step 10.
- Page 49 3. ST-700 Settings and Installation In the IP Address Configuration window, specify the range of IP addresses for ST-700. (1) When finished, click OK. (2). - When you assign IP addresses to 3 devices with the above setting, the Start IP Address "172.25.72.100"...
- Page 50 Tick ST-700 to configure in bulk and the check box of Restart the device after this configuration (1), and click Configure Now (2). - When a password has been set to ST-700, the dialog below will show up. Enter the password and click OK. Note...
- Page 51 - If the status field does not show Completed as the result of bulk configuration, check what was wrong. Change the configuration file and make the bulk configuration again. After ST-700 is updated with the specified configuration file, ST-700 will restart automatically. The new settings will take effect after the restart.
-
Page 52: Setup Using St-700 Web Page
3-5. Setup Using ST-700 Web Page 3-5-1. Connecting ST-700 to PC See Step 1 in 3-3. Individual Setup or Step 2 in 3-4-2. Configuring ST-700 in Bulk to connect ST-700 and your PC to configure devices. 3-5-2. ST-700 Web Page How to Access the Web Page Access the web page using the IP address set to ST-700. - Page 53 The login password configuration page is displayed. Enter the password to configure for ST-700 and click Submit. - The login password configuration window is displayed only when ST-700 is configured for the first time. Note The web page shows up.
-
Page 54: Web Page Structure
ST-700 User's Manual Web Page Structure After login, you can change ST-700 settings from the web pages. The following image shows the page structure for each configuration page. (1) Menu Shows the links to each configuration page. (2) Tab Appears when several pages are prepared to display the settings. If you click the tab, the content will be changed. - Page 55 You may need to scroll down to see the button in some pages. - To use ST-700 connecting to a public network, make sure you change the password. - The communication band of IEEE 802.11b/g or IEEE 802.11n/b/g is often occupied due to widespread of wireless devices, and ST-700 may not be able to secure communication band enough for transmission.
- Page 56 Serial Control Sets the serial monitor control function. Maintenance Item Outline Restart Restarts ST-700. Factory Default Resets ST-700 back to the factory default settings. Firmware Update Updates the firmware. silex Global Site Shows Silex Technology's web site. Logout Item Outline Logout Logs out from the configuration page and shows the login page.
-
Page 57: Configuring St-700 In Web Page
3. ST-700 Settings and Installation 3-5-3. Configuring ST-700 in Web Page See How to Access the Web Page in 3-5-2. ST-700 Web Page to access the web page. Select the configuration page from the menu or tab, and enter the setting values. - Page 58 To continue changing settings, select the configuration page from the menu or the tab. When you finish all the necessary changes, click Restart. ST-700 will restart. A progress bar will be displayed while the ST-700 restart process continues. When the progress bar reaches the right edge, the restart is completed. Close the web browser.
-
Page 59: Installation
4. Installation Installation... -
Page 60: Installation Procedure
- Install ST-700 by establishing a network with a PC without NTP server. Either way, ST-700 has to get the time from NTP server to play the programs. When NTP server is running in the network, see 4-2. Installing ST-700 in NTP Server Network to install ST-700. -
Page 61: Installing St-700 Without Ntp Server
4-3. Installing ST-700 without NTP Server When there is no NTP server in your network or when you install ST-700 and a display without connecting to your network, connect PC with SX Sign Control Software installed to the network. After SX Sign Control Software is installed, the PC will act as NTP server. - Page 62 ST-700 User's Manual (Blank page)
-
Page 63: Program Broadcasting
5. Program Broadcasting Program Broadcasting... -
Page 64: Program Playback Procedure
ST-700. This chapter describes how to play programs. 5-1-1. Creating Programs Create programs with SX Sign Control Software and import the data to ST-700. For details on how to create programs, see SX Sign Control Software User's Manual. -
Page 65: Use Usb Storage
5. Program Broadcasting Use USB Storage ST-700 can import Schedule from a USB storage attached to the USB port. To do so, export Schedule from SX Sign Control Software beforehand. For more details, refer to SX Sign Control Software User's Manual. -
Page 66: Program Playback Error
- ST-700 correctly receives the time from NTP server. - A program is set to the current time schedule. - You can check the communication status with NTP server on ST-700's web page. See 7-1-4. How to Check Playing Status. -
Page 67: Synchronizing Multiple Screen Content
- The monitor synchronization function has been enabled under the factory default settings. Note Access the web page and click Monitor synchronization on the menu. - See How to Access the Web Page in 3-5-2. ST-700 Web Page to access the web page with your web browser. Note... - Page 68 The new setting will take effect after ST-700 is restarted. Click Restart to restart ST-700. - To continue updating settings in other pages, wait restarting ST-700 until all updates are done. Note After the restart, the login page appears. The monitor synchronization function has been configured.
-
Page 69: Controlling Monitor From Serial Port
Here is how to use the serial control function. Access the web page, and click Serial Control on the menu. - See How to Access the Web Page in 3-5-2. ST-700 Web Page to access the web page with your web browser. Note... - Page 70 ST-700 User's Manual Change Serial Monitor Control to ENABLE on the Serial Control page. Change the serial port settings of ST-700. Change the settings so that ST-700 can communicate with the serial port of a connected monitor.
- Page 71 5. Program Broadcasting Change character strings to send to the serial port and the output time (1), and click Submit (2). - You can set a different character string and a time to Control1 and Control2. - Up to 40 alphanumeric characters can be entered in Control string. Note - The following table shows special characters including control codes.
- Page 72 - To continue updating settings in other pages, wait restarting ST-700 until all updates are done. Note After the restart, the login page appears. When ST-700 obtains the correct time from NTP server, it will send Control string from the serial port at the specified time.
-
Page 73: Security Functions
6. Security Functions Security Functions... -
Page 74: Password Setting
ST-700 User's Manual 6-1. Password Setting Use a web browser to access the web page. - See How to Access the Web Page in 3-5-2. ST-700 Web Page to access the web page with your web browser. Note Click Password on the menu. - Page 75 The setting is saved and restart appears. The new setting will take effect after ST-700 restarts. Click Restart. - To continue updating settings in other pages, wait restarting ST-700 until all updates are done. Note After the restart, the login page appears.
-
Page 76: Device Access Permission
- Check MAC addresses of the wireless LAN devices beforehand. Access the web page and click Wireless LAN(AP) on the menu. - See How to Access the Web Page in 3-5-2. ST-700 Web Page to access the web page with your web browser. Note... - Page 77 6. Security Functions Select the Filer Type under MAC Address Filter Configuration. - DISABLE: Allows connections from all the wireless LAN devices. - ALLOW: Accepts connections from only the registered wireless LAN devices. - DENY: Blocks connections from the registered wireless LAN devices. Enter the MAC address of the wireless LAN device in the MAC address input box, and click Add.
- Page 78 After the setting, the restart page shows up. The new settings will take effect after ST-700 is restarted. Click Restart. - To continue updating settings in other pages, wait restarting ST-700 until all updates are done. Note After the restart, the login page appears.
-
Page 79: Allowing Wired Lan Devices To Connect To St-700
- Check MAC addresses of the wired LAN devices beforehand. Access the web page and click Wired LAN on the menu. - See How to Access the Web Page in 3-5-2. ST-700 Web Page to access the web page with your web browser. Note The Wired LAN page appears. - Page 80 After the setting, the restart page shows up. The new settings will take effect after ST-700 is restarted. Click Restart. - To continue updating settings in other pages, wait restarting ST-700 until all updates are done. Note After the restart, the login page appears.
-
Page 81: Maintenance Functions
7. Maintenance Functions Maintenance Functions... -
Page 82: Status Checking
ST-700 User's Manual 7-1. Status Checking Use a web browser to access the web page. - See How to Access the Web Page in 3-5-2. ST-700 Web Page to access the web page with your web browser. Note Click the status page on the menu System Shows the network status such as TCP/IP. -
Page 83: How To Check System Status
7. Maintenance Functions 7-1-1. How to Check System Status This page shows the network status of ST-700 including TCP/IP. Product Information Item Outline Product Name Name of the product: ST-700 Version Firmware version of the product TCP/IP Information Item Outline... -
Page 84: How To Check Network Status
ST-700 User's Manual 7-1-2. How to Check Network Status This page shows the wireless LAN connection status of ST-700 when the network mode is Access Point or Station. Wireless LAN Common Configuration The following information is shown when the network mode is Access Point. - Page 85 7. Maintenance Functions Wireless LAN Configuration Item Outline SSID SSID in use Network Authentication Authentication method in use Shows ON/OFF about encryption with WEP key. This is shown when the network authentication is Open or Shared. Encryption Mode Encryption method in use...
-
Page 86: How To Check Video/Audio Status
ST-700 User's Manual 7-1-3. How to Check Video/Audio Status Video Information Item Outline Shows the current screen resolution. Monitor resolution It will show nothing when no monitor is connected. Shows the name of a monitor in EDID. Monitor name It will show nothing when no monitor is connected. -
Page 87: How To Check Playing Status
The start time is set to 0:00 on January 1, 2019. Example) 2019/01/01 00:00:34 (UTC+9:00) Shows the period of summer time (daylight saving time) of Summer time the year. Name of content now playing Content This is displayed when ST-700 is playing a non-splitting screen program. - Page 88 ST-700 User's Manual Storage Item Outline Capacity Maximum capacity which the user can use Free space Free space available for the user...
-
Page 89: Exporting Syslog Of St-700
This chapter describes how to export logs to Syslog server. Use a web browser to access the web page. - See How to Access the Web Page in 3-5-2. ST-700 Web Page to access the web page with your web browser. - Page 90 : Log message Output Example (1) <6>kernel: [1173.959511] wlan: [3438:E :HDD] received scan request Output Example (2) <78>CROND[4347]: (root) CMD (/usr/sbin/logrotate /etc/logrotate.conf ) - When ST-700 is not communicating with Syslog server, log messages cannot be sent to the Syslog server. Note...
-
Page 91: Restart
- To use AMC Manager®, see AMC Manager® User's Manual. Note 7-3-1. Hardware Reboot This section describes how to restart ST-700 with its system alone. Unplug and plug the power code back into the electrical outlet. (1), (2) Electrical Outlet... -
Page 92: Restart From Web Page
ST-700 User's Manual 7-3-2. Restart from Web Page Use a web browser to access the web page. - See How to Access the Web Page in 3-5-2. ST-700 Web Page to access the web page with your web browser. Note Click Restart on the menu. -
Page 93: Factory Reset
3) AMC Manager® - To use AMC Manager®, see AMC Manager® User's Manual. Note 7-4-1. Reset Switch This section describes a factory reset using ST-700's RESET switch. Unplug the AC adapter from the electrical outlet Electrical Outlet ST-700 AC Adapter... - Page 94 ST-700 User's Manual Using the tip of a ball-point pen, press and hold the RESET switch on the left side of ST- 700. Plug the AC adapter into an electrical outlet while pushing the RESET switch. Electrical Outlet Plug the AC Adapter into an electrical outlet.
-
Page 95: Factory Reset From Web Page
7. Maintenance Functions 7-4-2. Factory Reset from Web Page Use a web browser to access the web page. - See How to Access the Web Page in 3-5-2. ST-700 Web Page to access the web page with your web browser. Note Click Factory Default on the menu. -
Page 96: Firmware Update
3-2 Downloading Application Software. 7-5-2. How to Update Firmware Use a web browser to access the web page. - See How to Access the Web Page in 3-5-2. ST-700 Web Page to access the web page with your web browser. Note - The firmware can be updated using AMC Manager®. - Page 97 Click OK. The firmware update starts. Do not turn off ST-700 or close the web browser until the update is completed. When the login page appears, the firmware update has been completed. See the bottom left corner of the page to check the latest firmware version.
-
Page 98: Deleting Saved Schedules
ST-700 User's Manual 7-6. Deleting Saved Schedules To delete the data of program schedules, use SX Sign Control Software. Check SX Sign Control Software User's Manual for more details. -
Page 99: Web Page Setting Items
A. Web Page Setting Items Web Page Setting Items... -
Page 100: A-1. General Setting Items
ST-700 User's Manual A-1. General Setting Items The general setting items are the necessary items to use ST-700. Some of A-2. Details Setting Items can be changed. The following setting items can be set in the general settings. TCP/IP Configuration See A-2-1. -
Page 101: A-2. Details Setting Items
The specified host name will be displayed in AMC Manager® and SX Sign Note Control Software. TCP/IP Configuration Name DHCP Client It enables/disables DHCP protocol. Description ST-700 has to be in the same network of DHCP server to get IP addresses automatically. Value/Range ENABLE/DISABLE Default value ENABLE Name IP Address Description It specifies an IP address. - Page 102 DHCP Server Configuration Name DHCP Server Function It enables/disables DHCP server. Enable this setting to run ST-700 as DHCP server to automatically assign Description an IP address to PC. Disable this when DHCP server already exists in the same network.
- Page 103 A. Web Page Setting Items Name Start IP Address Description It specifies the start IP address when DHCP server function is enabled. Value/Range 0.0.0.0 to 255.255.255.255 Default value 192.168.0.11 Name End IP Address Description It specifies the end IP address when DHCP server function is enabled Value/Range 0.0.0.0 to 255.255.255.255 Default value...
- Page 104 ST-700 User's Manual Proxy Setting Name Proxy Function It enables/disables communications through a proxy server. Description Enable this setting to play web content in an environment that requires a proxy server. Value/Range ENABLE/DISABLE Default value DISABLE Name Proxy Server It sets the domain name or the IP address of proxy server to use when the Description proxy function is enabled.
-
Page 105: A-2-2. Wireless Lan(Ap)
When this is set to Access Point, the wireless LAN (AP) setting items Note besides this setting will be displayed. Wireless LAN Common Configuration Name Wireless Mode Description It specifies the radio frequency band that ST-700 uses. 2.4 GHz Value/Range 5 GHz Default value 5 GHz Name Channel It sets a channel to use in the wireless LAN. - Page 106 Wireless LAN Basic Configuration Name SSID It sets SSID of the wireless LAN to connect to ST-700. SSID is an identification for a group to communicate in a wireless LAN. Description Devices need to have the same SSID to communicate each other in a wireless LAN.
- Page 107 When it is Shared, this setting will be fixed to ON. Name Key Index It specifies the WEP key number (1, 2, 3, or 4). Description ST-700 and communicating devices have to have the same key index. Value/Range 1 to 4 Default value...
- Page 108 ST-700 User's Manual Name WEP Key1-4 Description It specifies the WEP key. 5 or 13-digit alphanumeric characters 10 or 26 hexadecimal digits * Alphanumeric characters usually mean single-byte alphabets and numbers. * When the size of key (key length) is 64 bits, enter 5 characters. When it is Value/Range 128 bits, enter 13 characters.
-
Page 109: Security Configuration
It sets the MAC address filter for the wireless LAN. Setting the MAC address filter will limit wireless LAN devices to connect Description to ST-700. When the vendor code of MAC address (the first 6 digits) is registered, all the devices having the vendor code will be filtered. -
Page 110: A-2-3. Wireless Lan(Sta)
Wireless LAN Basic Configuration Name SSID It sets SSID of the wireless LAN to connect to ST-700. SSID is an identification for a group to communicate in a wireless LAN. Description Devices need to have the same SSID to communicate each other in a wireless LAN. - Page 111 WEP is used for encryption of the communication. Shared (Shared key): Uses WEP key as the authentication key for encryption, and allows devices having the same key to connect to ST-700. WEP is used for encryption of the communication. WPA-PSK: Uses PSK for network authentication.
- Page 112 ST-700 User's Manual Name Encryption Mode It specifies the encryption algorithm when the network authentication Description method is set to WPA-PSK, WPA2-PSK, or WPA/WPA2-PSK. TKIP Value/Range AUTO Default value This setting can be made when the network authentication method is...
- Page 113 When it is Shared, this setting will be fixed to ON. Name Key Index It specifies the WEP key number (1, 2, 3, or 4). Description ST-700 and communicating devices have to have the same key index. Value/Range 1 to 4 Default value Name...
- Page 114 ST-700 User's Manual WPA/WPA2 PSK Configuration Name Pre-Shared Key It specifies the pre-shared key to use TKIP or AES as the encryption algorithm when the network authentication method is set to WPA-PSK, WPA2-PSK or WPA/WPA2-PSK. Description The pre-shared key is a keyword to generate an encryption key, which is called a network key or a password for some wireless LAN devices.
- Page 115 Name Client Certificate It uploads a client certificate. Click Browse and select a client certificate to Description upload. A cer tificate file used for authenticating ST-700 with IEEE802.1X Value/Range authentication function. Default value Nothing is uploaded. The uploaded client certificate can be confirmed under the Certificate Registration Status.
- Page 116 ST-700 User's Manual Name Inner Authentication Method It specifies the authentication protocol for EAP-TTLS and PEAP. Description For PEAP, only MSCHAPv2 is available. Value/Range MSCHAPv2 Default value MSCHAPv2 This setting can be made when the authentication is one of the following:...
-
Page 117: A-2-4. Wired Lan
It sets the MAC address filter for the wired LAN. Setting the MAC address filter will limit wired LAN devices to connect to Description ST-700. When the vendor code of MAC address (the first 6 digits) is registered, all the devices having the vendor code will be filtered. -
Page 118: A-2-5. Time Configuration
ST-700 User's Manual A-2-5. Time Configuration Name Description It enables or disables NTP protocol to get the time. Value/Range ENABLE/DISABLE Default value DISABLE Name NTP Server Description It specifies the domain name or the IP address of NTP server. Value/Range... - Page 119 A. Web Page Setting Items Name Reboot Time It specifies the time to restart ST-700 when the scheduled reboot function Description is in use. Value/Range 0:00 to 23:50 (set by 10 minutes) Default value 2:00 This setting can be made when the Scheduled Reboot is enabled.
-
Page 120: A-3. Security Setting Items
ST-700 User's Manual A-3. Security Setting Items A-3-1. Password Name New Password It sets the administrator password between 1 and 8 alphanumeric character length. Description The password is used for authentication when the user updates settings from a web browser or uses the device management software AMC Manager®. -
Page 121: A-4. Video/Audio Setting Items
Note The performance of AUTO or 3840 x 2160 is not guaranteed to play split- screen programs. Name Monitor orientation Description It sets the orientation of screen displayed by ST-700. Landscape Value/Range Portrait - Left Portrait - Right Default value Landscape A-4-2. -
Page 122: A-4-3. Monitor Synchronization
ST-700 User's Manual A-4-3. Monitor synchronization Name Monitor synchronization Description It enables or disables the multiscreen synchronization function. Value/Range ENABLE/DISABLE Default value ENABLE... -
Page 123: A-5. Broadcast Setting Items
It will read the data after finishing playing the current video. When the next video's bit rate is high, ST-700 will take time to read the video data and show a black screen for a moment to switch the video. -
Page 124: A-6. Device Management Setting Items
ST-700 User's Manual A-6. Device Management Setting Items A-6-1. Log Output Syslog Server Name Syslog Server Log Output Description It enables or disables a function to export logs to Syslog server. Value/Range ENABLE/DISABLE Default value DISABLE Name Syslog Server Description It specifies the domain name of Syslog server. - Page 125 A. Web Page Setting Items Name Data Bits Num Description It specifies the number of bits per character. Value/Range 7, 8 Default value This setting can be made when the Serial Monitor Control is enabled. Note Name Parity Description It sets the parity method for each character. none Value/Range even...
- Page 126 ST-700 User's Manual Control1 / Control2 Name Control string Description It sets a character string to send to the serial port. Value/Range 0 to 40 alphanumeric characters. Default value None (blank) Note This setting can be made when the Serial Monitor Control is enabled.
Need help?
Do you have a question about the ST-700 and is the answer not in the manual?
Questions and answers