Table of Contents
Advertisement
Quick Links
Advertisement
Table of Contents

Related Manuals for RS PRO RS-5110

Summary of Contents for RS PRO RS-5110
- Page 1 Instruction Manual RS-5110 146-4656 PARTICLE COUNTER...
-
Page 2: Table Of Contents
PARTICLE COUNTER / EN CONTENTS Title Page 1. SAFETY INFORMATION................... 1 2. GENERAL INFORMATION ................2 3. SPECIFICATIONS ..................... 3 4. QUICK START....................4 5. CONTROLS AND FUNCTIONS ................ 5 6. DISPLAY......................6 6-1 Main screen ....................6 6-2 Setup Screen ....................7 6-3 Label Menu Screen.................. -
Page 3: Safety Information
PARTICLE COUNTER / EN 1. SAFETY INFORMATION A Warning identifies a condition or action that pose hazard(s) to the user; a Caution identifies a condition or action that may damage the meter or the equipment under test. Read this entire manual before using the meter. Safety labels used in this manual and on the meter are as follows. -
Page 4: General Information
PARTICLE COUNTER / EN Caution To avoid possible damage to the meter: Avoid using the meter in an excessively dirty or dusty atmosphere. Excessive particle intake can damage the meter. Remove the isokinetic probe cap before the startup. Not doing so can damage the meter. -
Page 5: Specifications
PARTICLE COUNTER / EN 3. SPECIFICATIONS 6 Particle size channels: 0.3, 0.5, 1.0, 2.0, 5.0, 10.0 µm Flow rate: 0.1 cfm (2.83 L/min) Light source: Laser diode Calibration: PSL particles in air (NIST traceable) Counting efficiency: 50 % at 0.3 µm; 100 % for particles > 0.45 µm (per JIS B9921:1997) Zero count: 1 count/5 minute (per JIS B9921:1997) Coincidence loss: 5 % at 2,000,000 particles per cubic ft. -
Page 6: Quick Start
PARTICLE COUNTER / EN 4. QUICK START The meter may be used directly out of the box. To immediately use the meter: 1. Read “Safety Information” 2. Remove the Isokinetic probe cap. 3. Press the (POWER) key. 4. Press (COUNT) key to start sampling. Be sure to read this entire manual for more detailed information. -
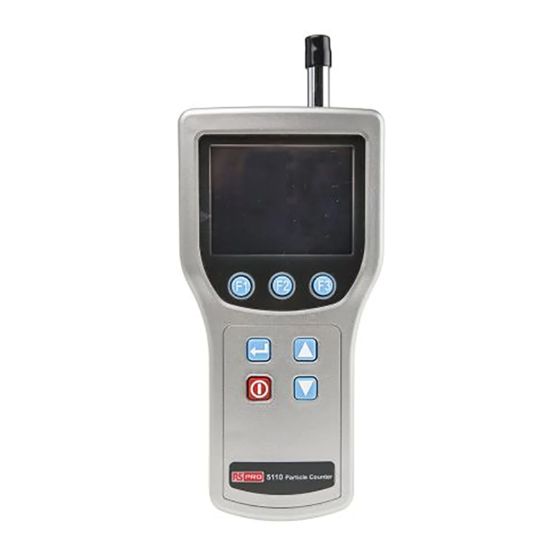
Page 7: Controls And Functions
PARTICLE COUNTER / EN 5. CONTROLS AND FUNCTIONS Parts description: 1. Isokinetic probe and cap. 2. External power: 12 VDC, 3 A External power. 3. USB Port. Power key: Press to turns the meter on and off. Arrow keys: Press to scroll within the selected screen. Return key: Press to store the setup changes and to return to the main screen. -
Page 8: Display
PARTICLE COUNTER / EN 6. DISPLAY Press the corresponding button from the keypad at the bottom of the LCD to invoke the following screens: Main screen Setup screen (pages 1 and 2) Label menu screen 6-1 Main screen The Main screen appears after the meter is turned on and after the opening screen appears. -
Page 9: Setup Screen
PARTICLE COUNTER / EN 6-2 Setup Screen 1. From the Main screen, press (SETUP) key, the Setup screen Page 1 appears. To get to Setup screen Page 2 while on Setup screen Page 1, press (PAGE 2) key. 2. Press keys to move up and through each parameter. -
Page 10: Label Menu Screen
PARTICLE COUNTER / EN 6-3 Label Menu Screen It may be useful to assign labels to samples taken from different areas or rooms. Use the Label menu to select sample labels. To edit labels using the keypad: 1. Press (LABEL) key on the main screen to display the Label Menu screen. - Page 11 PARTICLE COUNTER / EN Reviewing the buffer: To review the buffer from the Label menu, press (BUFFER) key to recall the buffer and press key to scroll through the different samples. The Label menu screen includes: List of location labels 09/15/17 Version No.
-
Page 12: Using The Meter
PARTICLE COUNTER / EN 7. USING THE METER The following sections give detailed information about using the meter. 7-1 Setup To set up the meter: Go through the different screens and set the desired parameters for sampling. Refer to previous sections regarding the different screens and menus. 7-1-1 Setting the Counting mode: The counting mode choices are: Concentration mode:... - Page 13 PARTICLE COUNTER / EN 7-1-2 Setting the air sampling volume or sampling time: To set the sample volume or sample time: 1. Press (SETUP) key on the Main screen. The Setup page 1 screen is displayed with the current “Cnt Mode” field is selected. 2.
- Page 14 PARTICLE COUNTER / EN 7-1-3 Setting the method of counting data: The choices for data counting are: Cumulative – Includes all particles that are larger than or equal to the particle size selected in the sample volume field. Differential – Includes all particles that are larger than or equal to the particle size selected in the sample volume field, but small than the next largest particle size.
- Page 15 PARTICLE COUNTER / EN 7-1-5 Setting the memory buffer: The meter can store measurement data in the internal flash memory or on micro SD card. To set the memory buffer: 1. Press (SETUP) key on the Main screen. The Setup page 1 screen is displayed with the current “Cnt Mode”...
- Page 16 PARTICLE COUNTER / EN 7-1-7 Setting the date and time: To set the date and time: 1. Press (SETUP) key on the Main screen. The Setup Page 1 screen is displayed. 2. Press (PAGE 2) key on the Setup Page 1 screen. The Setup Page 2 screen is displayed.
-
Page 17: Counter Operation
PARTICLE COUNTER / EN 6. Press to increase the time; press to decrease the time. 7. Once the desired time has been selected, press (SAVE) key. 8. Press (RETURN) key to return to the Main screen. Note: The maximum delay time is 23:59:59. 7-1-9 Setting the temperature unit: To set the Temperature unit to °... - Page 18 PARTICLE COUNTER / EN 7-2-1 Purging the Particle Counter: Before taking particle samples, the meter should be purged using the zero count filter. Purging the meter will make sure the readings are accurate. To purge the meter: 1. Fit the filter adapter onto the end of the zero count filter.
- Page 19 PARTICLE COUNTER / EN To collect samples: 1. Press the (POWER) key to turn on the meter. 2. If needed, select the required setting on the setup screen. Press (SETUP) key, than select the required settings on the setup Page 1 screen.
- Page 20 PARTICLE COUNTER / EN 2. Press (BUFFER) key, the Buffer Review screen and the last record stored in the buffer is displayed. 3. Press key to select the record displayed. The user can scroll from the newest to the oldest or the oldest to the newest data record in the buffer.
-
Page 21: Maintenance
PARTICLE COUNTER / EN 8. MAINTENANCE Warning The Meter contains no user-serviceable parts. To avoid electric shock, injury, or damage to the meter, do not open the meter. Use the zero count filter to ensure that the meter filter is free of contamination. Refer to “Purging the Meter”. -
Page 22: Purging The Meter Sensor
PARTICLE COUNTER / EN To connect the ac adapter: 1. Attach the power cord to the end of the ac adapter. 2. Plug the ac adapter into the 12V jack on the meter. 3. Plug the power cord into an ac outlet. The meter will take 2.5 hours to fully charge.
Need help?
Do you have a question about the RS-5110 and is the answer not in the manual?
Questions and answers