Table of Contents
Advertisement
Available languages
Available languages
Quick Links
Кусторезная машина
Manuel dʼutilisation
FR
(notice originale)
Instruction for use
EN
(Original instructions)
Руководство по эксплуатации
RU
(оригинальное руководство)
- Lire les instructions du manuel d'utilisateur. Se familiariser avec le fonctionnement et les commandes avant utilisation.
- Read the instruction manual. Familiarise yourself with how and its controls work, before using it.
- Внимательно прочесть инструкции руководства пользователя. Перед использованием ознакомиться с работой
устройства и его управлением.
K500020011
Débroussaileuse
Grasse cutter
ATHENAS 60S
01/2012
Advertisement
Table of Contents

Summary of Contents for Caiman ATHENAS 60S
- Page 1 Débroussaileuse Grasse cutter Кусторезная машина ATHENAS 60S Manuel dʼutilisation (notice originale) Instruction for use (Original instructions) Руководство по эксплуатации (оригинальное руководство) - Lire les instructions du manuel d’utilisateur. Se familiariser avec le fonctionnement et les commandes avant utilisation. - Read the instruction manual. Familiarise yourself with how and its controls work, before using it.
-
Page 3: Consignes De Sécurité
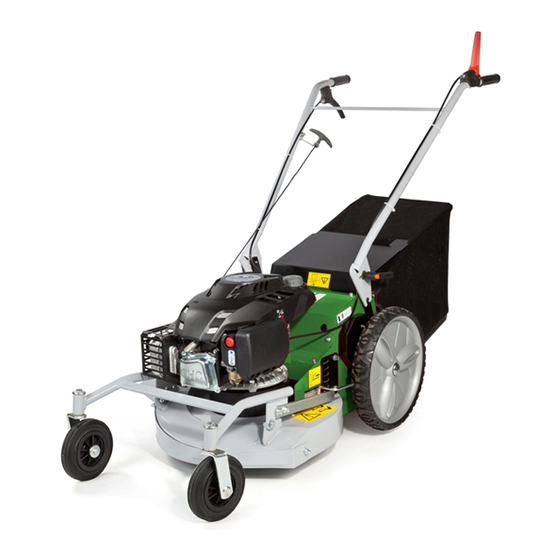
CONSIGNES DE SÉCURITÉ - Attacher une attention particulière aux indications précédées des men- - Avant dʼentreprendre le débroussaillage dʼune parcelle de terrain, déli- 4 - Maintenance / stockage tions suivantes: miter le périmètre de zone dangereuse pour les tiers, en fonction des in- - Arrêter le moteur et débrancher la bougie avant toute opération de ATTENTION : Signale une forte probabilité... - Page 4 PLAQUE DʼIDENTIFICATION DE LA MACHINE A - Puissance nominale B - Masse en kilogrammes C - Numéro de série D - Année de fabrication E - Type de la débroussailleuse F - Nom et adresse du constructeur G - Identification CE H - Vitesse maxi moteur MONTAGE / REGLAGE GUIDON Le guidon est plié...
-
Page 5: Montage De La Lame
MONTAGE DE LA LAME Gants obligatoires Dévisser les vis (1) puis la turbine (2) ce qui libère la lame. Remonter bien les pièces dans lʼordre du schéma. UTILISATION DE LA DÉBROUSSAILLEUSE PRÉPARATION PLEIN DʼHUILE ET NIVEAU PLEIN DʼESSENCE Super ou sans plomb Huile à... -
Page 6: Mise En Marche
MONTAGE DU BAC - ACCROCHAGE DU BAC MONTAGE DU BAC : Positionnez le sac, partie rigide en-dessous. Prendre l'armature métallique par la poignée et l'enfiler dans le sac poignée vers le de- ssus. La partie verticale de l'armature reste du côté ouverture du sac. Faire glisser les clips plastique autour de l'armature et les clipser dessus vers l'ex- térieur et dans l'ordre suivant : clips horizontal supérieur, clips latéraux et clips inférieur horizontal... -
Page 7: Arrêt Du Moteur
MARCHE AVANT EN DÉPLACEMENT OU TRAVAIL Marche avant ère ème ARRÊT DU MOTEUR FILTRE À AIR / NETTOYAGE DU MOTEUR Ne pas utiliser de solvant inflammable pour nettoyer lʼélé- ment mousse du fil- tre à air 5 - FR... - Page 8 Le catalogue pièces de rechanges ci-joint (en option), est destiné uniquement aux réparateurs agréés. À RÉALISER PAR UN ATELIER AGRÉÉ TENSION DES COUROIES Tension des courroies Desserrez légèrement les 2 écrous fixant le relai et déplacez celui-ci dans le sens de la flèche, ce qui retend les 2 courroies.
-
Page 9: Entretien Périodique
PROBLEME DE TRACTION Retendre le câble dʼavance à la poignée (Voir K2). Si le réglage est insuffisant visser la vis 1 ENTRETIEN PÉRIODIQUE Moteur : 1ère vidange au bout de 5 heures, ensuite toutes les 25 heures de marche. Se conformer au livret dʼentretien moteur. Resserrer lʼensemble des boulons de la machine au bout de 5 heures de marche. -
Page 10: Caractéristiques Techniques
CARACTÉRISTIQUES TECHNIQUES 12 - Incertitude de mesure (m/s²) 1 - Poids 5 - Régime moteur nominale (tr/mn) 13 - Vitesse dʼavancement 2 - • Puissance nette. La puissance du moteur indiquée 6 - Niveau de puissance accoustique garantie (selon di- dans ce document est une puissance nette obtenue par rective 2000/14/CE) 14 - Traction / Transmission... -
Page 11: Safety Precautions
SAFETY PRECAUTIONS Pay particular care to the sections marked as follows: - Before beginning to clear a stretch of ground, mark out the area that may 4 - Maintenance / storage DANGER : This indicates a strong likelihood of be dangerous for other people, as shown below. Mark out this area with - Stop the motor and disconnect the spark plug before cleaning, inspec- serious or even fatal injury if the instructions are notices forbidding people from entering while work is in progress. - Page 12 MACHINE IDENTIFICATION PLATES A - Nominal power B - Weight in kilograms C - Serial number D - Year of manufacture E - Type of grass cutter F - Manufacturer's name and address G - EC identifier H - Maximum motor speed FITTING / ADJUSTING THE HANDLEBARS The handlebars are folded up: pull handlebars avoiding damaging the cables.
- Page 13 ASSEMBLY OF THE BLADE Gloves must be worn Remove (1) then the turbine (2) to free the blade. Carefully re-install the parts in the order shown on the dia- gram. USE OF THE GRASS-CUTER PREPARATION OIL FILLER AND GAUGE PETROL Super or lead-free Recommended oil see the motor manual...
- Page 14 BAG ASSEMBLY - BASKET ASSEMBLY BAG ASSEMBLY : Position the bag, rigid part underneath. Catch the metal- lic skeleton by its handle and put it in the bag. Slide the plastic circlips aro- und the skeleton and clip them in following order : Upside horizontal circlips, then lateral circlips and finally downside horizontal circlips.
-
Page 15: Stopping The Engine
FORWARD MOVEMENT OR WORK Forward gear ère ème STOPPING THE ENGINE AIR FILTER / CLEANING THE MOTOR Do not use inflam- mable solvent to clean the air filterʼs foam rubber element 5 - EN... - Page 16 Pedestrian-controlled motor mower. The attached “part-list” (optional), is destined solely for the approved repairerʼs use. TO BE PERFORMED BY AN APPROVED WORKSHOP BELTS GRIPPING Belts gripping Loosen the nuts and remove the intermediary part (indicated way) to grip the belts. Then jam the nuts.
-
Page 17: Periodic Maintenance
TRACTION PROBLEMS Tension the drive cable on the handle (see K2). If there is insufficient adjustment, tighten the screw 1. PERIODIC MAINTENANCE Engine: 1st oil change after 5 hours and then every 25 hours of operation. Follow the instructions in the engine maintenance booklet. Tighten all the bolts in the machine after 5 hours of operation. -
Page 18: Technical Specifications
TECHNICAL SPECIFICATIONS 12 - Measurement uncertainty (m/s²) 1 - Weight 5 - Nominal engine revolutions (rpm) 13 - Velocity 6 - Guaranteed acoustic pressure level (as per Directive 2 - Net output. The engine power indicated in this docu- ment is the net output obtained by testing an engine from 2000/14/CE) 14 - Traction / Transmission a production run according to Standard SAE J 1349 at a... - Page 19 ПРАВИЛА ТЕХНИКИ БЕЗОПАСНОСТИ - - Обращать особое внимание на сведения, предшествующие сле- жухов и убедиться в надежной затяжке всех крепежных приспо- - Использование нерекомендуемых аксессуаров может сделать дующим указаниям: соблений. устройство опасным и повлечь за собой повреждения, которые Сигнализирует о высокой вероятности получе- - Прежде...
- Page 20 ЗАВОДСКОЙ ЩИТОК УСТРОЙСТВА A - Номинальная мощность B - Масса в килограммах C - Серийный номер D - Год выпуска E - Тип кусторезной машины F - Наименование и адрес производителя G - Маркировка ЕС H - Максимальная скорость вращения двигателя СБОРКА...
- Page 21 СБОРКА ЛЕЗВИЯ Ношение перчаток обязательно Открутить винты (1), затем центрифугу (2), что позволяет высвободить лезвие. Установить на место детали в порядке, показанном на схеме. ИСПОЛЬЗОВАНИЕ КУСТОРЕЗНОЙ МАШИНЫ ПОДГОТОВКА ПОЛНЫЙ ЗАПАС ТОПЛИВА ПОЛНЫЙ ЗАПАС МАСЛА И УРОВЕНЬ Рекомендуемое масло ➤ руководство по эксплуатации двигателя Бензин...
- Page 22 СБОРКА БАКА – КРЕПЛЕНИЕ БАКА СБОРКА БАКА: Установить мешок жесткой стороной вниз. Взять ме- таллический каркас за рукоятку и надвинуть его на мешок рукояткой вверх. Вертикальная часть каркаса остается со стороны отверстия мешка. Надвинуть пластиковые зажимы вокруг каркаса и закрепить его...
-
Page 23: Останов Двигателя
ПЕРЕДНИЙ ХОД ПРИ ПЕРЕМЕЩЕНИИ ИЛИ РАБОТЕ Передний ход ère ème ОСТАНОВ ДВИГАТЕЛЯ ВОЗДУШНЫЙ ФИЛЬТР / ЧИСТКА ДВИГАТЕЛЯ Для чистки пенопла- стового элемента воздушного фильтра не использовать вос- пламеняющиеся рас- творители 5 - RU... -
Page 24: Натяжение Ремней
Каталог запчастей, который прилагается (по требованию) предназначен только для уполномоченных специалистов по ремонту. РАБОТЫ, ВЫПОЛНЯЕМЫЕ УПОЛНОМОЧЕННОЙ РЕМОНТНОЙ МАСТЕРСКОЙ НАТЯЖЕНИЕ РЕМНЕЙ Натяжение ремней Слегка отвинтите 2 гайки, крепящие реле, и переместите его в направлении стрелки, что позволяет натянуть оба ремня. Снова надежно... - Page 25 ПРОБЛЕМА ТЯГИ Снова подтянуть кабель переднего хода к рукояти (См. рис. К2) Если регулировка недостаточна, закрутить винт 1 ПЛАНОВО-ПРЕДУПРЕДИТЕЛЬНЫЙ РЕМОНТ Двигатель: 1-й слив через 5 часов, затем каждые 25 часов работы. Для справки обращаться к журналу технического обслуживания двигателя. Подтягивать все болты устройства через 5 часов работы. Затем периодически выполнять проверку. Корпус...
-
Page 26: Технические Характеристики
ТЕХНИЧЕСКИЕ ХАРАКТЕРИСТИКИ 1 - Вес 4 - Номинальная мощность 11 - Уровень вибрации на руку оператора (согласно директивам EN 12733:2001, EN 12096-D:1997) 2 - Полезная мощность. Мощность двигателя, ука- 5 - Номинальный режим работы двигателя занная в настоящем документе, является полезной 12 - Погрешность... - Page 28 2 - PUBERT SAS Z.I. de Pierre-Brune CHATONNAY France 3 - PUBERT SAS 4 - KC00****** 5 - EA190V 6 - ATHENAS 60S 7 - 2006/42/EC, 2004/108/EC & 2000/14/EC 8 - NF EN 12733 : 2001 9 - CHATONNAY 10 - 30/11/2011...
Need help?
Do you have a question about the ATHENAS 60S and is the answer not in the manual?
Questions and answers