Table of Contents
Advertisement
Quick Links
See your user's guide – for more information about using your dock, visit
www.kodak.com/go/hdtvdocksupport.
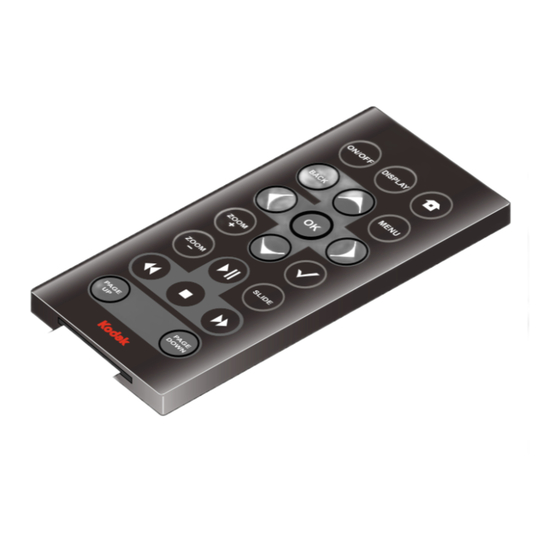
Remote control
Remove the tab to start
using the remote.
www.kodak.com/go/hdtvdocksupport
All manuals and user guides at all-guides.com
Button
ON/OFF
DISPLAY
Home
BACK
MENU
OK
4-way
ZOOM +
ZOOM -
select
SLIDE
play/pause
rewind
fast forward fast forward a video.
stop
PAGE UP
PAGE DOWN display the next page of images.
Press to
turn on/off the HDTV dock.
turn on/off picture/video status information bar.
return to the home screen.
return to the previous screen.
stop a slide show, display thumbnails.
display menu choices.
accept the current selection.
navigate through pictures or menus.
increase picture magnification.
decrease picture magnification.
mark pictures for an operation.
play a slide show.
play/pause a video or slide show.
fast rewind a video.
stop a video, display the first frame.
stop a slide show, display thumbnails.
display the previous page of images.
1
Advertisement
Table of Contents

Subscribe to Our Youtube Channel
Related Manuals for Kodak 2F6571


Summary of Contents for Kodak 2F6571
- Page 1 All manuals and user guides at all-guides.com See your user’s guide – for more information about using your dock, visit www.kodak.com/go/hdtvdocksupport. Remote control Button Press to ON/OFF turn on/off the HDTV dock. DISPLAY turn on/off picture/video status information bar. Home return to the home screen.
- Page 2 All manuals and user guides at all-guides.com Front/Side View 1 Remote control sensor Memory card slot - SD, MMC 2 Charging light USB connector 3 Power light Dock connector Back View 1 USB connector Audio out connectors 2 Video out connectors DC-In (5 V) www.kodak.com/go/easysharecenter...
- Page 3 All manuals and user guides at all-guides.com Connecting the dock power, HDTV power audio video Your power cable (included with the dock) may be different from the one pictured. Use the plug that accommodates your type of power outlet. www.kodak.com/go/hdtvdocksupport...
- Page 4 All manuals and user guides at all-guides.com Inserting a card or USB device USB devices (use either USB connector): card reader flash drive SD/MMC card Attaching the camera insert Custom camera insert included with your camera. www.kodak.com/go/easysharecenter...
- Page 5 Press then OK to choose an Thumbnails Input Source. (pictures/videos/ folders on a selected Input Source) Note: Devices connected to the dock are listed as Input Sources. Press BACK to move between the Input Source list and thumbnails window. www.kodak.com/go/hdtvdocksupport...
- Page 6 OK. Charging the camera battery 1 Connect the dock power. 2 Insert the battery in the camera (Kodak Ni-MH or Li-Ion rechargeable battery). Turn off the camera. 3 Place the camera on the dock. Charging begins. Full charging takes up to 3 hours.
-
Page 7: Working With Pictures/Videos
(see page 5), memory card, or USB drive (see page The Home screen displays your pictures and videos as thumbnails (see page Use the remote control and OK buttons to navigate through your pictures/videos and to make your selections. www.kodak.com/go/hdtvdocksupport... -
Page 8: Home Screen Features
View-only Favorites (see your camera user’s guide) Thumbnails view To navigate through the thumbnails, press To play a video ( ), highlight the video thumbnail, then press OK. Press or OK when the first frame appears (single view). www.kodak.com/go/easysharecenter... -
Page 9: Single View
To play a sound tag ( ) that is associated with a picture, press Press DISPLAY to turn on/off the picture information. Press to view previous/next picture. Press BACK or to return to the Home screen. www.kodak.com/go/hdtvdocksupport... -
Page 10: Using The Menu
Protect/Unprotect a picture/video from deletion. Press to highlight Protect (or Unprotect), then press OK. Delete a picture/video. Press to highlight Delete, then press OK. Press highlight your choice, then press OK. Press to highlight Yes, then press OK. www.kodak.com/go/easysharecenter... - Page 11 1 Press the MENU button after accessing the Home screen (see page 2 Press to highlight Select All, then press OK. A check mark appears on all pictures/videos in your current location. To remove the check marks, press MENU, highlight Unselect all, then press OK. www.kodak.com/go/hdtvdocksupport...
-
Page 12: Using Kodak Perfect Touch Technology
All manuals and user guides at all-guides.com Working with pictures/videos Using Kodak Perfect Touch technology Kodak Perfect Touch technology helps to ensure better, brighter pictures, and can only be applied to pictures that are larger than 2.0 MP. 1 In single picture view, press MENU. -
Page 13: Running A Slide Show
3, 5, 10, 15, 30, or 60 seconds. 1 On the Slide Show menu, press to highlight Interval, then press OK. 2 Press to highlight a display interval, then press OK. NOTE: The interval setting remains until you change it. www.kodak.com/go/hdtvdocksupport... -
Page 14: Printing Pictures
Print, then press OK. 6 Press to select the print quantity (1-39), then press OK to begin printing. To cancel printing, press BACK. Learning more about your dock www.kodak.com/go/hdtvdock dock accessories www.kodak.com/go/hdtvdocksupport Extended user’s guide Interactive troubleshooting and repairs... - Page 15 All manuals and user guides at all-guides.com Solving HDTV dock problems For step-by-step product support, visit www.kodak.com/go/hdtvdocksupport and select Interactive Troubleshooting & Repairs. HDTV dock problems If... Try one or more of the following Dock does not Make sure the power cable that was included with your dock is...
- Page 16 The use of controls, adjustments, or procedures other than those specified herein may result in exposure to shock and/or electrical or mechanical hazards. The use of an accessory that is not recommended by Kodak may cause fire, electric shock, or injury. For approved accessories, visit www.kodak/go/accessories...
- Page 17 Warranty service will include all labor as well as any necessary adjustments and/or replacement parts. If Kodak is unable to repair or replace a Product, Kodak will, at its option, refund the purchase price paid for the Product provided the Product has been returned to Kodak along with proof of the purchase price paid.
- Page 18 The option of repair, replacement, or refund is Kodak's only obligation. Kodak will not be responsible for any special, consequential or incidental damages resulting from the sale, purchase, or use of this product regardless of the cause.
- Page 19 Canadian DOC statement DOC Class B Compliance—This Class B digital apparatus complies with Canadian ICES-003. Observation des normes-Classe B—Cet appareil numérique de la classe B est conforme à la norme NMB-003 du Canada. Australian C-Tick N137 www.kodak.com/go/hdtvdocksupport...
- Page 20 (Product weight: 170 g.) Eastman Kodak Company Rochester, New York 14650 © Eastman Kodak Company, 2007 Kodak, EasyShare, and Perfect Touch are trademarks of Eastman Kodak Company. Eastman Kodak Company is an authorized licensee of the CompactFlash trademark. 2F6571_en www.kodak.com/go/easysharecenter...
Need help?
Do you have a question about the 2F6571 and is the answer not in the manual?
Questions and answers