Table of Contents
Advertisement
Advertisement
Table of Contents

Subscribe to Our Youtube Channel
Summary of Contents for Abaxis V9000T
- Page 1 V9000T Trinocular Microscope Operator’s Manual...
- Page 2 V9000T Trinocular Microscope V9000T Trinocular Microscope Original User’s Manual For Veterinary Use Only Customer and Technical Support For USA: 1-800-822-2947 For Europe: +49 (6155) 780 210 techsupport@abaxis.de April 2016 PN: 790-7013 Rev. D Text © 2016, Abaxis, Inc. Union City, CA 94587...
-
Page 4: Table Of Contents
V9000T Trinocular Microscope CONTENTS SAFETY NOTES ........................3 CARE AND MAINTENANCE ....................3 INTRODUCTION ........................4 UNPACKING AND COMPONENTS DIAGRAMS .............. 4-5 ASSEMBLY DIAGRAM & PROCEDURE ................6-8 ADJUSMENT & OPERATION ......................... 9 ILLUMINATION ........................... 9 MIRROR ......................9 SPECIMEN SLIDE ........................ -
Page 5: Safety Notes
V9000T Trinocular Microscope SAFETY NOTES 1. Open the shipping carton carefully to prevent any accessory, i.e. objectives or eyepieces, from dropping and being damaged. 2. Do not discard the molded Styrofoam container; the container should be retained should the microscope ever require reshipment. -
Page 6: Introduction
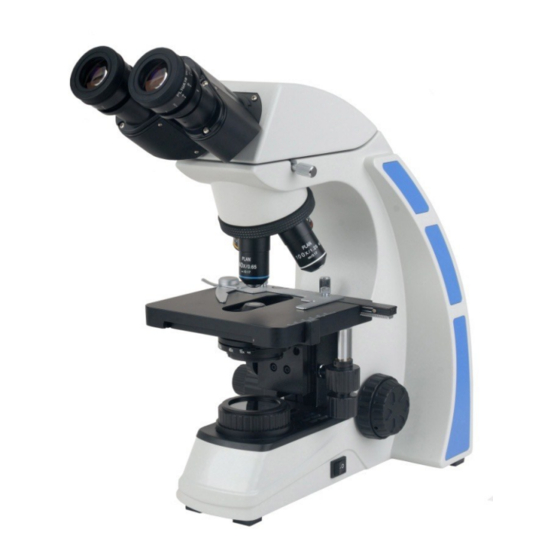
V9000T Trinocular Microscope INTRODUCTION ® ® Congratulations on the purchase of your new ACCU-SCOPE microscope. ACCU-SCOPE microscopes are engineered and manufactured to the highest quality standards. Your microscope will ® last a lifetime if used and maintained properly. ACCU-SCOPE microscopes are carefully assembled, inspected and tested by our staff of trained technicians in our New York facility. - Page 7 V9000T Trinocular Microscope COMPONENTS DIAGRAM Lock Screw Y-Axis Adjustment Knob Objective Nosepiece Coarse Focusing Knob Iris Diaphragm Adjustment Control Fine Focusing Knob X-axis Power Adjustment Switch Knob...
-
Page 8: Assembly Diagram & Procedure
V9000T Trinocular Microscope ASSEMBLY DIAGRAM The diagram below shows how to assemble the various modules. The numbers indicate the order of assembly. Your microscope was preassembled by our factory technicians at our New York facility prior to shipment. Should you need to disassemble/assemble your microscope in the future, please follow the instructions outlined below. - Page 9 V9000T Trinocular Microscope ASSEMBLY (continued) Condenser The condenser was installed and centered by our technicians prior to delivery. If the ② condenser needs to be re-installed or adjusted ① in the future, rotate the coarse focusing knob to raise the stage to the highest position (see Fig.
- Page 10 V9000T Trinocular Microscope ASSEMBLY (continued) Connecting the Power Cord IMPORTANT: Use care when storing the power cord so that it does not bend or twist. ① Make sure the power switch is at “0”(OFF) before connecting. Insert the connector ①...
-
Page 11: Illumination
V9000T Trinocular Microscope ADJUSTMENT & OPERATION Illumination With the microscope turned on, rotate the light ① adjustment knob until the illumination is comfortable for observation. Rotate the light adjustment knob clockwise to raise the voltage and brightness. Rotate the light adjustment knob counterclockwise to lower the voltage and brightness (see Fig. -
Page 12: Focusing
V9000T Trinocular Microscope Adjusting the Interpupillary Distance To adjust the interpupillary distance, hold the left and right eyetubes while observing a specimen. ① Rotate the eyetubes around the central axis until the fields of view of both eyetubes coincide completely. A complete circle should be seen in the viewing field when viewing the specimen slide. -
Page 13: Field Diaphragm
V9000T Trinocular Microscope ① Adjusting the Field Diaphragm (Optional) By limiting the diameter of the light entering the condenser, the field diaphragm can prevent other light and strengthen the image contrast. When the image is just on the edge of the field ②... -
Page 14: Oil Objective
V9000T Trinocular Microscope Using the Oil Objective (100x) The procedure for examining a specimen using an oil immersion objective is as follows: Rotate the nosepiece so the low power objective is in the optical path. Place one drop of immersion oil on the lighted area of the specimen slide ①... -
Page 15: Filter
V9000T Trinocular Microscope Using & Installing A Filter A filter is used to make the background color more suitable for the application and as a method to increase the contrast. Using a small jeweler’s flathead screwdriver, ② remove the set screw that secures the illuminator ①... -
Page 16: Led Bulb Replacement
V9000T Trinocular Microscope Replacing the LED Bulb Turn the main switch to “0” (OFF) before replacing the LED bulb. Unplug the power cord from the microscope. Gently place the microscope on its arm as shown in Figure 15. Figure 15 Using a Philips head screwdriver, remove the 4 screws to release the base plate (Figure 16). - Page 17 V9000T Trinocular Microscope Replacing the LED Bulb (continued) Using a Philips head screwdriver, unscrew the 2 screws to remove the LED bulb from its mount (Figure 18). Figure 18 Install the new bulb in position and screw it to its mount (Figure 19 &...
-
Page 18: Technical Specifications
V9000T Trinocular Microscope TECHNICAL SPECIFICATIONS Optical AIS E-Plan optical system system Head Siedentopf binocular viewing head, inclined 30⁰ Eyepiece PL10X/20mm diopter adjustable eyepiece, 20mm field of view Nosepiece Reversed quadruple nosepiece Objective AIS E-Plan achromat objective(4X, 10X, 40X, 100X) Coaxial coarse & fine focusing system, with stop limit & tension adjustment. - Page 19 V9000T Trinocular Microscope OPTICAL Problem Cause Corrective Measure Darkness at the periphery or Revolving nosepiece not in Revolve the nosepiece to click uneven brightness of view field click stop position stop position by swinging the objective correctly into the optical path...
- Page 20 V9000T Trinocular Microscope Image moves while focusing Specimen rises from stage Secure the specimen in the surface slide holder Revolving nosepiece is not in Revolve the nosepiece to the the click-stop position click-stop position Image tinged yellow Lamp intensity is too low...
- Page 21 V9000T Trinocular Microscope MECHANICAL PROBLEMS (continued) Problem Cause Corrective Measures Lamp does not light when No electrical power Check power cord connection switched on Lamp bulb burnt out Replace bulb Fuse blown out Replace fuse Slippage of focus when using...
-
Page 22: Maintenance
V9000T Trinocular Microscope MAINTENANCE Please remember to never leave the microscope with any of the objectives or eyepieces removed and always protect the microscope with the dust cover when not in use. SERVICE ® ACCU-SCOPE microscopes are precision instruments which require periodic servicing to keep them performing properly and to compensate for normal wear. - Page 23 Worldwide Headquarters 3240 Whipple Road Bunsenstrasse 9-11 64347 Griesheim Union City, CA 94587 Germany United States of America Tel: 510.675.6500 Tel: +49 6155 780 210 Tel: 800.822.2947 Abaxis and VetScan are registered trademarks of Abaxis, Inc. ©2016 www.abaxis.com 1300-7015 Rev. A...
Need help?
Do you have a question about the V9000T and is the answer not in the manual?
Questions and answers