Table of Contents
Advertisement
Quick Links
Advertisement
Table of Contents

Related Manuals for Marson MR15


Summary of Contents for Marson MR15
- Page 1 MR15 User’s Manual V1.0 MR15 Fixed Android UHF Reader User’s Manual...
-
Page 2: Table Of Contents
MR15 User’s Manual V1.0 Table of Content Chapter 1 Product Intro ......................3 Intro ........................... 3 Interface ........................4 Accessory List ......................5 Device installation...................... 6 Chapter 2 UHF demo ......................7 Operating Interface ....................7 Chapter 3 UHF tag scanning ....................9 Auto Scanning ...................... -
Page 3: Chapter 1 Product Intro
MR15 User’s Manual V1.0 Chapter 1 Product Intro 1.1 Intro MR15 is a 4-channel fixed RFID reader, based on Android 9.0. Integrated with Impinj R2000 RFID chip, it supports RS232, RJ45 and HDMI, and can be compatible with various types of antennas. With... -
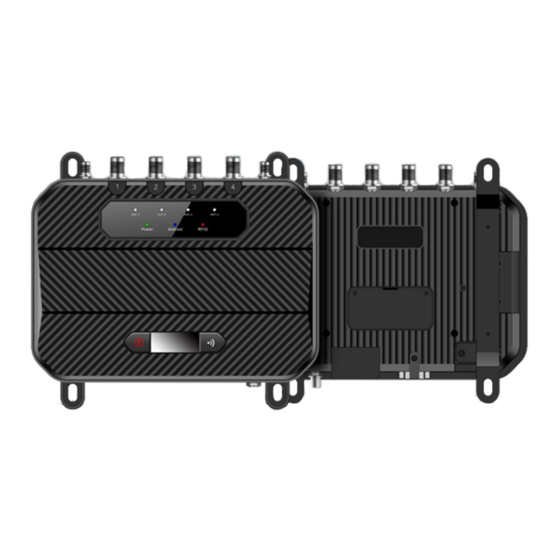
Page 4: Interface
MR15 User’s Manual V1.0 1.2 Interface Antenna Port USB-C HDMI USB 2.0 SCAN Power Button Button RJ45 GPIO RS232 Pic.1-1... -
Page 5: Accessory List
MR15 User’s Manual V1.0 1.3 Accessory List MR15 reader, 12V power adaptor UHF antenna, 6dBi, 9dBi, 12dBi etc. Feeder line, SMA male side connects with device, interface on other side needs match with antenna. RJ45 Ethernet cable HDMI cable 4G external antenna... -
Page 6: Device Installation
MR15 User’s Manual V1.0 1.4 Device installation MR15 reader adopts Android operating system, it can be connected with Internet through RJ45, WIFI and 4G etc. And connect with monitor through HDMI cable. Developer could use USB cable to connect device with PC for developing application, device could also be connected with PC through serial port cable. -
Page 7: Chapter 2 Uhf Demo
MR15 User’s Manual V1.0 Chapter 2 UHF demo 2.1 Operating Interface Pic.4-1... - Page 8 MR15 User’s Manual V1.0 Connect monitor through HDMI cable and long-press power button for 3 seconds to switch on device. Click demo_uhf icon to enter demo as Pic.4-1, UHF module will initiate as Pic.4-2, if there is no error messages show up, then initiation process has been successfully finished.
-
Page 9: Chapter 3 Uhf Tag Scanning
MR15 User’s Manual V1.0 Chapter 3 UHF tag scanning Click SCAN on top of navigation bar to enter tags reading page. 3.1 Auto Scanning Select “Auto”, then click “Start” button to start tags scanning circularly, the information such as EPC or TID, Count, RSSI and Ant. - Page 10 MR15 User’s Manual V1.0 Pic.5-2...
-
Page 11: Single Scanning
MR15 User’s Manual V1.0 3.2 Single Scanning Select “Single” button and click “Start” to start scanning tag, EPC or TID, Count, RSSI and Ant.number will display on right side, as Pic.5- Pic.5-3... -
Page 12: Read Uhf Tag
MR15 User’s Manual V1.0 3.3 Read UHF Tag Click “READ” on top of navigation bar to enter page of tag reading. User could read data of 4 areas, RESERVED, EPC, TID and USER, setup address and data length, default password is “00000000”, click “Read”... - Page 13 MR15 User’s Manual V1.0 Comment: user could filter tags by setup address, data length and data in EPC, TID and USER areas, select “Enable” button to switch on filter function in Pic.6-2. Pic.6-2...
-
Page 14: Write Tag
MR15 User’s Manual V1.0 3.4 Write Tag Click “WRITE” on top of navigation bar to enter tag writing page. User could write data in RESERVED, EPC, TID and USER areas, setup start address and data length, input access password and data(hex), click “Write Data”... -
Page 15: Lock Tag
MR15 User’s Manual V1.0 3.5 Lock Tag Click “LOCK” on top of navigation bar to enter tag locking page. Input access password( DONOT input default password.), then click column of “Lock Code”, it will display window for selecting different methods of locking, click “OK” to generate lock code automatically, then click “Lock”... - Page 16 MR15 User’s Manual V1.0 Pic.8-2...
-
Page 17: Kill Tag
MR15 User’s Manual V1.0 3.6 Kill Tag Click “KILL” on top of navigation bar to enter operating page. Input access password (DONOT input default password.), click “Kill” button to destroy tags in Pic.9-1. Comment: user could filter tag by setup address, data length and data for selecting EPC, TID or USER area. -
Page 18: Uhf Module Version
MR15 User’s Manual V1.0 3.7 UHF Module Version Click 3 dots on top right of application and click “About” in list to check version of UHF module in Pic.10-1. Pic.10-1... -
Page 19: Module Temperature
MR15 User’s Manual V1.0 3.8 Module Temperature Click 3 dots on top right of application, click “Module temperature” in list to check UHF module temperature in Pic.11-1. Pic.11-1... -
Page 20: Chapter 4 Config
MR15 User’s Manual V1.0 Chapter 4 Config Click “CONFIG” on top of navigation bar to enter setup page. 4.1 Working mode User could setup different frequency band for different countries, as Pic.12-1, click “Set Frequency” to confirm frequency band. Click “Get Frequency”... -
Page 21: Output Power
MR15 User’s Manual V1.0 4.2 Output Power User could select different output power from 5 to 30dBm in Pic.12-2, click “Set Power” to confirm setup. Click “Get Power” to get current output power. Pic.12-2... -
Page 22: R2000 Settings
MR15 User’s Manual V1.0 4.3 R2000 settings Select ANT1-ANT8 to setup antenna, selected antenna will start functioning, unselected antenna will in OFF in Pic.12-3. Click “Set Antenna” to confirm setup, “Get Antenna” to check current antenna status. Pic.12-3... -
Page 23: Protocol
MR15 User’s Manual V1.0 4.4 Protocol There are two protocols can be selected in Pic.12-4, click “Set Protocol” to confirm. Pic.12-4... -
Page 24: Rf Link
MR15 User’s Manual V1.0 4.5 RF link There are four parameters can be selected in this parameter, as Pic.12-5. Click “Set link parameter” to confirm, click “Get link parameters” to check current RF link parameters. Pic.12-5... -
Page 25: Qt Tag
MR15 User’s Manual V1.0 4.6 QT Tag Select “Set QTPara” to switch ON and OFF hidden areas of QT tag, click “Get QTPara” to check current status. Pic.12-6... -
Page 26: Open Tagfocus
MR15 User’s Manual V1.0 4.7 Open tagFocus Select ON/OFF of tagFocus in Pic.12-6. 4.8 Open FastID Select ON/OFF of “Open the EPC and TID” in Pic.12-6. 4.9 Open EPC and TID Select ON/OFF of “Open the EPC and TID” in Pic.12-6. -
Page 27: Chapter 5 Simplified Eu Declaration Of Conformity
MR15 User’s Manual V1.0 Chapter 5 SIMPLIFIED EU DECLARATION OF CONFORMITY Hereby, Marson Technology Co., Ltd declares that the radio equipment type Fixed Android UHF Reader is in compliance with Directive 2014/53/EU. -
Page 28: Chapter 6 Warning
MR15 User’s Manual V1.0 Chapter 6 Warning RF exposure information: The Maximum Permissible Exposure (MPE) level has been calculated based on a distance of d=20 cm between the device and the human body. To maintain compliance with RF exposure requirement, use product that maintain a 20cm distance between the device and human body. - Page 29 MR15 User’s Manual V1.0 or television reception, which can be determined by turning the equipment off and on, the user is encouraged to try to correct the interference by one or more of the following measures: - Reorient or relocate the receiving antenna.
Need help?
Do you have a question about the MR15 and is the answer not in the manual?
Questions and answers