
Related Manuals for BENKISER Vormischer II 3/8

Summary of Contents for BENKISER Vormischer II 3/8
- Page 1 Vormischer ii 3/8“ mit thermostat InstallatIons- und WaRtungsanleItung InstallatIon and maIntenance guIde...
-
Page 2: Technische Daten
3/8” PacKungsinhalt Wartung & anPassunge installation des oPtionalen 25 mm (1”) Verbindungssets g- 3/8” 9-13 testemPfehlungen Vormischer ii 3/8“ mit thermostat 3515050 14-15 beschrÄnKte garantie Min. Fließdruck 0.5 bar (7 Psi) Max. Fließdruck 5.0 bar (72.5 Psi) Max. Heißwassertemperatur Vorbereitung auf die installation Wasserleitungen vor installation der armatur sorgfältig durch-... -
Page 3: Installation
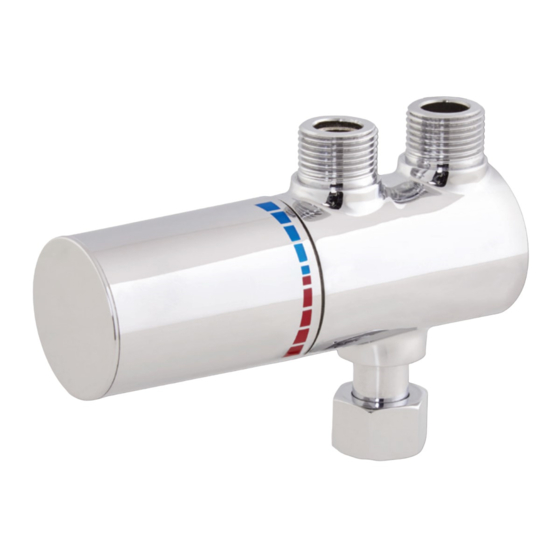
INSTALLATIoN PACKUNGSINHALT machen sie sich mit den bezeichnungen der teile vertraut und vergewissern sie sich, dass alle teile vollständig Verbinden sie den heißwasser-einlass mit enthalten sind: der heißwasser-leitung. auslass- Kaltwasser- heißwasser-einlass anschluss einlass-anschluss benutzen sie ein Kaltwasser-einlass Verbindungs-set um den Kaltwasser-einlass mit der Kaltwasser-leitung zu verbinden. - Page 4 WARTUNG & ANPASSUNGEN WARTUNG & ANPASSUNGEN ZUGANG ZUM FILTER stellen sie das spindel(a) so ein, dass die markierung schraube entfernen am spindel mit den Kerben an der Kartusche (b) und dem gehäuse (c) übereinstimmt. ∙ entfernen sie den Zum feststellen der temperatur, siehe abschnitt unten schwarzer ring schwarzen ring und die messing-mutter...
- Page 5 WARTUNG & ANPASSUNGEN WARTUNG & ANPASSUNGEN THERMISCHE DESINFEKTION TEMPERATUR FESTSTELLEN lösen sie die schraube und den drehknopf. drehen sie den Knopf und stellen sie mit einem thermometer die gewünschte benutzen sie den drehknopf, temperatur ein. um das spindel der thermostat-Kartusche auf max.
- Page 6 TESTEMPFEHLUNGEN INSTALLATIoN DES oPTIoNALEN VERBINDUNGS-SETS BEZEICHNUNG integriertes thermostatisches hP-s, hP-W, lP-s, mischventil lP-W 1. Verbinden sie a mit c des t-stücks. BEDINGUNGEN FÜR DEN NORMALEN GEBRAUCH (HP) 2. Verbinden sie d des t-stücks max. ruhedruck (bar) direkt mit der Kaltwasser-leitung fließdruck, heiß...
- Page 7 TESTEMPFEHLUNGEN TESTEMPFEHLUNGEN INBETRIEBNAHME MAX. STETIGE TEMPERATUREN 1. Prüfen sie, ob die bezeichnung des thermostatischen WÄHREND DEM TEST NOTIERT Vormischers der vorgesehenen anwendung (Waschtisch) anWendung mischWassertemPeratur °c entspricht. bidet 40°c max. 2. Prüfen sie, ob die Versorgungsdrücke im bereich der betriebsdrücke für die bezeichnung des Vormischers liegen Waschtisch 43°c max.
- Page 8 TESTEMPFEHLUNGEN TESTEMPFEHLUNGEN BETRIEBS-TESTS HÄUFIGKEIT 2. Wenn sich die temperatur seit dem letzten test erheblich Gesundheitswesen geändert hat, folgen sie den nächsten schritten: die betriebs-tests sollten 6 bis 8 Wochen und 12 bis 15 a. notieren sie die Änderung Wochen nach der inbetriebnahme durchgeführt werden. b.
-
Page 9: Beschränkte Garantie
Verkäufer lehnen armaturenwerk gmbh nach eigenem ermessen das Produkt jegliche haftung für besondere schäden, folgeschäden oder... -
Page 10: Technical Data
INDEX TECHNICAL DATA 100 mm (3-7/8”) technical data 37 mm (1-1/2”) 27 mm (1”) g- 3/8” g- 3/8” PacK contents installation 20 - 23 maintenance & adJustments installation of the oPtional 25 mm (1”) connection Kit 25-29 tYPe 3 ValVes information g- 3/8”... -
Page 11: Pack Contents
INSTALLATIoN PACK CoNTENTS familiarize yourself with the part names and confirm that the connect the hot water parts are included: inlet to the hot water mains. outlet cold water inlet connection connection hot water inlet cold water inlet use the connection kit to connect the cold water inlet to the cold water mains. -
Page 12: Maintenance And Adjustments
MAINTENANCE & ADjUSTMENTS MAINTENANCE & ADjUSTMENTS ACCESSING THE FILTER align gear knob (a) so that the mark on the knob is remove screw aligned with the notches on the cartridge (b) and on the valve body (c). to lock temperature see section below black ring ∙... - Page 13 MAINTENANCE & ADjUSTMENTS MAINTENANCE & ADjUSTMENTS THERMAL DISINFECTION LOCKING THE TEMPERATURE remove the screw and cap Locking the temperature: use the cap to adjust the turn the knob and use a thermostatic cartridge to the thermometer to set the max. temperature. desired temperature.
- Page 14 TYPE 3 VALVES INFoRMATIoN INSTALLATIoN oF THE oPTIoNL CoNNECTIoN KIT DESIGNATION integrated thermostatic mixing hP-s, hP-W, lP-s, valve lP-W 1. connect a to c on the t - Valve. CONDITIONS FOR NORMAL USE (HP) 2. connect d of the t- valve maximum static Pressure (bar) directly to the cold water mains.
- Page 15 TYPE 3 VALVES INFoRMATIoN TYPE 3 VALVES INFoRMATIoN COMMISSIONING MAXIMUM STABILIZED TEMPERATURES RECORDED DURING SITE TESTS 1. check that the designation of the thermostatic mixing aPPlication mixed Water temPerature c˚ valve matches the intended application (washbasin) 2. check that the supply pressures are within the range of bidet 40°c max.
- Page 16 TYPE 3 VALVES INFoRMATIoN TYPE 3 VALVES INFoRMATIoN IN-SERVICE TESTS FREQUENCY 2. if the temperature has changed significantly from the last Healthcare test results follow the next steps: the in-service tests should be followed 6 to 8 weeks and 12-15 a.
-
Page 17: Limited Warranty
installation... - Page 19 Daimlerstraße 2, D-93133 Burglengenfeld, Germany Tel. +49 (0) 9471 / 600 93-0 | Fax +49 (0) 9471 / 88 55 www.benkiser.de | info@benkiser.de 08.19 01500483 -a...
Need help?
Do you have a question about the Vormischer II 3/8 and is the answer not in the manual?
Questions and answers