Table of Contents
Advertisement
Available languages
Available languages
Quick Links
Advertisement
Table of Contents

Related Manuals for Promaker PRO-TZ2400


Summary of Contents for Promaker PRO-TZ2400
- Page 1 English: 2 I Español: 18 Chop Saw User’s Manual Model No.: PRO-TZ2400...
- Page 2 RULES FOR SAFE OPERATION USE SAFETY GLASSES Use face or dust mask if the cutting operation is dusty. Also use ear protection to reduce the risk of induced hearing loss. Safe operation this power tool requires that you read and understand this operator’s manual and all labels affixed to the tool.
- Page 3 • GUARD AGAINST ELECTRICAL loose clothing, or other jewellery, as SHOCK BY PREVENTING BODY they can be caught in moving parts. CONTACT WITH GROUNDED Rubber gloves and nonslip footwear SURFACES. For example: pipes, are recommended when working radiators, ranges, refrigerator enclosures. outdoors.
- Page 4 PROMAKER Authorized Service ® function. Check for alignment of Center. Stay constantly aware of cord location and keep it well away moving parts, binding of moving from the rotating wheel.
- Page 5 •REPLACEMENT WORKPIECE. repairs, whether electrical mechanical, should be made at a • NEVER cut more than one PROMAKER Authorized Service ® workpiece at a time. DO NOT Center. STACK more than one workpiece on the machine base at a time.
-
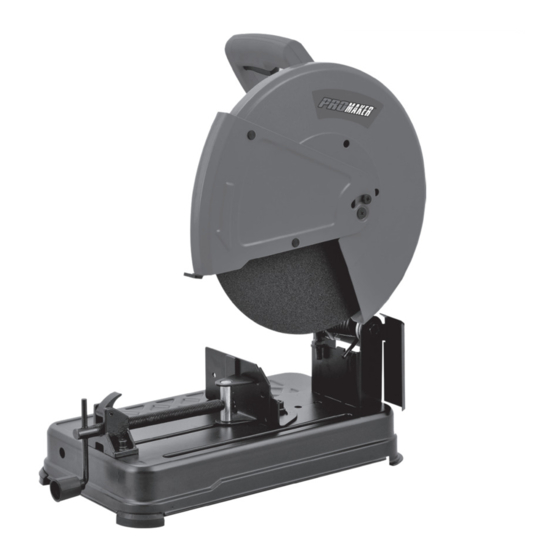
Page 6: Product Specifications
• DO NOT OPERATE THIS TOOL should any electrical component WHILE UNDER THE INFLUENCE fail to perform properly, shut off the power switch, remove the machine OF DRUGS, ALCOHOL, OR ANY plug from the power source and MEDICATION. have damaged, missing, or failed parts replaced before resuming •... - Page 7 Maximum Cutting Capacities 6. Vice Crank Handle 7. Machine Base 8. Vice Clamp Shape 9. Wrench 10. Depth Stop Bolt Angle 11. Spindle Lock Button 0° 115mm 119mm 115mm×130mm 137mm 12. Motor (4-1/2”) (4-23/32”) (4-1/2” ×5-3/32”) (5-3/8”) 13. Machine Arm 102mm×194mm 14.
-
Page 8: Adjustable Fence
materials up to 115 mm thick or 233 to be moved back when making cuts mm wide, depending upon the in stock that is thin or wide, such as angle stock. thickness or width of the material and the angle setting at which the QUICK LOCK-RELEASE LEVER cut is being made. - Page 9 connected to power supply when machine arm is spring loaded. you are assembling parts, making •Pull lower wheel guard upward, adjustments, installing or removing exposing wheel bolt that secures wheels, or when not in use. abrasive wheel to wheel arbor. As mentioned previously your cut-off •Pull the spindle lock button and machine has been factory assembled...
-
Page 10: Cutting Angle Adjustment
the wheel. Select another wheel. is used along with the vice clamp to provide a clamp for holding your • Clean debris from the inner washer workpiece securely when making and inner flange. cuts. It also makes your cut-off • Place new wheel over spacer, then machine more versatile. -
Page 11: Power Supply
ADJUSTING WIDTH OF CUT (Fig. 5-6) below: • Unplug your cut-off machine. • Cutting all types of ferrous metals such as 50.8 mm (2”) x 152.4 mm (6”) steel framing studs. WARNING • Cutting hard metal iron stock such Failure to unplug cut-off machine as square bar stock and angle iron. - Page 12 CUTTING WITH YOUR CUT-OFF To avoid accidental start up of your MACHINE (Fig. 10) cut-off machine, always make sure the switch is off before connecting to power source. Failure to heed this WARNING warning could result in serious Do not attempt to cut wood or personal injury.
-
Page 13: Maintenance
— with the exception of Never perform any cutting operation the externally accessible brushes freehand (without placing workpiece — should be performed by a in the vice). Material will get hot PROMAKER Authorized Service ® during cutting operation. -
Page 14: Troubleshooting
brushes when either has less than 1. Have the 6.35mm (1/4”) length of carbon switch replaced 1. Switch is remaining. at your nearest defective. authorized Do not replace one side without 2. Voltage from Motor stalls, service center. source is low. replacing the other. -
Page 15: Ec Declaration Of Conformity
Product: Chop Saw 2 months where you can exchange the tool for a higher Type: PRO-TZ2400 capacity one if the original does not meet your requirement, by paying the difference in price. • All the attributes offered by the warranty are valid presenting the original purchase invoice. - Page 16 www.promakertools.com...
- Page 17 Tronzadora de Metal Manual del Usuario Modelo No.: PRO-TZ2400...
-
Page 18: Lea Todas Las Instrucciones
NORMAS PARA OPERACIÓN SEGURA EQUIPOS PROTECCION. Use careta o máscara de polvo si la operación de corte es polvorienta. Siempre use protección de oídos para reducir el riesgo de pérdida auditiva inducida. Una segura operación de esta herramienta eléctrica requiere que usted lea y entienda este manual de operaciones y todas las etiquetas adheridas a la herramienta. - Page 19 el manual de operaciones. Aprenda a la velocidad para la cual fue las aplicaciones y limitaciones de diseñada. la máquina de corte, así como los peligros específicos relacionados • HERRAMIENTA con esta herramienta. ADECUADA. fuerce pequeña herramienta o accesorio • PROTÉJASE CONTRA para hacer un trabajo de una...
- Page 20 cuando cambie accesorios, discos, Un protector u otra pieza dañada brocas, cortadores, etc., Todas las debe ser reparada o reemplazada herramientas deben desconectarse. por un centro de servicio autorizado para evitar el riesgo de lesiones • ALMACENE LAS HERRAMIENTAS personales. INACTIVAS.
- Page 21 • PIEZAS DE REPUESTO. Todas las reparaciones, ya sean eléctricas NUNCA ARRANQUE • o mecánicas deben realizarse en un MAQUINA DE CORTE CUANDO Centro de Servicio Autorizado por EL DISCO ESTE EN CONTACTO PROMAKER ® CON LA PIEZA.
- Page 22 PROMAKER®. idénticas. El uso de otros repuestos puede crear un peligro o dañar el • ASEGÚRESE QUE EL AREA DE equipo. TRABAJO TENGA SUFICIENTE ILUMINACIÓN para ver el trabajo...
-
Page 23: Especificaciones Técnicas
ESPECIFICACIONES TÉCNICAS ADVERTENCIA: No intente modificar esta herramienta Technical Specifications o crear accesorios no recomendados para esta herramienta. Cualquier Voltaje/ 120V/ modificación es un uso incorrecto Frecuencia 60Hz y puede resultar en riesgos que Potencia 2400W pueden causar lesiones personales Velocidad 3600rpm graves. - Page 24 CARACTERÍSTICAS de sujeción para mantener fija su pieza de trabajo de manera segura MOTOR cuando se hacen los cortes. Se Esta máquina tiene un motor con trata de una guía ajustable que se suficiente potencia para realizar ha proporcionado para hacer que trabajos de corte resistente y fuerte.
- Page 25 se cambia el disco abrasivo. Tire del asegúrese de que la herramienta botón de bloqueo del eje solamente esté desenchufada de la fuente de mientras instala, cambia o retira el alimentación. El incumplimiento de disco de corte. esta advertencia podría resultar en lesiones personales graves.
- Page 26 hacerlo podría causar un accidente • Con la llave suministrada, apriete ya que el disco no se ajustaría firmemente el perno del disco. correctamente. Nota: El perno tiene roscas a la derecha. Gire el perno en sentido AL INSTALAR (Fig. 3) horario para apretar.
-
Page 27: Fuente De Alimentación
A continuación, afloje el perno del PRECAUCIÓN tope ajustable. No arranque su máquina de corte abrasivo sin comprobar si hay • Gire la guía hasta que el ángulo interferencia entre el disco y el de corte deseado en la escala esté soporte de la base de la máquina. - Page 28 de la herramienta. Una caída lesiones personales graves. considerable del voltaje causará una pérdida de potencia y una • Para evitar que la máquina sobrecarga de la máquina. se mueva o se incline durante el proceso de corte, asegure la ¡...
-
Page 29: Mantenimiento
Centro de Servicio Autorizado por PROMAKER® • Antes de encender la máquina, REEMPLAZO DE ESCOBILLAS realice una operación en seco de (Fig. 12) la operación de corte, solo para... -
Page 30: Solución De Problemas
SOLUCIÓN DE PROBLEMAS revisado periódicamente para comprobar su desgaste. Proceda de la siguiente manera PROBLEMA CAUSA SOLUCIÓN cuando se requiera su reemplazo: 1. Conecte el cable • Desconecte la máquina de corte. 2. Haga que 1. El cable no le reemplacen esta enchufado el cable en a la toma... -
Page 31: Ec Declaración De Conformidad
5. La superficie equipo aprobación. de trabajo no 5. Reubique y esta alineada asegure en una Producto: Tronzadora de Metal superficie plana. Modelo Tipo: PRO-TZ2400... - Page 32 www.promakertools.com...
Need help?
Do you have a question about the PRO-TZ2400 and is the answer not in the manual?
Questions and answers