Table of Contents
Advertisement
Quick Links
Home
Pro-651/652/106/197 - WS1040/1065 - PSR 500/600
Click
here
Intro/Review
Main Features
Scanning Terminology
Understanding Object Oriented Memory
Object Numbering
Understanding Scan Lists
Understanding Trunking
Understanding Multi-Site Trunking
Understanding IDs
Understanding Receive Modes
Understanding CTCSS/DCS/NAC
Turning on the Scanner and Setting the Squelch
A Look at the Keypad
A Look at the Display
Basic Settings for Navigation
Navigating the Menus
Using Menu Help
Text Tagging and Qtext
Customizing Qtext
Using Qtext
Global Settings (GLOB) Menu
Planning Systems and Scan Lists
Creating (Programming) Objects
CONV (Conventional) Object Menu
Programming CTCSS/DCS/NAC Tones
TSYS (Trunked System) Object Menu
Programming a Motorola Fleet Map
Fleet Maps
Programming Offset and Base Frequency for UHF/VHF
Selecting EDACS ID Format
TGRP (Talkgroup) Object Menu
SRCH/STLK/SWPR (Search/Stalker/Sweeper) Object Menus
Duplicating Objects
Finding Objects
Deleting Objects
WS1040
This generation of radios, half made by GRE and the newer Pro-651/652 and WS1040/65
by Whistler, are all identical in operation. The PSR-C (Canadian) models are no different
from the US models except that the bandplan setting defaults to Canada, the V-Scanner
Easier to Read
Digital Scanner Manual
to buy a printed, bound, formatted in color, copy of this manual from
Last Updated October 04, 2019
Pro-651
Pro-106
Contents
Scanning the Scan Lists
Turning Scan Lists Off and On
Storing...
Using Pause and Manual
Temporary/Permanent Lockout
Unlocking Objects
Priority Scanning
Using the Attenuator
Using the Favorites/Skywarn Lists
Optimizing Scanning Parameters
Tune Search/Analyze Mode
Dedicated Searches
Public Safety/Air/Ham Search
Public Safety, Air, and Ham Group Charts
Marine/CB/FRS Search
Marine, CB, and FRS/GRMS/MURS Search Channels
Rail Search
Limit Search
Zeromatic Tuning
Signal Stalker/Spectrum Sweeper Search
Unlocking Search Frequencies
Using Weather Modes
Weather Radio
Weather Priority
SAME Standby
Event Codes
Using V-Scanner Folders
Preprogrammed V-Scanner Folders
Expert Settings Menu
Cloning/Uploading/Downloading
Firmware Version/Updates and Power-On Menus
Memory Used
Scanner Reset
Default Step Chart
Menu Outline
Footnotes/Related Links
Intro/Review
PSR500
Scanner Master
Contents
WS1065
Pro-652
Advertisement
Table of Contents

Related Manuals for Scanner Master Pro-6510

Summary of Contents for Scanner Master Pro-6510
- Page 1 Easier to Read Pro-651/652/106/197 - WS1040/1065 - PSR 500/600 Digital Scanner Manual Click here to buy a printed, bound, formatted in color, copy of this manual from Scanner Master Last Updated October 04, 2019 Contents Intro/Review Scanning the Scan Lists Main Features...
-
Page 2: Main Features
folders include Canadian provinces, and firmware updates are separate. The newer Pro- 651/652 and WS1040/65 don’t have preprogrammed V-Scanner folders. Programming isn't too hard once you figure out how to navigate the new menus. These are another excellent set of radios that have many fine features for scanning, searching, and trunking. - Page 3 Automatic Adaptive Digital Tracking (ADT) - when monitoring P25 digital systems, instantly adapts the digital decoder to the digital modulation format of the transmitted signal, then analyzes the signal over 50 times each second and adapts to any subtle changes caused by multipath or fading. No cumbersome manual adjustments are required.
-
Page 4: Understanding Trunking
Key Lock (HH models) - lets you lock the scanner's keys to help prevent accidental changes to the scanner's programming. Key Confirmation Tones - the scanner sounds a tone when you press a key, perform an operation correctly, and an error tone if you make an error. Can be turned off. - Page 5 The control channel is continually transmitted to the field units and has a sound similar to listening to a boat engine over the phone (in manual mode; you won't hear this when you are trunking the system.) This control channel is also a good check to see if you can trunktrack the system. If you can't hear a control channel when you step through the trunking frequencies (in manual mode), you either don't have all the frequencies or are too far away to receive the control channel and the system.
-
Page 6: Turning On The Scanner And Setting The Squelch
distant transmitters on the same channel. In all major metropolitan areas of the United States, every available radio channel is assigned to more than one user. Public safety radio systems on the same frequency are usually set up at a distance of 40 miles apart, or more. This means that you may hear transmissions from a distant system when your local system is not transmitting. -
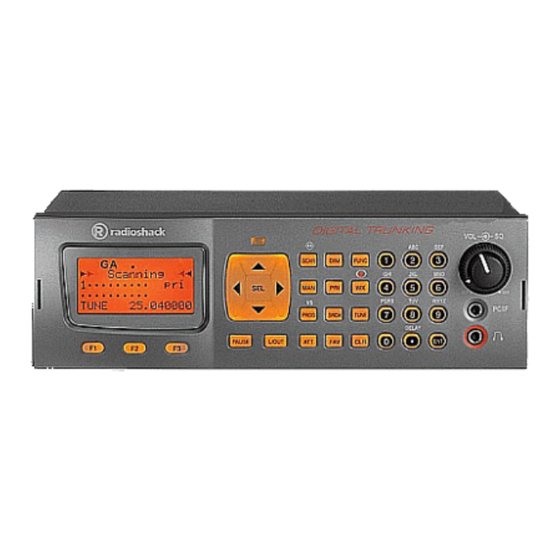
Page 7: A Look At The Display
PSE (Pause) Pauses scan or search mode. 1-0/A-Z Used to turn scan lists 1-10 on/off. Inputs numbers or characters. FUNC- 1-0 Used to turn scan lists 11-20 on/off. FUNC-0 toggles Zeromatic Tuning on/off in dedicated search mode. CL (Clear) Clears an incorrect character in text mode. FUNC-CL Clears an entire entry field in text mode or deletes objects. - Page 8 pri appears if priority is off. PRI appears if priority is on. Wx# shows the weather channel number in Weather Scan Mode. Wx#-P indicates weather priority is on 4th Line Scan Lists 11-20 (1-20) that are enabled for scan will appear. A . (dot) indicates the Scan List is disabled. Blinking numbers indicate empty enabled Scan Lists.
- Page 9 the Scan List Number (01-20), FV (Favorites), SW (Skywarn), or ns (no scan list) shows the Scan List the object is assigned to in Manual Mode and PGM alternates in Program Mode. The Object Type appears as TGRP (Talkgroup), CONV (Conventional), LMIT (Limit search), SWPR/STLK (Sweeper/Stalker search), SR-P (Public Safety service search), SR-A (Air service search), SR-H (Ham service search), SR-C (CB service search), SR-M (Marine service search), SR-F (FRS/GMRS/MURS service search), or SR-R (Railroad service search).
-
Page 10: Navigating The Menus
z (lowercase) shows zeromatic off or Z (uppercase) shows zeromatic on for the search. d (lowercase) shows the delay off or D (uppercase) shows the delay on for the search. 3rd Line FM, AM, or NFM appears to show the Modulation and Frequency. any CTCSS/DCS/NAC tone/code received alternates with a Conventional frequency. -
Page 11: Quick Text
Press FUNC then CL to clear the existing tag if desired. Move the cursor to the position where you want to insert the text. Select each letter by pressing the corresponding number key below each letter (2 for A,B,or C). The display will then show the available letters. - Page 12 Contrast Press ◄ ► to select the best contrast. Contents Owner Allows you to edit the welcome screen seen when you turn on the radio. Press SEL/ENT to edit. You are allowed 4 lines of (16 character) text. Press ▼ ▲...
- Page 13 Warning: The scanner will charge continuously with the scanner turned off and plugged into external power. (External smart charger is strongly recommended). Enter the number of hours, 0 - 16 the charger will charge. AttenMode Sets the global attenuator mode. Global applies attenuation (on or off) to all objects. Normal uses object attenuation settings. 'G' will appear in the middle of the display when set to Global.
- Page 14 Key Repeat When set to 'On', allows you to press and hold keys like ▼ ▲ to navigate through the menu faster. Default is On. Press ◄ ► to select On or Off. LCD BlinkOff For alternating text displays, sets the display time for the secondary display element. (object number, channel name, ID name/number, search name, scan list number) Enter the amount of time, 1 - 250 (10 - 2500 ms).
- Page 15 Search, and Talk Group objects can all go in the same list. The main lists, 1-20, can be scanned with any other list but the 'Favorites List' and the 'Skywarn List' will only scan objects in each respective list and no other lists. The only disadvantage here is there are only 22 lists to put everything in. But, you can put as many objects in each of these 22 locations that memory allows.
- Page 16 Scan Lists: This is where you select which Scan List(s) you want the object to be in for scanning. Press ◄ ► to select the list (01-22) then press SEL/ENT to select any/every list you want the conventional object to be in. A * (asterisk) will appear in front of each list the object will be assigned to.
- Page 17 Note: AttenMode must be set to Normal for this setting to apply. You can also toggle this setting by pressing ATT when the object is in the display in Scan mode. Delay: When set to 'On', a delay is used to wait for reply traffic after a transmission according to the Delay Time setting for the object.
- Page 18 present. Default is Off. Press ◄ ► to select On or Off. Note: AttenMode must be set to Normal for this setting to apply. You can also toggle this setting by pressing ATT while monitoring any talkgroup in the system. Narrow FM: Use Yes when the system is known to use Narrow FM modulation.
- Page 19 Enter the Hi Channel and press SEL/ENT. Enter the Offset and press SEL/ENT. Enter the Base Frequency and press SEL/ENT. Enter the Step and press SEL/ENT. Press F1 (Save) to save the table and exit. Press ▼ to move to the next table number (as needed) and repeat. Press F1 (Save) to save all trunking tables and exit.
- Page 20 Priority: When set to 'On', the ID will be given priority over other IDs when Priority (in the GLOB menu) is also set to On. Default is Off. See also Priority Scanning. Press ◄ ► to select On or Off. Note: You can also do this by pressing PRI when the ID is in the display in manual, program, or scan modes.
- Page 21 FrLo FrHi Modulation Zeromatic Options for All Search Object Options Scan Lists: This is where you select which Scan List(s) you want the object to be in for scanning. Press ◄ ► to select the list (01-22) then press SEL/ENT to select any/every list you want the object to be in. A * (asterisk) will appear in front of each list the object will be assigned to.
-
Page 22: Duplicating Objects
Srvc: Allows you to select the type of service search. Default is Pub Safety. Press ◄ ► to select Pub Safety, Aircraft, Amateur, CB, Marine, FRS/GMRS/MURS, or Railroad. Contents Groups (PubSafty,Aircraft,Amateur only): Allows you to select which groups that will be searched for Pub Safety, Aircraft, and Amateur service searches. -
Page 23: Deleting Objects
Press F1 (OK) to search. Press F3 (NEXT) to search again. To edit the object, press F2 (EDIT). 5. By L/Out Status: Note: Temporary lockout are not shown. Press PGM then F2 (EDIT) then F3 (FIND) then F1 (L/Out). Press (or press and hold) F3 (Next) to locate the object in the list. Press L/OUT to unlock. -
Page 24: Priority Scanning
Press ▼ ▲ to scroll to the trunked system and press FUNC then L/OUT to toggle temporary lockout or L/OUT to toggle permanently lockout for the system. Unlocking Objects Contents See also Find by L/O Status. To Unlock a Conventional, Talkgroup, or Search Object: (to unlock search frequencies within search objects see Unlocking Search Frequencies). - Page 25 Optimizing Scanning Parameters Contents Move your scanner/antenna to a different location. Sometimes just 12" helps. Digital is especially real fussy. Get a better antenna. The stock rubber duck/whip antennas are just average quality. Conventional Scanning Setting the squelch properly is the easiest and quickest way to receive channels better. Set the SQ Wait 1 (in the 'Expert Settings' menu) down to 7 or 5.
- Page 26 To pause on a frequency press PSE. To lockout a frequency press F1 (FrL/O). To unlock a frequency Unlocking Search Frequencies. To toggle the receive mode press F2 (Mode). To store a frequency into the Default Scan List press F3 (Stor). To toggle the search delay on or off...
-
Page 27: Dedicated Searches
Analyze Mode is very similar to Tune Mode for trunking frequencies. The information is much the same as TUNE mode. There are two ways to get to analyze mode: To analyze the trunked system for a talkgroup in the display, press F2 (TSYS) then F3 (Analyz). Or, press PGM then F2 (EDIT). -
Page 28: Limit Search
To view all channels press F2 until (ALL-[uppercase]) appears. To view just unlocked channels press F2 until (all-[lowercase]) appears. To lockout a channel press F1 (FrL/O). To unlock a channel press F2 until (ALL)(uppercase) appears. Press ▼ ▲ to locate the locked out channel ('L' in front of channel) and press L/OUT to unlock. - Page 29 Enter the lower frequency and press ENT. Enter the upper frequency and press ENT. Press F1 (Save). To change direction or resume searching press ▼ or ▲. To pause on a frequency press PSE. To lockout a frequency press F1 (FrL/O). To unlock a frequency Unlocking Search Frequencies.
-
Page 30: Using Weather Modes
Unlocking Search Frequencies To unlock a frequency press PGM then F3 (GLOB) to enter the 'Global Settings' Menu. Press ▼ to locate SRCH L/Outs then press SEL/ENT to view the lockout list. Press ▼ to locate the frequency and press F3 (Del) to unlock (or press and hold to delete multiple frequencies). To unlock all frequencies press FUNC then F3 (Del) while in the lockout menu. - Page 31 Using V-Scanner Folders V-Scanner Selection V-Scanner Menu Contents These scanners have two types of memory storage. Main memory and V-Scanner memory. Main memory is what you see and use when you turn on the scanner. V-Scanner memory is used to store complete copies of your scanner's main memory including objects, 'Global Settings' and dedicated search configurations.
- Page 32 Settings by Type General Tuning P25 Trunking Motorola Trunking Stalker/Sweeper Settings Weather Settings Digital Tuning CTCSS/DCS/NAC EDACS Trunking Zeromatic Settings Misc Settings General Tuning SQ Wait 1 The amount of time to wait for a signal on a frequency while scanning (scan speed) in the same band. The lower the value the faster the scan speed, the higher the value, the slower the scan speed.
- Page 33 ACSQ PolInt The interval of time to check for a CTCSS/DCS/NAC signal. Default Value 100 (100 ms). Values: Enter 10-1000 (10 - 1000 ms). Menu Help Text: Interval to poll for value Win500 Name - Extended Settings>CTCSS/DCS/NAC> PSREdit Name - Weather/Advanced Configuration>HD5 Settings> Query Interval Query Interval HD5 Fade...
-
Page 34: Weather Settings
Squelch Delay #2 in Search Mode Stalk(Sweep)SrchSQ1 Length of time to wait for a signal on a frequency during Stalker/Sweeper while searching (small signal quality). Default Value 10 (10 ms). Values: Enter 1-100 (1 - 100 ms). Menu Help Text: Stalker/Sweeper search small sig qual Win500 Name Extended Settings>Spectrum Sweeper>... - Page 35 TUNE mode display Tune Mode Text RSSI Sig Cal Allows you to customize the signal strength meter bar threshold values for the bars 1-5. Settings of 470 540 610 680 750 provide a wider range indication of signal strength than the default settings. [2] Default (WS1040/65) Suggested...
- Page 36 Win500 Name - Extended Settings> PSREdit Name - General Configuration>Other Options> Allow 5kHz steps 138-174 MHz Use 5khz steps from 138-174 MHz CCDump Enables the Control Channel Dump feature. Default Value No. Values: ◄ ► to No/Yes. Menu Help Text: Dump CC msgs to PC/IF Win500 Name - Extended Settings>...
- Page 37 26.965-27.405 157.470-161.5725 Police-Business-Rail 27.410-29.505 VHF Lo 157.455-161.595 Police-Business-Rail 29.510-29.700 10m Ham 161.600-161.975 Remote Broadcast-Maritime 29.710-49.830 VHF Lo Band 162-174 12.5 (*5) Government Band 49.835-54 6m Ham 216.0025-219.9975 Maritime 108-136.9916 8.33 Civilian Air 220-224.995 1.25m Ham-General Trunked 137-137.995 Satellite 225-379.99375 6.25 AM Military Air 138-143.9875 12.5...
- Page 38 ID Tracker II/III TrunkMON ScanBuddy-monitors/logs Stalker/Sweeper "hits" Click here to visit Scanner Master Preset Fleet Maps Contents In Motorola II systems (no programming the fleet map required), all the blocks have size code, S0, which has a size limitation of 512 radios. In Type I systems, size codes are used in different blocks to denote the maximum number of users in that block.
- Page 39 1024 2048 4096 Thanks to Radio Reference.com for most of this information. Contents Home Last updated October 04, 2019 web counter...
Need help?
Do you have a question about the Pro-6510 and is the answer not in the manual?
Questions and answers