Table of Contents
Advertisement
Quick Links
Advertisement
Table of Contents

Summary of Contents for Medi Capture MediCap USB170
- Page 1 MediCap ® USB170 Medical Still Image Recorder User Guide USB170-UG01-EN-130812-MC...
- Page 2 ® MediCap USB170 User Guide – English Precautions for Use WARNING: To reduce the risk of fire or shock hazard, do not expose this equipment to rain or moisture. CAUTION: To reduce the risk of fire or shock hazard and annoying interference, use the recommended accessories only.
- Page 3 ® MediCap USB170 User Guide – English Important Safety Instructions 1. Read all of these instructions. 2. Keep these instructions. 3. Heed all warnings in these instructions. 4. Follow all of these instructions. 5. Do not misuse this apparatus. 6. Clean only with a dry cloth. 7.
-
Page 4: Table Of Contents
Front Panel........................6 Back Panel ........................6 Typical Connections ......................7 Quick Start Guide ......................8 Connecting the MediCap USB170 ..................9 Inserting a USB Flash Drive ....................9 Capturing Images ......................9 Reviewing Images ......................10 Creating Patient Folders ....................11 Using the Menus ...................... -
Page 5: Introduction
® MediCap USB170 User Guide – English Introduction Quick Start: Review the front and back panels, and the connection ® The MediCap USB170 allows you to easily capture digital medical diagrams on the images from virtually any analog medical imaging device that has following pages. -
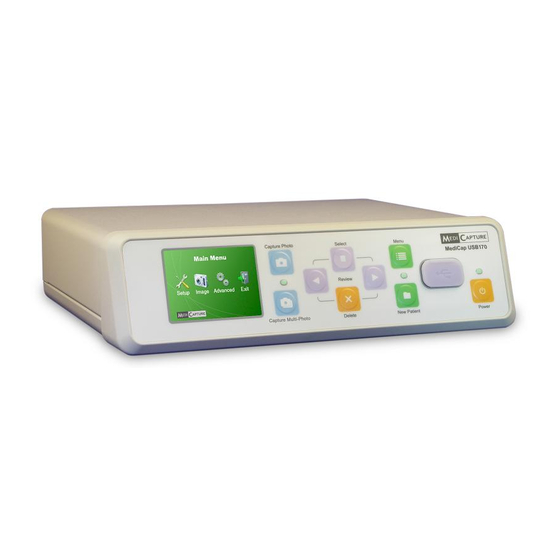
Page 6: Front Panel
® MediCap USB170 User Guide – English Front Panel Back Panel 6 of 20 USB170-UG01-EN-130812-MC... -
Page 7: Typical Connections
® MediCap USB170 User Guide – English Typical Connections Important Note: There is a very brief delay (0.06 sec.) between the time when the video signal enters the USB170 and when it is displayed on a monitor connected to the USB170. If this delay is not suitable for your medical environment, do not connect your monitor to the USB170. -
Page 8: Quick Start Guide
3. Insert the supplied MediCapture USB flash drive in the To best configure your front panel. (This is a small “stick” with a silver connector MediCap USB170, see on one end.) the Menu sections in this manual starting on 4. -
Page 9: Connecting The Medicap Usb170
Connecting the MediCap USB170 To connect the MediCap USB170, see the diagram on page 7. The MediCap USB170 is easy to set up. It connects “in-line” between a monitor and a video source (for example, an ultrasound camera, surgical video camera, etc.) 1. -
Page 10: Reviewing Images
® MediCap USB170 User Guide – English Two things will help you confirm that you have captured an image: • The image number will be displayed in the upper-left corner of the monitor. • The ‘Capture Light’ located between the two capture buttons will blink. -
Page 11: Creating Patient Folders
Patient Information Using the Menus screen will be displayed. This gives you the Settings and options for the MediCap USB170 can be accessed via the opportunity to enter the Menus. patient’s name, etc. See page 16 for more Menu button information. -
Page 12: Main Menu
® MediCap USB170 User Guide – English Main Menu To display the Main Menu, press the Menu button on the front panel. Then you can use the Next and Back buttons to navigate through the submenus. Use the Select button to make a choice. The submenus to the Main Menu are: •... -
Page 13: Setup Menu
® MediCap USB170 User Guide – English Setup Menu Setup • Date / Time Clock Set Date / Time Stamp • Language English, German, French, Spanish Italian, Portuguese, Japanese, Chinese • Input Options Input Source o BNC / S-video ... -
Page 14: Image Options Menu
® MediCap USB170 User Guide – English Image Options Menu Image Options • Format JPG, TIFF, PNG, DICOM • Resolution (in pixels) Natural 1280 x 1024 1024 x 768 800 x 600 640 x 480 •... -
Page 15: Transferring Images To Your Computer
® MediCap USB170 User Guide – English Transferring Images To Your Computer 1. Insert the USB flash drive containing captured images into a USB connector on your computer. 2. The computer will manage the flash drive just like any other drive on your computer. -
Page 16: Patient Information Feature
® MediCap USB170 User Guide – English Detailed Explanation of the Anti-Blur Option To understand the Anti-Blur option, it is first necessary to understand video “fields.” When recording the objects it is pointed at, a video camera scans a series of horizontal lines. The beam makes two passes to record one complete image. -
Page 17: Using An External Hard Drive
® MediCap USB170 User Guide – English Using the Patient Information Feature After you turn on this feature, a Patient Information screen will be displayed at the start of each imaging session (each time you press the New Patient button or insert a flash drive). -
Page 18: Connecting To A Network
® MediCap USB170 User Guide – English Connecting to a Network You can connect the USB170 to a network by using an adapter which is available from MediCapture. Making the network connection requires knowledge of computer networks. It is recommended that you contact a computer professional to make the connection. When you connect the USB170 to your network, you can access the USB170 drive from any computer on the network. -
Page 19: Appendix A: Specifications
Image Size 1280 x 1024, 1024 x 768 pixels, 800 x 600 pixels, 640 x 480 pixels Kit Contents MediCap USB170, USB flash drive, video cables, power cable, user guide Certifications Conforms to Medical Devices Directive 93/42/EEC Medical Equipment with respect to electrical shock, fire and mechanical hazards only in accordance with IEC 60601-1:2005, ANSI/AAMI ES60601-1:2005, CAN/CSA C22.2 No.60601-1:2008,... -
Page 20: Appendix B: Medicapture Limited Warranty
® MediCap USB170 User Guide – English Appendix B: MediCapture Limited Warranty MediCapture Inc. (“MediCapture”) warranties the product(s) listed below to be free of defects in materials and workmanship for a period of one (1) year. Should warranty service be required, the warranty period will be extended by the number of days required to restore normal operation and return the product(s).
Need help?
Do you have a question about the MediCap USB170 and is the answer not in the manual?
Questions and answers