
Summary of Contents for Alcor System CSSMS
- Page 1 Continuous Solar Seeing Measurement System CSSMS Installation and user manual April 12th, 2021 © ALCOR-SYSTEM...
-
Page 2: Table Of Contents
Table of Contents CSSMS installation ..............................3 Control Box installation ............................. 3 Sensor installation ............................. 8 Software .................................. 10 System requirement and operating system ....................10 installation software ............................11 Software User Interface ..........................15 2.3.1 Recorded data ............................19 System maintenance ............................... -
Page 3: Cssms Installation
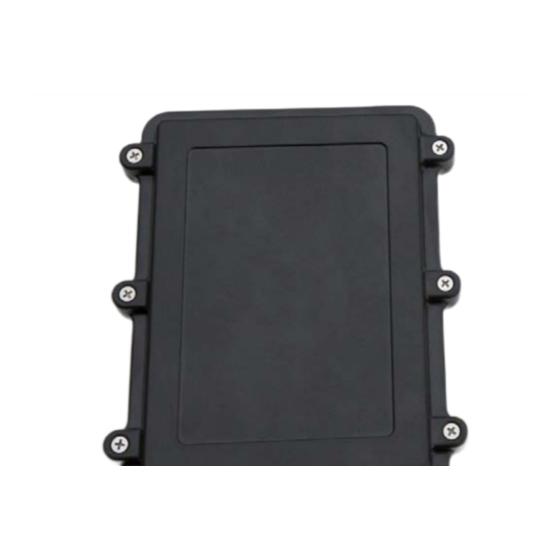
1 CSSMS installation The system is made of two parts, a control box and a sensor mounted to a ball support that allows any orientations. The sensor cannot be detached from the control box, and in located 50 cm apart. - Page 4 Control box Fig. 2 ∅6 mm / ¼’’ Fixing brackets Fig. 3 Take care of the coaxial cable at the output of the box, it is short and fragile. Do not stretch it to the maximum length or/and avoid to twist it. Connector keying and different number of pins are preventing connection errors.
- Page 5 Control box connectors side Fig. 4 Connector Role Gender (camera side) USB connector Male 5 pins Power connector Male 2 pins USB connector (#1) This is tied up to a 6 pins connector. Please connect the CSSM first and then connect to PC second. The cable that goes to the PC is 20m length.
- Page 6 Connectors’ definition Fig. 5 Turn the connector a little bit, when you fell the two parts of the connector are facing, then the connector can be pushed into its counterpart. You should never force it; it should be gentle! Connector attachment step #1: go straight with proper key orientation Fig.
- Page 7 Connector attachment step #2: rotate clockwise to have to lock the ring to prevent the cable from detaching Fig. 7 Connectors opposite side from box Fig. 8 © ALCOR-SYSTEM...
-
Page 8: Sensor Installation
When the connector is correctly pushed you can turn the locking ring clockwise to attach it. On the other side connector #2 goes to the 24V/1.5A power supply, and connector #1 goes to any USB port of your PC. This is an USB 2.0 Link. Sensor installation The sensor is a photodiode placed into a waterproof casing in the backside of a special green filter (see below filter transmission) it peaks at 550 nm. - Page 9 The base of the ball support has a female thread 3/8’’ 16 TPI UNC thread, allowing to attach it in a permanent position nearby the control box. Please, be sure both axis (azimuth and elevation) are tightened very firmly, so that it does not move over the course of the time because of the wind or the effect of the rain.
-
Page 10: Software
Latest product software can be found in our web site: http://www.alcor-system.com/common/CSSMS/software/CSSMS_Installer.exe System requirement and operating system Hardware requirement (Minimum) for CSSMS V1 PC with AMD or Intel CPU, (with passmark index above 2000) o Intel Core i3-4012Y @ 1.50GHz... -
Page 11: Installation Software
installation software Warning, to make this installation it is important to connect the device first and only after install the software, this operation allows to change device’s name to see if it’s correctly connected. If you miss this step to check whether your device is connected or not could be more difficult. The system is powered and connected, run CSSMS_Installer.exe, it will install all the software required for this device. - Page 12 At the end of the installation, two program icons on your desktop must appear. The first one is the main application which allows to use the CSSMS system. The second application icon is a java application which allows to carry out hardware update (if needed).
- Page 13 PID : Product ID must be 003F VID : Vendor ID must be 04D8 There is a quite useful software, that can help to check whether the CSSMS device has connected properly. https://www.nirsoft.net/utils/usb_log_view.html It can be installed and will help out to be sure the device is properly recognized. On USB connect this line should be added Vendor ID and Product ID are equal to the figures above.
- Page 14 In “Details” then “Device instance path” the PID/VID of your device can be found and check whether it matches or not. Browse all HID devices that are listed in the device manager, until the good one is found. Under Windows 10, after 30 to 60 seconds, if your device is correctly connected, this message should appear (at the bottom right of the screen) ©...
-
Page 15: Software User Interface
Device Connection ack message Fig. 18 Important: If the CSSMS device is not recognized by Windows, the application, on startup seeks for the CSSMS, and if not detected will display an error message and close himself. Control box USB cable must be connected both side, and powered properly prior starting the software that performs measurements. - Page 16 Part #1 Setup Menu Part #2 Seeing plot versus time Part #3 Photodiode / SUN mean signal chart Part #4 Seeing figure and other information Part #5 Log output Part 1: Setup Menu Setup menu Fig. 20 1: Time span which can be plotted, before graphics will scroll horizontally. 2: Minimum of Sun signal to allow seeing data to be computed.
- Page 17 Seeing versus time Fig. 21 This plot shows the seeing (expressed in arcsec) measured by the system over the time. One measurement point is added each second of time (based on 25 000 measurements per sec of SUN’s scintillation). A good “seeing” figure is below 2 arcsec. This is a seeing figure computed in compliance with the Fried’s theory definition of seeing.
- Page 18 Photodiode mean SUN signal Fig. 22 Part 4: Information This part shows the main information about the system. system Information Fig. 23 Last Seeing figure measured, last minute mean and last 5 min mean (1). Information about photodiode, reflecting mean SUN signal (2). Advanced information, with noise levels, mostly used for debugging purposes (3).
-
Page 19: Recorded Data
The log panel writes information that the software can display. This is for debugging purposes. Fig. 24 2.3.1 Recorded data The software records all the seeing data into a text file and appends new data to this file. This is the folder where the measurements are stored C:\Users\[Logged user name]\Documents\Solar_seeing This is a simple ASCII text file and can be opened with any software such as notepad++, excel, or... -
Page 20: System Maintenance
3 System maintenance It is advisable to clean from time to time (say three time a year), the top of the SUN sensor, to avoid accumulation of unwanted dusts or atmospheric contaminants that will dim the signal. Use alcohol, and clean and soft tissue. -
Page 21: Trouble Shooting
Use of this product involving people's lives is the responsibility of the user and in no way ALCOR SYSTEM will be held liable for injuries to persons or property theft as the use of this system described in this manual.
Need help?
Do you have a question about the CSSMS and is the answer not in the manual?
Questions and answers