
Subscribe to Our Youtube Channel
Related Manuals for Nesco NC-57100 NORU


Summary of Contents for Nesco NC-57100 NORU
- Page 1 Instruction Manual คู ่ ม ื อ การใช้ ง าน VACUUM CLEANER MODEL : NC-57100 NORU 400 W 220 V 50 Hz...
- Page 3 ถึ ง ท่ า นผู ้ ม ี อ ุ ป การะคุ ณ ทุ ก ท่ า น ขอขอบคุ ณ ทุ ก ท่ า นที ่ ไ ว้ ว างใจเลื อ กใช้ ผ ลิ ต ภั ณ ฑ์ ข อง...
- Page 4 ค� ำ เตื อ นเพื ่ อ ควำมปลอดภั ย 1. ค� ำ เตื อ นเพื ่ อ ควำมปลอดภั ย ก่ อ นการใช้ ง าน กรุ ณ าอ่ า นและปฏิ บ ั ต ิ ต ามข้ อ ควรระวั ง ของคู ่ ม ื อ ฉบั บ นี ้ แม้ ว ่ า คุ ณ อาจมี ส ิ น ค้ า ที ่ ค ล้ า ยคลึ ง กั...
- Page 5 -ห้ า มน� า วั ต ถุ ใ ดๆเข้ า ไปในตั ว เครื ่ อ ง -ห้ า มใช้ ว ั ต ถุ ใ ดๆ ที ่ ท � า ให้ เ กิ ด การกี ด ขวางการหมุ น เวี ย นของอากาศระหว่ า งการใช้ ง าน -ถ้...
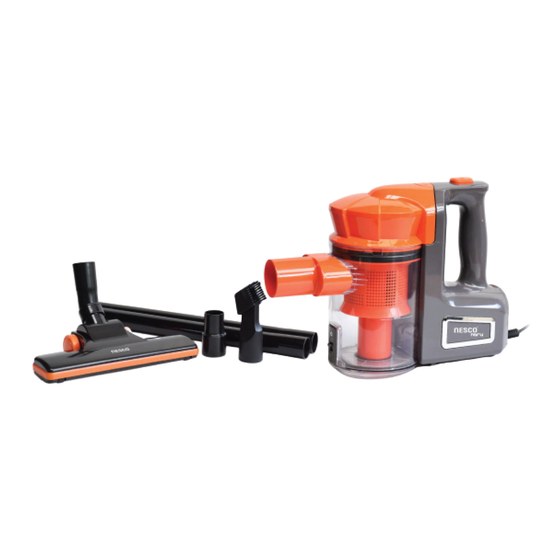
- Page 6 วิ ธ ี ก ำรใช้ ง ำน 1. วิ ธ ี ก ำรใช้ ง ำน ข้ อ แนะน� ำ -กรุ ณ าตรวจสอบให้ แ น่ ใ จว่ า คุ ณ ได้ ร ั บ ชิ ้ น ส่ ว นทั ้ ง หมดที ่ ร ะบุ ไ ว้ ใ นรายการ -การเคลื...
- Page 7 หั ว แปรงขนาดเล็ ก : ส� า หรั บ ท� า ความสะอาดผ้ า ม่ า น, ชั ้ น วางหนั ง สื อ ,โคมไฟและวั ต ถุ อ ื ่ น ๆ ที ่ อ ่ อ นนุ ่ ม 3. กำรท� ำ ควำมสะอำดแท็ ง ค์ เ ก็ บ ฝุ ่ น การท�...
- Page 8 ขั ้ น ตอนกำรดู แ ลรั ก ษำ 1. กำรท� ำ ควำมสะอำดตั ว กรองและไส้ ก รองฝุ ่ น ข้ อ ควรระวั ง : เมื ่ อ ไส้ ก รองสกปรกอย่ า งเห็ น ได้ ช ั ด ว่ า มี ฝ ุ ่ น หรื อ ลมดู ด ฝุ ่ น ลดลง กรุ ณ าท� า ความสะอาดไส้ กรองฝุ...
- Page 9 ข้ อ ควรระวั ง ข้ อ แนะน� า : หลั ง จากท� า ความสะอาดตั ว กรอง จะต้ อ งท� า ให้ แ ห้ ง สนิ ท ก่ อ นการประกอบเข้ า เครื ่ อ ง เพื ่ อ หลี ก เลี ่ ย งความเสี ย หายที ่ อ าจเกิ ด ขึ ้ น กั บ ตั ว เครื ่ อ ง จึ ง ขอแนะน� า ให้ ท ิ ้ ง ไว้ ใ นที ่ โ ล่ ง เป็ น เวลาอย่ า งน้ อ ย 24 ชั ่ ว โมง หลั...
- Page 10 2. วิ ธ ี บ � ำ รุ ง รั ก ษำ ค� า เตื อ น: ต้ อ งเก็ บ ปลั ๊ ก ให้ เ รี ย บร้ อ ยก่ อ นการบ� า รุ ง รั ก ษาเครื ่ อ ง ค�...
- Page 11 เงื ่ อ นไขกำรรั บ ประกั น สิ น ค้ ำ - สั ญ ญาการรั บ ประกั น มี ร ะยะเวลา 1 ปี น ั บ จากวั น ที ่ ท ่ า นซื ้ อ สิ น ค้ า - การรั...
-
Page 13: Vacuum Cleaner
VACUUM CLEANER 400 W 220 V 50 Hz Dear Customer Thank you for choosing a Nesco appliance. The experience, design, feature and technology of this appliance, as well as the strict quality controls used during manufacture, will provide full satisfaction for many years. - Page 15 TIP & SAFTY PRECAUTIONS 1.Warnings Before using this appliance, read and follow all warnings and instructions in this manual, even if you are familiar with this product. This appliance is not intended for use by persons (including children) with reduced physical, sensory or mental capabilities, or lack of experience and knowledge, unless they have been given supervision or instruction concerning use of the appliance by a person responsible for their safety.
- Page 16 DO NOT use with any openings blocked and do not restrict airflow. DO NOT operate the appliance with a damaged cord or plug. If the supply cord is damaged, it must be replaced by the manufacturer, its service agent or similarly qualified persons in order to avoid a hazard. DO NOT use without filters in place.
- Page 17 Instruction for use 1. Assembly Method Note: - Before assembly, please ensure that you have received all parts listed in the parts list. - Always transport / send the appliance in its original packaging so that it does not become damaged. - Always remove the plug from the power socked before fitting or removing accessories.
- Page 18 2.2 Using the cleaning accessories Dual-position carpet/ floor brush. Pos.1: bristles extended, for hard floors Pos.2: bristles retracted, for carpets Narrow nozzle : For cleaning radiators, comers, edges, drawers etc. Small brush : For cleaning curtains, shelves, books, inlaid finite lamps and other delicate objects.
-
Page 19: Cleaning And Care
3.2 Emptying Method II - Remove the dust canister from the product by pressing dust canister release button (PIC.4) and pulling the dust canister away from the product as the arrowhead shown. (PIC.5) - Holding the dust canister over a dust bin, press the dust release button as shown (PIC.6), the bottom of the dust canister will drop down to release the dirt. - Page 20 Exhaust Air Filter (PIC.10) The exhaust air filter cleans the air a final time before it leaves the vacuum cleaner. You can access and clean the exhaust air filter as follows: this is located at the rear of the vacuum cleaner inside the grille. - Unclip the grille by pressing the tab downward and remove to expose the filter inside the grille.
- Page 21 - Put the filters back on the top plate of filtration net (PIC.13), then close the cover clockwise by lining up the triangle mark (on the side of cover) and the line mark on the side of bowl (PIC.14). PIC.13 PIC.14 - Refit the dust canister in to the vacuum cleaner, simply align the dust canister into its position (PIC.15) and close until it locks in place (PIC.16).
-
Page 22: Warranty
2. User Maintenance WARNING: The plug must be removed from the power socket before any maintenance or replacement. NOTE: To maximize the performance of your vacuum cleaner, you should clean your filters regularly. 3. Important for cleaning - The Filters must be cleaned regularly for best suction performance and to prevent over-heating and damage to your vacuum cleaner. - Page 23 Neco Group Co.,Ltd. 46/178 3 Floor Moo 12 Nuanchan Rd. Klongkum Buengkum Bangkok Thailand 10230 Tel 0-2363-7757-62 Fax 0-2363-7763 บริ ษ ั ท เนสโก้ กรุ ๊ ป จำ � กั ด 46/178 ชั ้ น 3 หมู ่ 12 ถนนนวลจั น ทร์ แขวงคลองกุ ่ ม เขตบึ...
Need help?
Do you have a question about the NC-57100 NORU and is the answer not in the manual?
Questions and answers