Table of Contents
Advertisement
Auto Feed Screw Driving System
VISLIDER
Instruction Manual
Thank you for purchasing, this Muro Auto
Feed Screw Driving System, Vislider.
Please read this instruction manual carefully
before use so you fully understand the proper
use and safety features of this tool.
This manual should be kept in a safe place
for future reference.
VL42-FD
VL42-FL
Double Insulation
Advertisement
Table of Contents

Summary of Contents for MURO VISLIDER VL42-FD
- Page 1 VISLIDER VL42-FD VL42-FL Double Insulation Instruction Manual Thank you for purchasing, this Muro Auto Feed Screw Driving System, Vislider. Please read this instruction manual carefully before use so you fully understand the proper use and safety features of this tool.
-
Page 3: Table Of Contents
Table of Content Contents Page No General Power Tool Safety Warnings Safety Instructions for Use of Vislider Product Specifications List of Bits Part Names Assembling the Tool Tool Adjustments Driving Screws Maintenance and Inspection To prevent fire, electric shock, or injury, read all safety precautions carefully ◆... -
Page 4: General Power Tool Safety Warnings
General Power Tool Safety Warnings Warning WARNING Read all safety warnings and all instructions. Failure to follow the warnings and instructions may result in electric shock, fire and/or serious injury. Save all warnings and instructions for future reference. The term "power tool" in the warnings refers to your mains–operated (corded) power tool or battery- operated(cordless)power tool. - Page 5 Warning d) Remove any adjusting key or wrench before turning the power tool on. A wrench or a key left attached to a rotating part of the power tool May result in personal injury e) Do not overreach. Keep proper footing and balance at all times. This enables better control of the power tool in unexpected situations.
-
Page 6: Safety Instructions For Use Of Vislider
• The wrong combination of screws and rotating speed of the tool may overload the motor, which may result in damage or injury. • For details about the applicable tool for your screws, please see our website - www.muro.com, contact your dealer, or the Customer Service Department of MURO NORTH AMERICA INC.. - Page 7 Warning 10) A repair of the power tool should be requested from a specialized shop. • The power tool complies with applicable safety standards. Never disassemble or modify the power tool. • Repair of the power tool must be requested from the shop where you purchased it. •...
-
Page 8: Product Specifications
Muro collated coil screws allow you to drive screws efficiently and safely on floor, deck and roof applications. Only Muro screws can be used in the Vislider. Not using Muro branded screws can damage the tool and WILL void the warranty. -
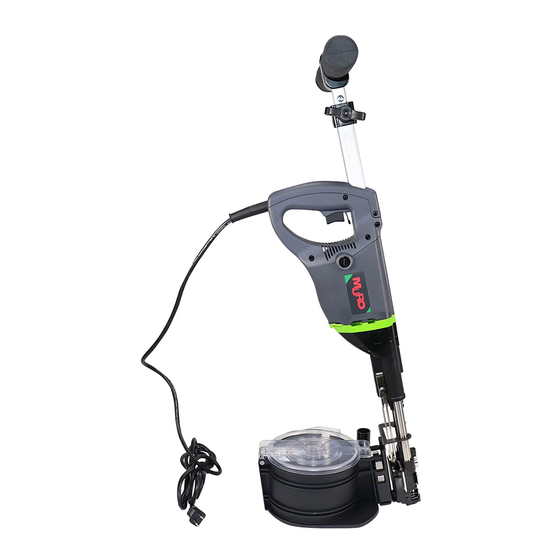
Page 9: Part Names
Part Names Handle cover Handle grip Handle shaft stopper Rod handle Handle shaft Rod handle Motor grip lock lever Trigger lock button Bit Locking Trigger switch Sleeve Countersinking Forward/Reverse Adjustment Guide pole switch dial Magazine bracket Brush cap Lid retainer Adjusting Magazine Lid lever... -
Page 10: Assembling The Tool
Assembling the Tool Attachment and Detachment of Magazine Detachment Attachment Magazine 2.Remove the magazine lock button by pulling it upward. Magazine lock button Push in the buttons. Magazine groove Snap (on both sides) Magazine bracket rail (on both sides) Align the magazine grooves with the rails 1. - Page 11 Attachment and Detachment of Magazine Lid * Where screws of 3-1/8" - 4" (85-100 mm) in length are used, the magazine lid cannot be closed firmly. In such cases, remove the magazine lid. Detachment 1. Raise the magazine lid perpendicularly. Detach the one Push...
- Page 12 Assembling the Tool Attachment and Detachment of Rod Handle Attachment Rod Handle 1. Raise and hold the rod handle lock lever. 2. Turn the grooved side of the handle Handle cover shaft toward the lock lever. Insert the (closed and fixed state) handle shaft into the tool by pushing down.
- Page 13 Loading the Muro Collated Screws 1. Pull the stopper of the magazine lid and open the lid. Get the coil of Muro collated screws, remove the elastic band. Place the coil of Muro collated screws with the heads of screws facing upward.
-
Page 14: Tool Adjustments
Tool Adjustments The Adjusting Plate Screw guide Set the position of the adjusting plate in accordance with the length of the screw. 1. Raise the adjusting lever to unlock the adjusting plate. 2. Slide the adjusting plate to a position where a distance from the bottom edge 2. -
Page 15: Driving Screws
Driving Screws Adjusting Countersinking Depth A screw driving depth can be adjusted by Deep Sallow turning the screw driving depth-adjusting dial. From the motor grip side Countersinking Screw driving depth adjusting dial Adjustment Right turn … Shallow dial Left turn … Deep The driving depth is changed 1.5 mm per one revolution. - Page 16 1. Make sure that the Muro collated screw coil and the appropriate bit are loaded and the tool is properly adjusted. Lock the trigger switch and put the motor into the continuous operation mode.
-
Page 17: Maintenance And Inspection
Maintenance and Inspection Warning ◆ When inspecting or maintaining this tool, be sure to turn off the power and unplug the power cord. 1) Inspection the Bit • If a bit is worn or broken screw driving can be affected and the heads may be damaged. The unique double-ended bits for Vislider allows both ends to be used. - Page 18 THIS PAGE INTENTIONALLY LEFT BLANK...
- Page 19 THIS PAGE INTENTIONALLY LEFT BLANK...
- Page 20 7 Tilbury Court, Brampton, Ontario, L6T 3T4, Canada Tel: 1-800-665-6876 Fax: 905-451-7936 http:// www. muro.com 7-1 Kiyohara Industrial Park, Utsunomiya City, Tochigi Prefecture 321-3231 Japan Tel: +81-28-667-7148 Fax: +81-28-667-4795 http:// www. vislider.com/ V L42 M 02 U2 0 20 0 612...
Need help?
Do you have a question about the VISLIDER VL42-FD and is the answer not in the manual?
Questions and answers