
Related Manuals for EndRun Ninja


Summary of Contents for EndRun Ninja
- Page 1 "Smarter Timing Solutions" Ninja Time Server GPS-Synchronized User Manual USM3210-0000-000 Revision 3 August 2021...
-
Page 3: Preface
Time Server User Manual Preface Thank you for purchasing the Ninja Time Server. Our goal in developing this product is to provide Our goal in developing this product is to bring precise, Coordinated Universal Time (UTC) into your network quickly, easily and reliably. Your new Ninja is fabricated using the highest quality materials and manufacturing processes available today, and will give you years of troublefree service. -
Page 4: About This Manual
During the warranty period, EndRun will repair or replace, at its option, products which prove to be defec- tive. Products not manufactured by EndRun Technologies are warranted for ninety days or longer, as provided by the original equipment manufacturer, from date of shipment. -
Page 5: Warranty Repair
Please provide the serial number of the unit and the nature of the problem. If it is determined that the equipment has failed and you want EndRun to perform the repairs, we will issue you an RMA number and specific shipping instructions. -
Page 6: Table Of Contents
........... . 6 Ninja Physical Description . - Page 7 ..........18 Connecting Instruments to the Ninja Chapter Three - Console Port Control and Status .
- Page 8 ............. 26 gpsrefpos .
- Page 9 ............37 systimemodeconfig .
- Page 10 ......... . 59 Configuring the Ninja as a Stratum 1 Server .
- Page 11 ..........68 Setting Up NTP Clients on Windows .
- Page 12 ............90 Transfer File to Ninja .
- Page 13 Appendix E - Installing the GPS Antenna ....... . . 105 .
- Page 14 Appendix I - Operation with a GPS Simulator ......121 ........... 121 Console Port Commands .
-
Page 15: Chapter One - Introduction
35 cubic inches of mounting space and consumes less than 6 watts of power. Ninja is a precision server of Coordinated Universal Time (UTC) that can be connected via an Eth- ernet port to any TCP/IP network. Available timing protocols include Network Time Protocol (NTP) and Simple Network Time Protocol (SNTP). -
Page 16: Standard Features
Firmware and configurable hardware parameters are stored in non-volatile FLASH memory, so the Ninja can be easily and securely upgraded in the field using SSH and SCP or the local RS-232 serial port. Upgrades via FTP and Telnet are also possible although these protocols are not secure. We make all firmware upgrades to our products available to our customers free of charge. -
Page 17: Gps Timing-How It Works
FIGURE 1 - N INJA G PS SYSTEM TIMEBA SE GPS Timing-How It Works The time and frequency engine in the Ninja receives transmissions from satellites that are operating in compliance with the Navstar GPS Interface Specification known as IS-GPS-200. It specifies the receiver interface needed to receive and demodulate the navigation and time transfer data contained in the GPS satellite transmissions. -
Page 18: Where To Use It
Where to Use It Since signals from the GPS satellites are available at all locations on the globe, you may deploy the Ninja virtually anywhere. However, you must be able to install an antenna with good sky visibility, preferably on the rooftop. -
Page 19: Chapter Two - Basic Installation
Chapter Basic Installation This chapter will guide you through the most basic checkout and physical installation of your Ninja Time Server. See Chapter 7 - NTP for instructions on how to configure your unit as an NTP Server. Other chapters and appendices will give you the information needed to configure your installation for the maximum performance in your operating environment. -
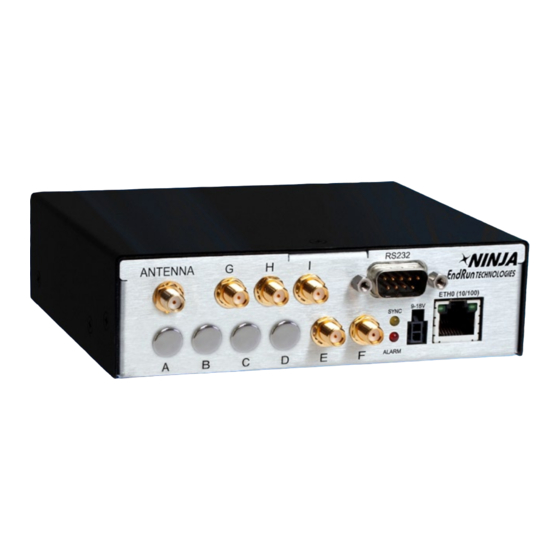
Page 20: Ninja Physical Description
Ninja Physical Description The drawings above show the Ninja Time Server front and rear-panels with optional outputs E and F being used. (Unused outputs are plugged.) For more information see Chapter 9 - Inputs/Outputs and Appendix J - Specifications. Descriptions below briefly describe the standard and optional I/O... -
Page 21: Configuration Label
Performing a Site Survey Using the front panel status LED indicators, it’s easy to find out if your Ninja will work in your desired location: 1. Temporarily mount the antenna on the roof. Make sure that it is not blocked by large metallic objects closer than one meter. - Page 22 If your Ninja has an OCXO oscillator then it will require a 5 minute warm-up period before it begins searching for a GPS signal. If your Ninja has a TCXO oscillator then it will start searching for a GPS signal within a minute.
-
Page 23: Installing The Ninja
Ninja where the operating ambient temperature might exceed 122°F (50°C). The Ninja internal temperature must not exceed 70˚C, as measured by the built-in temperature sensor accessible via the “oscctrlstat” serial port command. Internal temperature will remain in safe range if all conditions are met: A. -
Page 24: Connecting The Dc Power
Do not install the Ninja where the operating ambient temperature might exceed 122˚F (50˚C). NOTE The Ninja chassis with AC Power Option must be grounded using either the bottom mounting holes or the rear panel ground lug. N i n j a U s e r M a n u a l... -
Page 25: Connecting And Configuring Ethernet
If your network does use DHCP for host configuration, and you are in a hurry to get your Ninja up and running, you may proceed to Verifying Network Configuration to make sure that the network parameters were set up correctly. -
Page 26: Test The Serial Port
C H A P T E R T W O NOTE You must use an RS-232 null-modem cable or adapter if you are connecting the Ninja to another computer. The cable included in the shipping kit is a null-modem cable. -
Page 27: Using Netconfig To Set Up Your Ip
“root” user. After correctly entering the password at this prompt, password: the sign on message is shown. It identifies the host system as Ninja and shows the software part number, version and build date. The out-of-the-box hostname is set to “Ninja”, and the domainname is set to “your.domain”. -
Page 28: Verify Network Configuration
NinjaTS(root@NinjaTS:~)-> reboot Verify Network Configuration If you are using the RS-232 serial I/O port to communicate with Ninja, you will be able to see the kernel-generated boot messages when the unit reboots. You should note the lines Configuring eth0 as 192.168.1.120... -
Page 29: Check Network Operation
If so, then the Ethernet interface of your Ninja has been successfully configured to oper- ate on your network and you are ready to check operation of the Ninja over the network. If not, you should recheck your configuration and/or repeat the procedure. -
Page 30: Using Ssh
Here you may log in as “root” with password “endrun_1”. After correctly entering the password the sign on message is shown. It identifies the host system as Ninja and shows the software part number, version and build date: NinjaTS 6010-0086-000 v 1.00 Tue Feb 25 14:17:44 UTC 2020... -
Page 31: Using Https
If you want to use HTTPS you must first enable it. See Chapter 5 - Security, Enable/Disable Pro- tocols for instructions. You may monitor the status of the Ninja via the HTTPS interface. For secu- rity reasons, you may not change any settings. See Chapter 4 - HTTP/HTTPS for more information. -
Page 32: Connecting Instruments To The Ninja
C H A P T E R T W O Connecting Instruments to the Ninja SMA jacks provide the means of connecting your equipment to the Ninja. The Ninja Time Server can provide up to five optional outputs. Options are: Digital outputs (1PPS or PPO and IRIG-DC) -
Page 33: Chapter Three - Console Port Control And Status
RS-232 serial port. A network cable and a serial cable are provided with each Ninja shipment. The serial cable is wired as a null-modem adapter and can be used to connect Ninja to the serial port on your computer. Detailed specifications on the ports, including the RS-232 pinout, are in Appendix J - Specifications. -
Page 34: Available User Commands
Available User Commands COMMAND FUNCTION accessconfig Interactive script that guides you in configuring access to Ninja that is limited to telnet snmpd specific hosts. The resulting /etc/hosts.allow and /etc/hosts.deny files are saved to the non-volatile FLASH disk. Factory default configuration allows access by all hosts. - Page 35 C O N T R O L A N D S T A T U S C O M M A N D S help Prints help for all Ninja-specific (not Linux) commands. help command Prints command-specific help. For example:...
- Page 36 C H A P T E R T H R E E setsigfltmask Command to enable or mask the Signal Loss Fault. See the command. sigfltmask settfomfltlvl Command to change the TFOM fault level sigfltmask Prints the current setting for the Signal Loss Fault mask. See the command.
-
Page 37: Detailed Command Descriptions
RS-232 serial I/O port or from a session. telnet This script modifies these files: /etc/hosts.allow and /etc/hosts.deny. These are non-volatilely stored in the FLASH disk /boot/etc directory. You must reboot Ninja after running this script for the changes to take effect. Command: accessconfig Ninja reply: Interactive script is started. -
Page 38: Cpuioconfig
See Chapter 9 - Inputs/Outputs, Programmable Pulse Output (PPO) Option for more information. Command: cpuioconfig Ninja reply: Interactive shell script is started. cpustat This command shows a group of key values for monitoring the health of the Linux CPU and operat- ing system status. -
Page 39: Dumpephemeris
This command displays the current GPS Subsystem dynamic mode of operation. It has two possible settings: OFF or ON. When it is OFF, it is assumed that Ninja is installed in a stationary location. When it is ON, it is assumed that Ninja is installed on a moving platform. Dynamic mode is intended for shipboard applications only. -
Page 40: Gpsionoinfo
WGS-84 ellipsoid. PDOP, HDOP, VDOP and TDOP are also shown. OORCnt is the out-of-range counter which may be non-zero when Ninja has been moved more than 200 meters from its previous location without being placed in UNKNOWN mode using the command. -
Page 41: Gpsrefpos_Ecef
C O N T R O L A N D S T A T U S C O M M A N D S Command: gpsrefpos Ninja reply: CURRENT REFERENCE POSITION = AVG N38d24m54.30s W122d45m10.95s +00004.1 meters RMSPDOP: 2.4 AvgCnt: 28800... -
Page 42: Gpstrkstat
FLASH Write Fault and that there is an Antenna Short Fault. Command: gpsstat Ninja reply: LOCKED TFOM = 4 2001 092 04:48:56 13 13 2 7 151 328605 41.6 010A gpstrkstat This command displays the current GPS Subsystem satellite tracking status. A list of twelve satellite numbers along with azimuth, elevation and C/No is displayed for each receiver channel. -
Page 43: Gpsutcinfo
F/W 6010-0088-000 Ver 1.00 - FPGA 6020-0018-000 Ver 0085 - Sep 9 11:08:23 2019 help This command displays a list of Ninja commands (not Linux commands). To get help on a particular command you would type , followed by the command. -
Page 44: Inetdconfig
RS-232 serial I/O port or from a session. telnet This script modifies the /etc/inetd.conf file, which is non-volatilely stored in the FLASH disk /boot/ etc directory. You must reboot Ninja after running this script for the changes to take effect. Command: inetdconfig Ninja reply: Interactive script is started. -
Page 45: Ntpconfig
Server for details on the use of this command. The two files that are modified are /etc/ntp.keys and /etc/ntp.conf. Both of these are non-volatilely stored in the FLASH disk /boot/etc directory. You must reboot Ninja after running this script for the changes to take effect. -
Page 46: Oscctrlstat
C H A P T E R T H R E E Command: ntpstat Ninja reply: 20130117.00:02:40 -0.000000051 129127988 129015079 1594.4/sec oscctrlstat This command displays the current values of the system oscillator control parameters. These param- eters are related to the disciplined system oscillator. The command formats the data and prints this fixed-length string having these fields: YYYYMMDD.HH:MM:SS LKSTAT COAST ESTERR MEASERR TIMEDEV AGERATE TAU EFCDAC TEMP... -
Page 47: Passwd
C - Helpful Linux Information. Command: passwd Ninja reply: Interactive script is started. rcvrserialnumber This command shows the serial number of the GPS Receiver in the Ninja. Command: rcvrserialnumber Ninja reply: 15080056 rcvrstat This command shows three critical status parameters of the GPS Receiver: the number of satellites currently being tracked, the automatic gain control DAC value for the receiver front end, and the average Carrier-to-Noise ratio of the tracked satellites. -
Page 48: Setantfltmask
This command starts an interactive utility that allows you to set the accurate reference position of Ninja. This utility must be run as the root user. By default, the unit is configured to locate itself us- ing the GPS satellites. In some situations, visibility of the sky is limited and Ninja will not be able to determine its position. -
Page 49: Setsigfltmask
C O N T R O L A N D S T A T U S C O M M A N D S Command: setgpsrefpos Ninja reply: Interactive utility is started. setinhibitoutputsmode This command allows you to set the inhibit mode of the timing outputs. Timing outputs are pulse rates and time codes. -
Page 50: Sysosctype
This command displays the installed system oscillator type. It is either STD-TCXO or OCXO. Command: sysosctype Ninja reply: Installed Oscillator is OCXO. sysrootfs This command returns the currently loaded linux root file system, either 0 or 1, where 0 is the fac- tory-installed root file system and 1 is the upgraded root file system. -
Page 51: Systemio
Below is an example of a typical response to this command: Command: sysstat Ninja reply: LOCKED TO GPS, Offset = +0.000000024, LI = 00, TFOM = 4 @ 2013 012 06:03:10 18 systemio This command returns the current settings for all installed, system-wide I/O signals that may be routed to the SMA connectors. -
Page 52: Sysversion
This command allows you to update the configuration of the Linux bootloader after a new kernel im- age has been written to the UPGRADE kernel partition of Ninja FLASH disk. You may also use it to reset the default back to the FACTORY kernel partition. Refer to Appendix B - Upgrading the Firm- ware, Performing the Linux Kernel Upgrade for detailed instructions for performing the upgrade procedure. -
Page 53: Upgradekernel
If an argument value of 2 is given, then the currently configured default root file system is shown. Command: updaterootflag 1 Ninja reply: Default Root File System now set to: UPGRADE Command: updaterootflag 2... - Page 54 C H A P T E R T H R E E This page intentionally left blank. N i n j a U s e r M a n u a l...
-
Page 55: Chapter Four - Hyper Text Transport Protocol (Http/Https)
(see Chapter 5 for instructions). NOTE When Ninja is shipped from the factory, HTTP/HTTPS is disabled. If you want to enable, see Chapter 5 - Security, Enable/Disable Protocols. For security reasons, we recommend that you configure for HTTPS only. -
Page 56: Navigation
C H A P T E R F O U R To get started with the web interface simply point your browser to the IP address of the Ninja and log in. By default, IPv4 will accept a request for HTTP or HTTPS. The server needs additional configu- ration for HTTPS only and IPv6. -
Page 57: Configure Https
H T T P / H T T P S I N T E R F A C E Configure HTTPS HTTP/HTTPS use files for the default configuration located in /etc/hiawatha. Of these, you will typically only need to modify hiawatha.conf. Advanced users who need to modify the default con- figuration will need to edit the file and copy it to the /boot/etc/hiawatha directory. -
Page 58: Configure Https Only For Ipv6
C H A P T E R F O U R Configure HTTP for IPv6 You must edit the /etc/hiawatha/hiawatha.conf file and set the Interface value in the Binding configu- ration block for Port 80. (A commented example is present in the default file.) After making and saving your changes, you must copy the edited file to the non-volatile FLASH area and reboot the unit: cp -p /etc/hiawatha/hiawatha.conf /boot/etc/hiawatha... -
Page 59: Configure Certificate And Key
-in privkey.pem -out key.pem openssl x509 -in cert.csr -out cert.pem -req -signkey key.pem -days 1001 cat key.pem cert.pem > hiawatha.pem The file will be created in the /boot/etc/hiawatha/tls directory. You must reboot the Ninja for changes to take effect. NOTE If you request your X.509 SSL/TLS certificate from a Certificate-Signing Authority (CA) you must have the... - Page 60 C H A P T E R F O U R This page intentionally left blank. N i n j a U s e r M a n u a l...
-
Page 61: Chapter Five Security
Many of these are standard multiple-user access control features of the underlying Linux operating system which controls the Ninja. Others are provided by the additional protocol servers selected for inclusion in your Ninja, and the way that they are configured. -
Page 62: Linux Operating System
NTP query access, see Chapter 7 - NTP, Restrict NTP Query Access. Restrict Access - Telnet, SSH and SNMP By default, Ninja is configured to allow access by all users via Telnet, SSH and SNMP. To ensure security and to protect against denial-of-service attacks, you should restrict access by using the command. -
Page 63: Enable/Disable Protocols
S E C U R I T Y As shipped from the factory, these two files are empty. When you run , these lines accessconfig are added to the /etc/hosts.deny file: in.telnetd: sshd: snmpd: to all hosts not listed in the /etc/ This tells to deny access to tcpd... -
Page 64: Enable Snmp, Ssh And Http/Https
-p /etc/rc.d/rc.snmpd /boot/etc/rc.d cp -p /etc/rc.d/rc.sshd /boot/etc/rc.d cp -p /etc/rc.d/rc.hiawatha /boot/etc/rc.d Reboot Ninja when done for the changes to take effect. IMPORTANT After modifying /etc/rc.d/rc.snmpd, rc.sshd or rc.hiawatha, you must copy them to the /boot/etc/ rc.d directory and reboot the system. It is very important to use the when performing the copy. -
Page 65: Openssh
OpenSSH The secure shell protocol server running in Ninja is based on the portable OpenSSH for Linux. As such it supports both SSH1 and SSH2 protocol versions. By default, only SSH2 is enabled in Ninja due to security issues with SSH1. For more information about OpenSSH, and to obtain client soft- ware, refer to the OpenSSH website: openssh.com... -
Page 66: Http/Https
NTP Client Setup. You can also restrict query access. See Restrict NTP Query Access in Chapter 7. Network Security Vulnerabilities EndRun addresses major network security vulnerabilities that affect Ninja on this webpage: endruntechnologies.com/support/product-bulletins This Application Note describes best practices to secure your time server and mitigate many network security vulnerabilities: endruntechnologies.com/pdf/Time-Server-Security-Best-Practices.pdf... -
Page 67: Chapter Six - Simple Network Management Protocol (Snmp)
"Smarter Timing Solutions" Chapter Simple Network Management Protocol (SNMP) Your Ninja includes the NET-SNMP version 5.5.1 implementation of an SNMP agent, , and a snmpd SNMP notification/trap generation utility, . It supports all versions of the protocol in use snmptrap today: SNMPv1 (the original Internet standard), SNMPv2c (never reached standard status, often called “community SNMP”) and SNMPv3 (the latest Internet standard). -
Page 68: Enterprise Management Information Base (Mib)
Quick Start Configuration -- SNMPv1/v2c You should be able to compile the NINJA-MIB file on your SNMP management system and access the variables defined therein. The factory default community names are “NINJAGPS_0” for the read-only community and “endrun_1” for the read-write community. This is all that is required for operation under v1 and v2c of SNMP. -
Page 69: Change Default Community Strings (Passwords)
IP address or hostname of the destination host for receiving the xxx.xxx.xxx.xxx notifications or informs generated by Ninja. By default, the v2c trap or inform will be sent to port 162. You may optionally add another parameter, to the ends of the... -
Page 70: Configuration Of Snmpv3
To use the SNMPv3 capabilities of Ninja, you must first set up user information and access limits for those users in /etc/snmpd.conf. Uncomment and edit these two lines to define your v3 users and their access parameters: rwuser root priv .1... -
Page 71: Configuring Snmpv3 Notifications And Informs
Digest Algorithm 5 (MD5) with password endrun_1 and may use the Data Encryption Standard (DES) to encrypt the session data with passphrase endrun_1. The second line will cause a user Ninja to be created who may be authenticated using the Secure Hash Algorithm (SHA) with password NINJAGPS_0. -
Page 72: Example Of Usmuser Record
C H A P T E R S I X Field# Field Name Field Value usmUser usmUser usmStatus [a number (most likely 1)] userStorageType [a number (most likely 3)] engineID [0x followed by a number string/hash] name [0x followed by a number string/hash] secName [0x followed by a number string/hash] cloneFrom... -
Page 73: Chapter Seven - Network Time Protocol (Ntp)
NTP. Only basic approaches to NTP client configuration for operation with Ninja will be described. If you have never used NTP, then you should spend some time reading the on-line documents, especially the Distribution Notes, FAQ and Configuration subject matter, which... - Page 74 Enter a key number (1-65534) or 0 to quit: Ninja Enter the key (1-31 ASCII characters): Writing key number: 2 and Key: Ninja to ntp.keys Enter a key number (1-65534) or 0 to quit: ---NTP Authentication Configuration N i n j a U s e r M a n u a l...
- Page 75 Otherwise clients may easily be “spoofed” by a fake NTP server. You can specify an MD5 key number that the Ninja will use in its broadcast/multicast packets. The clients on your network must be configured to use the same key.
-
Page 76: Configuring The Ninja As A Stratum 2 Server
1. When you want a backup source of time. In this case, Ninja will operate as a Stratum 1 Server as long as it is locked to the GPS signal. If it loses the signal, then Ninja will start to drift away from “perfect”... -
Page 77: Mask Alarm
MD5: This method is trickier only because MD5 keys must be set up and distributed accurately to the NTP clients in a secure way. Ninja is factory configured to authenticate its replies to NTP MD5 clients using its default set of keys. -
Page 78: Unix-Like Platforms: Md5 Authenticated Ntp Client Setup
Use the command peers to display the NTP peers which your computer is using. One of them should be the Ninja server which you have just configured. You should verify that it is being ‘reached’. (You may have to continue issuing the peers command for a minute or two before you will see the ‘reach’ count incre- ment.) If you have other peers configured, verify that the offset information for the Ninja server peer... -
Page 79: Configure Ntp
1 2 Modify the line added previously in Unix-like Platforms: Basic NTP Client Setup so that authenti- cation will be used with the Ninja server using one of the trusted keys, in this example, key # 1: server 192.168.1.120 key 1 Restart to have it begin using the Ninja server with MD5 authentication. -
Page 80: Unix-Like Platforms: Broadcast/Multicast Ntp Client Setup
, the NTP daemon, looks for by default in the /etc direc- ntpd tory. Assuming that your Ninja server has been configured to use key 2 for broadcast authentication as shown in the example in Configuring the NTP Server above, make sure that key 2 is included in line, and add this line to the end of the ntp.conf file:... - Page 81 Use the command peers to display the NTP peers which your computer is using. One of them should be the Ninja server which you have just configured. You should verify that it is being ‘reached’. (You may have to con- tinue issuing the peers command for a minute or two before you will see the ‘reach’...
-
Page 82: Setting Up Ntp Clients On Windows
“trustedkey” list. Setting Up NTP Clients on Windows To configure your Windows computer to use your Ninja, you must have successfully completed the procedures in Configuring the NTP Server above. Client installation must be performed by a user with administrative priviledges. - Page 83 Knowledgable NTP users who would like to customize the security aspects of the configuration of the NTP daemon in Ninja should edit the /etc/ntp.conf file directly and then copy it to the /boot/etc directory. Be sure to retain the ownership and permissions of the original file by using when cp –p...
- Page 84 C H A P T E R S E V E N This page intentionally left blank. N i n j a U s e r M a n u a l...
-
Page 85: Chapter Eight - Ipv6 Information
Chapter IPv6 Information The Ninja supports IPv6 out-of-the-box with a modern version 4.14.88 Linux kernel. During network configuration, you have the option to disable IPv6 on the Ethernet port. The IPv6 addressing scheme will see expanding deployment in the near future due to the fact that there are no longer any IPV4 addresses to be allocated in many regions of the world. -
Page 86: Ipv4-Only Protocols
IPv6 addresses. Refer to the NTP documentation for details on the directive. interface IPv4-Only Protocols There are several protocols running on Ninja which are not IPv6-capable: (client and server), telnet . Due to their intrinsic insecurity,... -
Page 87: Chapter Nine - Inputs/Outputs (I/O)
Chapter Nine Inputs/Outputs (I/O) Standard configuration for Ninja is one Ethernet port, an antenna input, an RS-232 serial port, and a DC power connector. Up to five optional outputs can be configured. These include time code, pulse rates and alarm. -
Page 88: Output Options
C H A P T E R N I N E Output Options In addition to the standard I/O described above, the Ninja can be configured with up to five optional outputs. These outputs are labeled E through I. These optional outputs are described below. -
Page 89: Irig-Am Option
The 1 PPS is a “system signal”. This means that there is one 1 PPS signal that affects the whole sys- tem. In other words, if your Ninja has multiple 1 PPS outputs and you change the pulse width, then all 1 PPS outputs will be affected. -
Page 90: Trigger Ppo Function
C H A P T E R N I N E View and Change the PPO command will list any connector on the Ninja that has an I/O signal. Connectors avail- cpuio able for the PPO are G, H and I. The... -
Page 91: Alarm Option
40V. For more details see Appendix J - Specifications, Optional Alarm Output. View the Alarm Output Connector command will list any connector on the Ninja that has an I/O signal. The connector avail- cpuio able for the Alarm Output is identified as I. - Page 92 C H A P T E R N I N E This page intentionally left blank. N i n j a U s e r M a n u a l...
-
Page 93: Chapter Ten - Optional Precision Time Protocol (Ptp/Ieee-1588)
2008 standard. Option The PTP/IEEE-1588 protocol is an optional feature in the Ninja. It is not a software option that you can install after purchase. You must have it installed at the factory. If you are unsure whether your device has PTP installed then you check the label on top of the unit. There will be a PTP indicator. If you are remote then you can use the command. -
Page 94: Ptp Configuration And Status
The default PTP configuration settings in the Ninja are shown below. If you need to modify these set- tings then you will need to reconfigure the PTP Subsystem. You may perform the configuration from either a telnet or ssh session, or the local RS-232 console. Default PTP settings are:... - Page 95 The following is a transcript of the question and answer configuration utility provided by ptpcon- . The utility modifies this non-volatile file: /boot/etc/ptp.conf. The user-entered parameters for the default profile are underlined: Ninja (root@NinjaPTP:~)-> ptpconfig *************************************************************************** *********Precision Time Protocol Configuration***************************** *************************************************************************** This interactive utility will guide you in configuring the ptp daemon configuration file that controls its operation.
- Page 96 The following is a transcript of the question and answer configuration utility provided by ptpcon- . The utility modifies this non-volatile file: /boot/etc/ptp.conf. The user-entered parameters for the 802.1AS profile are underlined: Ninja (root@NinjaPTP:~)-> ptpconfig ******************************************************************************* *************Precision Time Protocol Configuration***************************** ******************************************************************************* This interactive utility will guide you in configuring the ptp daemon configuration file that controls its operation.
-
Page 97: Ptp Status
P T P / I E E E - 1 5 8 8 PTP Status The ptpstat command allows you to query the status of the PTP Subsystem. Following is the response to this command: CLASS STATE CLKID UTC UTCV Where: is the IEEE-1588 version 2 for the 2008 standard. -
Page 98: Ptp Operation
9. The Clock Class is UNLOCKED when the GPS Subsystem TFOM level is 9. The PTP State is the state of the port. When the Ninja is the Master PTP Clock on the network, the State will report MASTER. Otherwise, the State will report PASSIVE, LISTENING or INITIAL- IZING. - Page 99 P T P / I E E E - 1 5 8 8 The PTP UTC Offset Valid is either TRUE or FALSE. The UTC Offset Valid is TRUE if the current UTC Offset is known to be correct, otherwise it is FALSE. The PTP Clock Accuracy is transmitted when the time is accurate to within the the following: 25ns Clock is synchronized or in holdover, PTP clock <...
-
Page 100: About Ptp Seconds
Disable the PTP Protocol The instructions below assume that the PTP Option has been installed on your Ninja. To check, see the section titled Option at the beginning of this chapter. To disable the Precision Time Protocol issue the following command: chmod -x /etc/rc.d/rc.ptpd... -
Page 101: Appendix A - Time Figure Of Merit (Tfom)
> 10 ms, unsynchronized state if never locked to GPS In all cases, the Ninja reports this value as accurately as possible, even during periods of GPS signal outage where the Ninja is unable to directly measure the relationship of its timing outputs to UTC. - Page 102 A P P E N D I X A This page intentionally left blank. N i n j a U s e r M a n u a l...
-
Page 103: Appendix B - Upgrading The Firmware
NOTE The Ninja firmware consists of several different binary files. You may only need one or two of them. The revision history on our website will tell you which files need to be upgraded. The firmware image files are for the Linux RFS (root file system), the Linux Kernel and the GPS Receiver. -
Page 104: Transfer File To Ninja
If you are using , you may open a command window on the remote computer and securely trans- fer the root file system image from the remote computer to your Ninja. A command like this should be used: scp –p 6010-0086-000_3.00.gz root@host.your.domain:/home/rootfs.gz... -
Page 105: Recovering From A Failed Rfs Upgrade
Recovering from a Failed RFS Upgrade To restore your Ninja to a bootable state using the factory root file system, you must use the serial I/O port and reboot the Ninja by cycling the power. Refer to Chapter 2 – Basic Installation, Connect the Serial I/O Port and Test the Serial I/O Port for setup details. -
Page 106: Performing The Linux Kernel Upgrade
If you are using , you may open a command window on the remote computer and securely trans- fer the kernel image from the remote computer to your Ninja. A command like this should be used: scp –p 6010-0087-000_2.00.gz root@host.your.domain:/tmp/kernel.gz... -
Page 107: Recovering From A Failed Kernel Upgrade
Recovering from a Failed Kernel Upgrade To restore your Ninja to a bootable state using the factory kernel, you must use the serial I/O port and reboot the Ninja by cycling the power. Refer to Chapter 2 – Basic Installation, Connect the Serial I/O Port and Test the Serial I/O Port for setup details. -
Page 108: Problems With The Gps Receiver Upgrade
A P P E N D I X B to this specific file on your Ninja: /tmp/rcvr.bin. The GPS Receiver image will be named with the software part number and version like: 6010-0088-000_1.04.bin. When following the instructions below, substitute the name of the actual GPS Receiver image that you are installing for 6010-0088- 000_1.04.bin. -
Page 109: Performing The Gps Receiver Fpga Upgrade
GPS Receiver. This is rarely, if ever, upgraded. First you need to download the FPGA image from the EndRun website to a place on your network which is accessible to the Ninja. The link to the Ninja upgrade page is shown above. - Page 110 A P P E N D I X B The FPGA version should match that of the binary file that you uploaded. N i n j a U s e r M a n u a l...
-
Page 111: Appendix C - Helpful Linux Information
Linux information is described in this appendix. Linux Users Ninja is shipped from the factory with two users enabled. The first is the “root” user with password “endrun_1”. The root user has access to everything on the system, including the ability to perform system setup procedures. -
Page 112: Change Password
NTP Monitoring and Troubleshooting The following command displays which NTP clients are reaching the NTP daemon running on the Ninja. It will not try to look up host names. ntpq -n -c mrulist A useful command for querying NTP status is the following. -
Page 113: Text Editors
Now it is included edit on the Ninja file system for legacy reasons, since it has been the default editor for all first and second generation EndRun Technologies products. A man page for is resident on the system. When... -
Page 114: Redirect Syslog Files To Remote Host
You can redirect syslog files to a remote host (syslog server) by adding the standard Linux redirect commands to the Ninja’s syslog.conf file. Follow this sequence: 1. Edit /etc/syslog.conf using one of the editors on the previous page. Insert this line: *.* @remote_host... -
Page 115: Appendix D - Third-Party Software
"Smarter Timing Solutions" Appendix D Third-Party Software Your Ninja is running several different software products created and/or maintained by open source projects. Open source software comes with its own license. These are printed out for your informa- tion below. GNU General... -
Page 116: Ntp Software License
A P P E N D I X D For the developers’ and authors’ protection, the GPL clearly explains that there is no warranty for this free software. For both users’ and authors’ sake, the GPL requires that modified versions be marked as changed, so that their problems will not be attributed erroneously to authors of previous versions. -
Page 117: Hiawatha Software License
* ADVISED OF THE POSSIBILITY OF SUCH DAMAGE. *************************************************************************** Hiawatha Software License The Hiawatha webserver as implemented in the Ninja is distributed under the GPL license version 2: hiawatha-webserver.org/license Linuxptp Software License The Linuxptp as implemented in the Ninja is distributed under the GPL license version 2: sourceforge.net/directory/license:gpl... - Page 118 A P P E N D I X D This page intentionally left blank. N i n j a U s e r M a n u a l...
-
Page 119: Appendix E - Installing The Gps Antenna
"Smarter Timing Solutions" Appendix Installing the GPS Antenna This appendix contains guidelines for installing the GPS antenna. Mounting the antenna with a good view-of-the-sky is very important. A rooftop installation is usually best. The accuracy & stability specifications in Appendix J - Specifications assume an antenna installation with a very good view- of-the-sky. -
Page 120: Gps Antenna Kit
A P P E N D I X E GPS Antenna Kit The Ninja is available with an optional GPS Antenna Kit which includes 50 feet (15 meters) of an- tenna cable. This amount of cable is sufficient for the majority of GPS antenna installations. Longer cable runs can also be accommodated. -
Page 121: Long Cable Runs
Belden 1505A also has very low DC resistance, which is important for long cable runs. For very long cables, if the DC resistance is too high, not enough voltage will be available at the end farthest from the Ninja where the antenna and preamplifiers are installed. For cable lengths less than 700 feet, Belden 9104 is acceptable. -
Page 122: Using Two Or Three Lnas
A P P E N D I X E Cable Length Cable Number of Type LNAs Up to 250 feet Belden 9104 (76 meters) or equivalent 251 to 500 feet Belden 9104 (77 to 152 meters) or equivalent 501 to 700 feet Belden 9104 (153 to 213 meters) or equivalent... -
Page 123: Other Accessories
3. The signal splitter supplied by EndRun has a built-in preamplifier to compensate for signal loss through the splitter. If using a splitter other than the one supplied by EndRun you may need to com- pensate for splitter signal loss by using a separate GPS preamplifier. -
Page 124: Calibrate Your Receiver
A P P E N D I X E Calibrate Your Receiver In order for the Ninja to synchronize with maximum accuracy to UTC, the delay for the cable and all devices between the antenna and the GPS receiver input (i.e. GPS preamplifiers, signal splitters, lightning arrestors, etc.) must be compensated for. -
Page 125: Mounting On A Rooftop
WGS-84 is not the way that mapmakers and surveyers report the height. That means, in order to use the height information as reported by Ninja, you need to do a conversion. One easy way to do the conversion is by going to this link: unavco.org/software/geodetic-utilities/geoid-height-calculator/geoid-height-calculator.html... - Page 126 A P P E N D I X E ������������ ����������� ������������� ������������ ������������� ���������������� ������������������ ������������� ������������� ���������� �������������� ���������� FIG U RE 1 - G PS A NTENNA ROOFTOP MOUNTIN G HAR DWA RE N i n j a U s e r M a n u a l...
- Page 127 I N S T A L L I N G T H E G P S A N T E N N A ������������ ����������� ������������� ������������ ������������� ���������������� ������������������ ����������� ����������������������� ���������� ��������������������� ������������� ������������� ���������� �������������� ���������� FIG UR E 2 - GP S AN TEN NA R OOFTOP MOUNTING HARDWARE WITH PRE AMPLIFIER N i n j a U s e r M a n u a l...
- Page 128 A P P E N D I X E This page intentionally left blank. N i n j a U s e r M a n u a l...
-
Page 129: Appendix F - Leap Seconds
Automatic Leap Second Insertion Your GPS-synchronized Ninja precisely adjusts for leap seconds if and when they occur. There is nothing you need to do in order to keep your Ninja accurately synchronized to UTC. You can see the current GPS-UTC parameters that are downloaded from the satellites by using the command. - Page 130 A P P E N D I X F This page intentionally left blank. N i n j a U s e r M a n u a l...
-
Page 131: Appendix G - System Faults
You may want to mask the ANT fault if you are using a GPS splitter. You may want to mask the SIG fault if you are operating your Ninja as a Stratum 2 NTP Server and are not using a GPS signal. -
Page 132: Gps Receiver Fpga Configuration
NTP Polling (POLL) This fault indicates that the GPS Receiver is not receiving polling requests from the NTP daemon. This could be due to a hardware or software failure. If the condition persists please contact EndRun Customer Support. GPS Communication (COM) This fault indicates that the Linux Subsystem is unable to establish communications with the GPS Receiver. -
Page 133: Appendix H - Time Code Formats
Appendix Time Code Formats An optional feature of your Ninja is one amplitude-modulated time code output, or up to three DC- shift time code outputs (on PPO connectors). Time codes are commonly used to provide time infor- mation to external devices such as displays, magnetic tape devices, strip chart recorders and several types of embedded computer peripheral cards. -
Page 134: Ieee-1344 Bit Definition
A P P E N D I X H IEEE-1344 Bit Definition Bit Position Bit Definition Explanation Year, BCD1 Unit years Year, BCD2 Year, BCD4 Year, BCD8 Not used Year, BCD10 Tens years Year, BCD20 Year, BCD40 Year, BCD80 Position identifier Leap second pending Set to one, 59 seconds prior to leap insertion Leap second... -
Page 135: Background
GPS-based timing systems supporting critical infrastructure functions could be vulnerable to mal- function due to weak signals, jamming, spoofing or accidental GPS control system errors. EndRun Technologies’ GPS timing receiver technology has evolved to be highly robust against these threats. -
Page 136: Resetlastgpswn
GPS receiver firmware will be used as the Last GPS Week Number. This Last GPS Week Number is the minimum possible full GPS week number. The Ninja will never allow the date and time to be set prior to the date and time corresponding to this Last GPS Week Number. -
Page 137: Resetleaphistory
This will compromise the effectiveness of the integrity checking algorithm. The command must be issued with one argument: TRUE Command: resetleaphistory TRUE Ninja reply: Resetting Leap History N i n j a U s e r M a n u a l... - Page 138 A P P E N D I X I This page intentionally left blank. N i n j a U s e r M a n u a l...
-
Page 139: Appendix J - Specifications
"Smarter Timing Solutions" Appendix J Specifications The following accuracy and stability specifications assume a stationary position (not dynamic mode), four satellite lock, and the antenna mounted with a full view-of-the-sky. GPS Receiver: L1 Band – 1575.42 MHz. 12 Channels, C/A Code (16 correlators). Static mode and dynamic-platform mode (shipboard only). - Page 140 A P P E N D I X J Platform: Operating System Kernel Version: 4.14.88 Slackware Linux Distribution Version: 14.2 Processor: 500 MHz RAM: 128MB FLASH: 4GB Supported IPv4 Protocols: SNTP, NTP v2, v3, v4, SHA/MD5 authentication, broadcast/multicast and autokey SSH client and server with “secure copy”...
- Page 141 S P E C I F I C A T I O N S Ninja DB9M Pin Signal Name Not Connected Receive Data (RX) Transmit Data (TX) Not Connected Ground Not Connected Not Connected Not Connected Not Connected Size: Chassis: 1.5”H x 5.3”W x 4.44”D.
-
Page 142: Optional Outputs
A P P E N D I X J Optional Outputs Optional 1 PPS Output: Signal: Positive TTL pulse into 50Ω. TTL (50Ω to GND): V (max)=0.4V, V (min)=2.4V, V (nom)=2.5V, V (max)=3.0V. Width: User selectable to 20 us, 1 ms, 100 ms, 500 ms. User-Calibration: +/- 500 us, 1 ns resolution. -
Page 143: Compliance
S P E C I F I C A T I O N S Compliance CE, FCC, RoHS, WEEE Data subject to change. EndRun Technologies may make changes to specifications and product descriptions at any time, without notice. N i n j a U s e r M a n u a l... - Page 144 A P P E N D I X J NI N JA DI MEN SI ONS SHOWING 5 O PTIO NAL OUTPUTS (E - I) N i n j a U s e r M a n u a l...
- Page 145 S P E C I F I C A T I O N S EXTERNAL AC POWE R SUPPLY (O PTIO N) N i n j a U s e r M a n u a l...
- Page 146 A P P E N D I X J N i n j a U s e r M a n u a l...
-
Page 147: Special Modifications - Changes For Customer Requirements
Special Modifications Changes for Customer Requirements From time to time EndRun Technologies will customize the standard Ninja for special customer requirements. If your unit has been modified then this section will describe what those changes are. This section is blank. - Page 148 S P E C I A L M O D I F I C A T I O N S This page intentionally left blank. N i n j a U s e r M a n u a l...
- Page 150 2270 Northpoint Parkway Santa Rosa, CA 95407 TEL 1-877-749-3878 FAX 707-573-8619 "Smarter Timing Solutions" endruntechnologies.com...
Need help?
Do you have a question about the Ninja and is the answer not in the manual?
Questions and answers