
Subscribe to Our Youtube Channel
Related Manuals for Radio Shack Make:it


Summary of Contents for Radio Shack Make:it
- Page 1 Robotics Sensor Kit User’s Guide 2770172 We hope you enjoy your Make: it Robotics Sensors Kit from RadioShack. Please read this user’s guide before using your new sensors kit.
-
Page 2: Package Contents
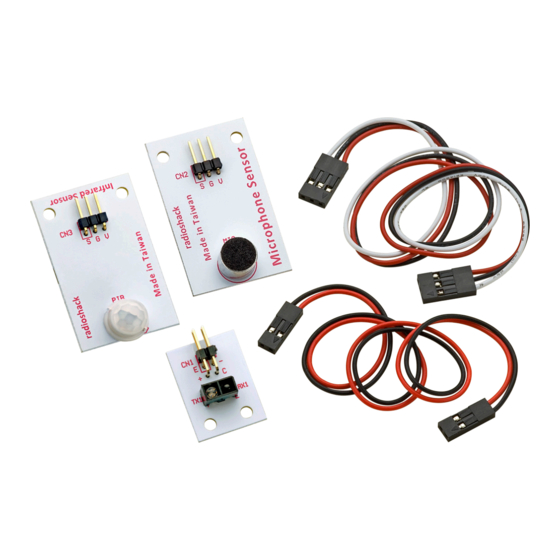
Package Contents Optical Sensor Microphone Infrared Sensor Cables 2-Pin (2) 3-Pin (2) Features • Ideal for voice-operated or light-operated robotics as well as projects requiring motion detection • Sensors require 5V supply voltage • Works with core PCB in the Make: it Robotics Starter Kit Specifications are subject to change and improvement without notice. -
Page 3: Optical Sensor
Optical Sensor Detection Range ....0.08 – 0.8 in (2 – 20mm) Connect the optical sensor to the J9 pins on the PCB using two 2-pin cables. Note: On the sensors, match the red wire to the positive pin and the black wire to the negative pin. On the PCB, the red wires should face toward the center of the board. - Page 4 Microphone Microphone Sensitivity ........105 dB ............(at 7.87 in./20 cm) Connect the microphone sensor to the J11 pins on your PCB using a 3-pin cable. V to V (power source) G to G (ground) S to I (digital pin) The signal is HIGH when no sound is detected and LOW when sound over 105 dB (for example, hand claps) is detected.
-
Page 5: Infrared Sensor
Infrared Sensor Use the passive infrared (PIR) sensor to let your project detect motion. Detection Range ........7.9 in. (20cm) 1. Attach the lens to the sensor. - Page 6 2. Connect the infrared sensor to the J11 pins on your PCB using a 3-pin cable. V to V (power source) G to G (ground) S to I (digital pin) The signal is HIGH when no motion is detected and LOW when motion is detected.
- Page 7 Download the Support Files 1. For schematics and programs, go to http://shack.net/MakeItRobotics. 2. At the end of the blog post, click Make: it Robotics Sensors Kit Support Files and save the folder to your computer. 3. If you have not created a directory in your Arduino folder for the Make: it Robotics programs, open READ_ME.txt and follow the directions.
- Page 8 6. Open the corresponding .ino file in the Arduino programming environment. • Open optical.ino to program the optical sensor. • Open microphone.ino to program the microphone. • Open infrared.ino to program the PIR sensor. 7. Verify and upload the program to your Arduino board.
-
Page 9: Limited Warranty
Limited Warranty RadioShack warrants this product against defects in materials and workmanship under normal use by the original purchaser for ninety (90) days after the date of purchase from a RadioShack-owned store or an authorized RadioShack franchisee or dealer. RADIOSHACK MAKES NO OTHER EXPRESS WARRANTIES. - Page 10 replace the product with the same or a comparable product or (b) refund the purchase price. All replaced products, and products on which a refund is made, become the property of RadioShack. RADIOSHACK EXPRESSLY DISCLAIMS ALL WARRANTIES AND CONDITIONS NOT STATED IN THIS LIMITED WARRANTY.
- Page 11 DAMAGES, EVEN IF RADIOSHACK HAS BEEN ADVISED OF THE POSSIBILITY OF SUCH DAMAGES. Some states do not allow limitations on how long an implied warranty lasts or the exclusion or limitation of incidental or consequential damages, so the above limitations or exclusions may not apply to you.
Need help?
Do you have a question about the Make:it and is the answer not in the manual?
Questions and answers