Advertisement
Quick Links
Advertisement

Related Manuals for luxvision PM 200


Summary of Contents for luxvision PM 200
- Page 1 USER’S MANUAL PUPILOMETER PM 200...
- Page 2 Notification Dear Users, Thank you for your purchase of PM 200 Pupilometer. Please take time to read our user’s manual carefully before use. This guarantees you to make full use of this unit and prolongs the operation life of this unit.
-
Page 3: Table Of Contents
Content Function Introduction ..................4 Name of Parts ....................5 Operation ....................11 Maintenance ....................16 Specifications ....................17... -
Page 4: Function Introduction
1. Function Introduction Uses PM 200 is a digital precision optical instrument used to measure stance between human pupils in the process of optometry for fitting ectacles. Characteristics This device is designed in a scientific and reasonable way, integrating technologies on optics, mechanism, electricity and microcomputer into whole. -
Page 5: Name Of Parts
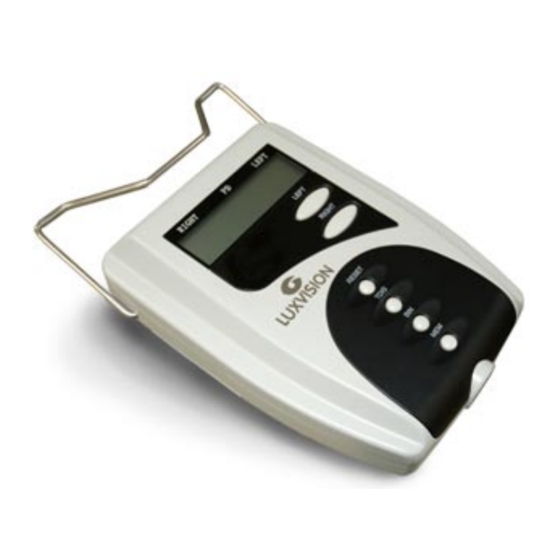
2. Name of Parts Description of the Front Panel (as shown in Fig.1) 8. Nose Bearer 10. Observation 4. Display Window Window 3. Lens Pupil Measuring Key 2. Right Pupil Measuring Key 1. Reset 6. Pupillary distance Conversion Key 7. Measuring State Transition Key 5. - Page 6 in opposite direction of the nose bearer. Now numerical value of the pupillary distance increases, and every pressing of the key will enable the pupillary distance pointer to move 0.5mm, with Right data being increased by 0.5mm. 3. Left Pupil Measuring Key It is used to measure left pupillary distance.
- Page 7 Important Matters Information on the reading display window do not appear simultaneously, instead, they will appear only when you need to measure a given state. 5. Memory Key It is used to store the current data. Press the key once to save the data and press again to cancel the saving.
- Page 8 Description of Rear Panel (as shown in Fig.3) 5. Forehead Bearer 2. Baffle Switch 1. Baffle 3. Battery Box 4. Preset Screw Fig. 3 1. Baffle It is located at bottom of the instrument. For operation, turn on the switch and then lay down the baffle to separate observer and testee.
- Page 9 5. Forehead bearer The testee’s forehead reasts on the forehead bearer so that the position of his pupils is fixed. Viewed from the Measuring Window (as shown in Fig.4) Pupillary Distance Pointer The widths in the observation windows of the device are 0.45mm vertical black lines, one in the left window and the other in the right window.
- Page 10 Black area Black area Observation window Fig.5a (It is the state of the observation window when pupillary distance pointer reaches 41.5mm) Observation window Black area Black area Observation window Fig.5b (It is the state of the observation window when Pupillary distance pointer reaches 22mm) Viewed from the Observation Window (as shown in Fig.6) Target to be stared at In the middle of an eyeball-shape circle in the center of the device’s inner visual...
-
Page 11: Operation
Measuring window Bright ring Target to be Green area stared at Fig. 6 3. Operation This is a high-tech intelligent instrument, which is very easy to operate. Please operate it according to the following procedures, thus you can get measured data easily and rapidly. - Page 12 About Baffle Open the baffle (as shown in Fig. 7) Push the baffle switch in the arrow direction, thus the baffle can be opened. Fig. 7 Start-Up (as shown in Fig.8) Press RESET key to make the start-up of the device initialized. After that a micro- processor in the device sets and right pupillary distance pointers at the middles of the left and right measuring windows, and the data on the corresponding digital liquid crystal display windows are shown as follows respectively: LEFT 31.5mm,...
- Page 13 3.4.2 Put the nose bearer lightly on testee’s nose bridge and keep the device in a horizontal state. 3.4.3 Let the testee stare at the staring target of the device. Important Matters In the process of measurement (and the measurement of monocular pupillary distance described in the following section), to achieve precise data of measurement and make process of measurement easily and quickly, the tester should remind the testee to always stare at the Staring Target in a level state, without moving his (her) eyeballs.
- Page 14 Fig.9b (It is the state of the display window when Left eye pupillary distance is measured) Important Matters When measuring right eye pupillary distance, the right observation window is in the state of measurement, and left observation window becomes the following state: immeasurable area is black and measurable area is black-white strip, and then pupillary distance pointer is invisible (as shown in Fig.
- Page 15 Black-white strip area Black area Pupillary distance pointer Black area Observation window Fig.10b (It is the state of the observation window when Left eye pupillary distance is measured) Memory of the Measured Data (as shown in Fig. 11) Press MEM Key to store the measured data so as to avoid change of the measured data due to misoperation of some other key.
-
Page 16: Maintenance
Fig.13a Fig.13b Important Matters The pupillary distance actually measured by the PM 200 is the pupillary distance at the distance of ∞ far target, and pupillary distances at the distances of other targets are obtained through calculation, only for reference. -
Page 17: Specifications
5. Specifications Binocular pupillary distance 44 ~ 83mm Left or right pupillary distance 22 ~ 41.5mm Binocular pupillary distance 45 ~ 82mm Left, right pupillary distance 22.5 ~ 41mm ≤ 5mm Indication error ≤ 0.5mm Rounding error 30cm ~ ∞ Distance of target Power source Voltage: DC 3V... - Page 18 LUXVISION, Inc. shall not be liable for any errors or for incidental or consequential damages in connection with the furnishing, performance, or use of this manual or the examples...
Need help?
Do you have a question about the PM 200 and is the answer not in the manual?
Questions and answers