Table of Contents
Advertisement
Advertisement
Table of Contents

Related Manuals for Jenquip EC10


Summary of Contents for Jenquip EC10
- Page 1 Handbook EC10 Platemeter Made by...
-
Page 2: Table Of Contents
Jenquip Pasture Management Software is supplied with your platemeter on a USB stick. Contents Introduction/ Important safety note Assembly Instructions Top handle assembly instructions /grooved rod extension Operating the platemeter EC10 Front Button Displays Zero calibration Start up/self test Selecting the factory default formula... -
Page 3: Introduction/ Important Safety Note
Introduction Congratulations on the purchase of your EC10 Platemeter. This platemeter is a highly engineered precision device for measuring the average height of pasture relative to density of the pasture. This is directly relative to the quantity of dry matter present (kilograms of dry mat- ter –... -
Page 4: Assembly Instructions
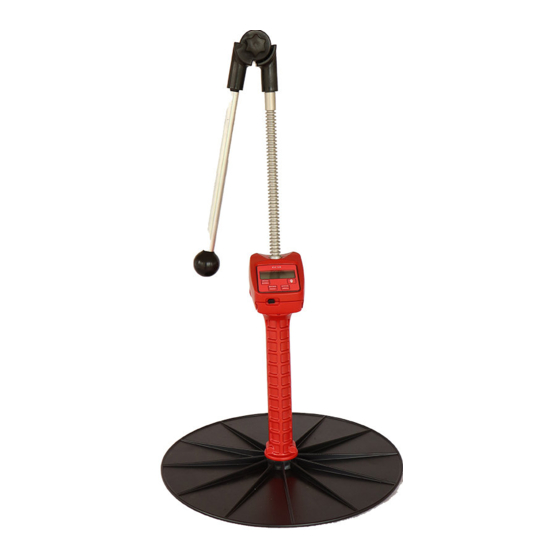
Assembly Instructions The platemeter is supplied in three parts: The plate The plate sits on top of the pasture to establish average height and density. The area-to-weight ratio of the plate has been carefully calibrated. The rod with meter The grooved rod allows pasture to be measured in 0.5 cm intervals (clicks). The rod includes the electronic meter. -
Page 5: Top Handle Assembly Instructions /Grooved Rod Extension
Handle assembly instructions Screw top handle onto the top of the grooved rod where it comes out of the counter. Grooved Rod Extension (for the 400mm model) Turn upside down and slip off the O ring. Put 4 drops of thread locker into the female end. -
Page 6: Operating The Platemeter
On/off switch EC10 Front display buttons The functions of the EC10 are defined by the four buttons on the front of the unit. The words in BOLD type (see below) are the primary functions. Activate by pressing the button briefly. Activate the secondary functions (in normal type, see below) by holding the button down until the function operates. -
Page 7: Zero Calibration
Zero Calibration To ensure that the platemeter accurately measures the compressed height of the pasture the platemeter must be calibrated. This requires setting a base level of zero so that measurements can be benchmarked against this. If the counter does not return to zero after each “plonk”... -
Page 8: Start Up/Self Test
Start up/self test Switch the unit on. It will beep and show “EC10” in the display panel. If the battery needs recharging it will beep 3 times and “lo” will display on the panel. The current formula in use will be displayed next with the “+” part of the equation first (default 500) and then the “x”... -
Page 9: Seasonal Variations Of Formulas
Seasonal variations of formulas 1 Winter & early spring - before stem growth x125 + 640 2 Late spring & early summer - during stem growth x130 + 990 3 Mid summer x165 + 1480 4 Early autumn - before autumn rain x159 + 1180 5 Late autumn - after rain x 157 + 970... -
Page 10: Entering Your Own Formula For Displaying Available Covers
Entering your own formula for displaying available covers: changes to the EC10 Displays “Available” cover required in some markets. All the current features of the EC10 are still there and function in exactly the same way. There is now an extra option in the menu called “A---”... - Page 11 Examples: Assume the formula used is (h x 140) + 500 – 1000 If the average “h” (height) = 4.0 then: (4 x 140) + 500 – 1000 would result in a display of “60” kg Any negative number entered by the user is saved to memory and ready to use next time.
- Page 12 Dexcel or Meat & Wool, do the following: 1. While the EC10 is switched on hold down the “MENU” button. The display reads: “F--d”. Press the UP arrow once to change the “d” (default to “c”...
-
Page 13: Using Your Platemeter/Taking Paddock Readings (The Pasture Walk)
The EC10 can save recorded average height readings to a specific paddock number which can be selected on the EC10. These readings can then be downloaded via the mini USB cable from the EC10 and aligned with your paddocks in “walk order”... - Page 14 Switch the unit on via the on/off switch at the back of the counter. If starting the first paddock ensure the EC10 does not contain any old data. Press and hold the “Reset” button until display changes to 0. (There will be two short beeps.) Press and hold the “Menu”...
- Page 15 Pressing the arrow key again will show the next paddock with data in it. Once the last recorded paddock is displayed the EC10 will beep and return to the normal display. You can escape the paddock display function at any time by pressing “Disp”.
- Page 16 How to take paddock readings - step by step instructions Height Press & hold “reset” button to clear any old data Reset Count Menu Press & hold the “menu” button Press the arrow button twice until p cl (paddock clear) shows on the display Disp Enter...
- Page 17 Instructions for downloading your platemeter software Load software onto computer. Connect USB cable to computer and to the EC10. Attach cable to counter.
-
Page 21: Software
Software The Jenquip Pasture Management Software provided can be used, however this is only suitable for single farms. Jenquip recommends for multiple farm users the use of the Android App which can be purchased separately. It takes the information from your farm walk and produces ready-to-use reports. -
Page 22: Replacing The Battery
Replacing the battery On start up if you get a “Lo” battery warning then the battery will need replacing over the next farm walk or two. A triangle icon in the top left hand corner also indicates a low battery. The electronic counter is powered by a single 9V battery. The use of an alkaline battery is recommended, though a standard heavy duty battery will still work well. -
Page 23: Fault Finding
Fault finding There is no visual display Check Resolution Replace the battery If you have just changed a battery you Service: Send to your service agent. may have damaged the battery snap clip that attaches to the top of the battery. - Page 24 Check Resolution Check the metal shaft is coming right Clean the platemeter back into the base of the tube. En- sure there is no grass or soil build-up preventing it from doing so. Also check the washer at the bottom of the shaft is not catching on the bottom of the plate.
- Page 25 How do I change a formula? Resolution Check Hold down the ‘Formula’ button until The platemeter is switched on. If the display changes to ‘F d’. While you wish to select the inbuilt default the ‘d’ is displayed, press the ‘Reset’ formula button.
Need help?
Do you have a question about the EC10 and is the answer not in the manual?
Questions and answers