Advertisement
Table of Contents
- 1 STEP 1: Preparations before Installing Monitor
- 2 STEP 2 - Option A: Install Bracket to the Desk
- 3 (A) Parts Included
- 4 (B) Attachment Screw Set
- 5 (C)Tools Needed for Assembly
- 6 Step 2 - Option B: Install Bracket Using Screw through Hole in the Desk
- 7 STEP 3: Attaching Monitor to Arm Plate
- 8 STEP 4: Using Cable Management System
- Download this manual
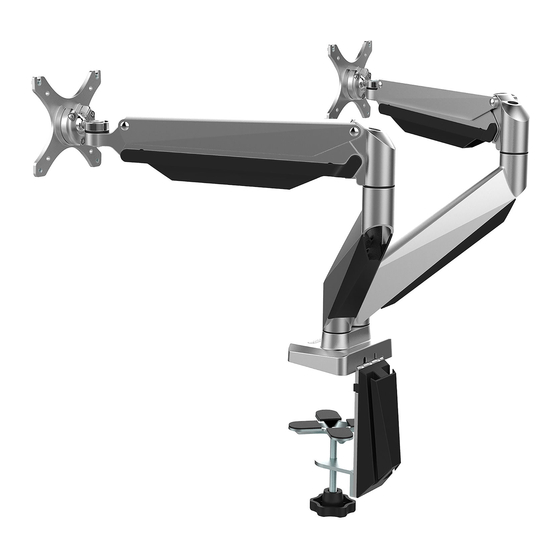
Item No. D7D
Installation Guide
100 x 100
4.4-19.8Ibs
10" - 27"
-90° -15°
75 x 75
2-9kg
Package Included
(A) Parts Included
(B) Attachment Screw Set
A.
B.
C.
D.
M6 x12mm
M6 x14mm
M4 x12mm
M5 x12mm
(3PCS)
(8PCS)
(8PCS)
(C)Tools Needed for Assembly
①. Bottom support 1 x 1
②. Screw x 1
③. Washer x1
④. Butterfly knob 1 x 1
⑤. Bottom support 2 x 1
⑥. Knob x 1
⑦. Cable cover x 1
⑧. Anti-slip rubber 1 x 1
⑨. Anti-slip rubber 2 x 1
⑩. Anti-slip rubber 3 x 4
⑪. Washer x 1
E.
F.
Φ6.5 xΦ13 x 2.0
4 x 4 Allen key
(1PC)
(2PCS)
(16PCS)
STEP 1: Preparations before installing monitor
1. Verify that the monitor has holes at VESA spacings, either 100 x 100mm or 75 x 75mm.
If it does not have this pattern, the monitor cannot be installed.
2. Remove the monitor's original fixed base. Be careful not to scratch the screen.
STEP 2 - Option A: Install bracket to the desk
This option is for desks without a gromment hole.
1. Attach the bottom support 2 (5) to the tube by tightening screws (C) with 4 x 4mm hex key (F).
2. Turn the mount upside-down and put anti-slip rubber 1 (8) and anti-slip rubber 2 (9) onto the
bottom support 2 (5).
3. Put anti-slip rubber 3 (10) onto the top of knob (6).
4. Attach the knob (6) to the bottom support 2 (5) using screws (D) with 4 x 4mm hex key (F).
5. Position the bottom clamp against desk surface and fully tighten clamp knob (6).
G.
5 x 5 Allen key
(1PC)
Installation Steps
75 x 75 / 100 x 100 mm
F
Desk
For table thickness: 0.98 – 4.72
25-120mm
(25 – 120mm) select appropriate
hole in the bottom support according
Tighten
to the desk thickness.
F
"
"
Advertisement
Table of Contents

Subscribe to Our Youtube Channel
Related Manuals for Loctek D7d


Summary of Contents for Loctek D7d
- Page 1 STEP 1: Preparations before installing monitor 1. Verify that the monitor has holes at VESA spacings, either 100 x 100mm or 75 x 75mm. Item No. D7D If it does not have this pattern, the monitor cannot be installed. Installation Guide 2.
- Page 2 ADDRESS: 47618 Kato Road, Fremont, CA, 94538 United States If the monitor cannot stop at any height, pls TEL: 1-855-421-2808 use the supplied 5x5 allen key to adjust the Facebook: Loctek ±90° Twitter: LoctekOfficial screw on the arm. To make the mount and Website: www.loctek.us...
Need help?
Do you have a question about the D7d and is the answer not in the manual?
Questions and answers