Table of Contents

Advertisement

Quick Links

1050RT | 1050RT (EU) |
1050RT X-Series
Compact Track Loader
Operator's Manual
50950436 Rev. H 05/21
Original Instructions

Advertisement

Table of Contents
loading
Need help?

Need help?

Do you have a question about the MUSTANG 1050RT X Series and is the answer not in the manual?

Questions and answers

Alaine Gregory Baron
May 21, 2025

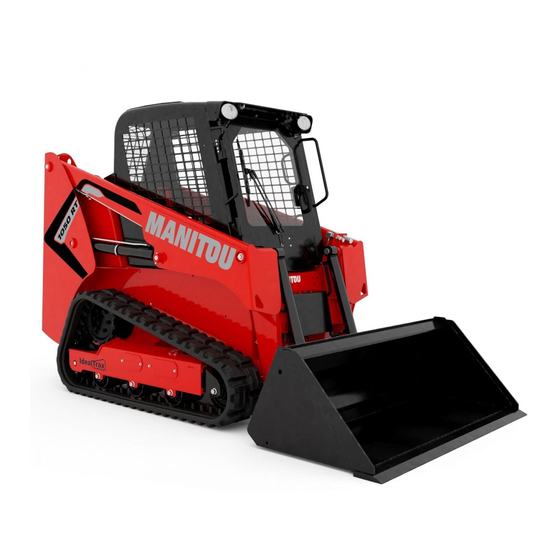
one of the tracks is tight and the other is loose the hydrolics are both working

1 comments:
Mr. Anderson
May 24, 2025

One track could be tight and the other loose on a Manitou 1050RT X Series if the automatic track tensioning system is not working properly. This system adjusts track tension when the engine starts. If it malfunctions, one track may not be correctly tensioned.

This answer is automatically generated

Subscribe to Our Youtube Channel

Summary of Contents for Manitou MUSTANG 1050RT X Series

  • Page 1 1050RT | 1050RT (EU) | 1050RT X-Series Compact Track Loader Operator’s Manual 50950436 Rev. H 05/21 Original Instructions...
  • Page 2 WARNING This product can expose you to lead which is known to the State of California to cause cancer and birth defects or other reproductive harm. For more information go to www. P65Warnings.ca.gov WARNING Breathing diesel engine exhaust exposes you to chemicals known to the state of California to cause cancer and birth defects or other reproductive harm.
  • Page 3 GEHL®, MUSTANG by MANITOU®, MANITOU®, brand warrants new MANITOU Group equipment to the Original Retail Purchaser to be free from defects in material and workmanship for a period of twelve (12) months or Two Thousand Hours (2000 h) from the Warranty Start Date which occur first.
  • Page 4: Table Of Contents

    TABLE OF CONTENTS INTRODUCTION Safety Symbol and Signal Words . . . . . . . . . . . . . . . . . . . . . . . . . . . . . . . . . . . . . . . . . . . . . . 5 Contents and Use of this Manual .
  • Page 5 Coolant Compound Table . . . . . . . . . . . . . . . . . . . . . . . . . . . . . . . . . . . . . . . . . . . . . . . . . . . . 40 Tracks .
  • Page 6 . 74 Sprocket Tooth Wear and Track Life . . . . . . . . . . . . . . . . . . . . . . . . . . . . . . . . . . . . . . . . . . .
  • Page 7 Electrical System . . . . . . . . . . . . . . . . . . . . . . . . . . . . . . . . . . . . . . . . . . . . . . . . . . . . . . . . . 121 Windshield Washer Reservoir .
  • Page 8: Introduction

    . avoided, may result in minor or moderate Manitou Group, in cooperation with the injury. Society of Automotive Engineers, has adopted this: IMPORTANT: The word “IMPORTANT”...
  • Page 9: Machine Orientation

    Because of ongoing product improvements, liability for any resulting damage or injury . information included in this manual may not exactly match the machine . Manitou Group Service and Registration reserves the right to modify and improve The wide Manitou Group dealership net-...
  • Page 10 Introduction Machine Model and Serial Track Drive Motor Model Number _______________________________ Numbers Track Drive Motor Serial Number Machine Model Number _______________________________ _______________________________ Machine Serial Number _______________________________ Hydraulic Pump Model Number _______________________________ Hydraulic Pump Serial Number _______________________________ Component Serial Numbers Engine Model Number _______________________________ Engine Serial Number _______________________________...
  • Page 11: Component Identification

    Introduction Component Identification Fig. 1 - Machine Components Item Description Upright Lift Cylinder Tracks 50950436/G0121 Printed in U.S.A.
  • Page 12: List Of Attachments

    Introduction Item Description Front Work Lights Hand holds Lift Arm Auxiliary Hydraulic Couplers Tilt Cylinders Attachment Bracket Engine Cover Tail Lights Rear Work Lights Rear Door Roll-Over/Falling Object Protective Structure (ROPS/FOPS) Restraint Bar Lift Arm Support Device Table 1 - Component Identification List of Attachments Dirt / Construction Buckets Weight...
  • Page 13: Using Attachments

    . Contact your dealer before using attachments or equipment not approved • Improper operating techniques, such as by Manitou Group . Use of non-approved driving too fast . attachments or unauthorized modifications is • Incorrect adjustment of the seat and prohibited .
  • Page 14: Fire Extinguisher

    NOTE: • Select machines with good suspension included as standard equipment nor available seats . as an option from Manitou Group. • Look for controls that are easy to use . Manufacturer Information • Ensure good visibility from the opera- tor’s position .
  • Page 15: Indicator And Operation Symbols

    Introduction Indicator and Operation Symbols Power Off Power On Engine Start Battery Charge Electrical Power Worklight w/Tail Worklight Safety Alert Hazard Flasher Fasten Seatbelt Lights Read Operator’s Horn Volume - Full Volume - Half Full Volume - Empty Manual Engine Oil Parking Brake Engine Air Filter Engine Oil...
  • Page 16 Introduction Hot Surface Remove Key Crush Hazard Pinch Point Crush Hazard Hazard Rotating Fan - Auxiliary Safety Lock Lift Arm Float Keep Away Hydraulics Flow Engine Critical Error Hitch Lock Hitch Unlock Heater Temperature Warning Front Window Rear Window Engine Error Code Lock Unlock Washer...
  • Page 17 Manitou . In any case, the following activities are strictly prohibited:...
  • Page 18: Safety

    The word “CAUTION” indicates a observed closely . potentially hazardous situation that, Manitou Group, in cooperation with the if not avoided, may result in minor or Society of Automotive Engineers, has adopted moderate injury.
  • Page 19: Mandatory Safety Shutdown Procedure

    . valve is in neutral . • Manitou Group always takes operator’s Empty the attachment and lower the lift safety into consideration during the arm and attachment to the ground .
  • Page 20: Before Starting

    . machine (see “Payloads/Capacities” on • Before working near power lines (either page 41) . Contact your dealer or Manitou above-ground or buried cable type), Group for information about attachment always contact the power utility and approval and compatibility with specific establish a safety plan with them .
  • Page 21: During Operation

    Safety to support the weight of the machine and During Operation the load . • ALWAYS fasten the seat belt securely • The operator’s area, steps and hand holds and properly . Never operate the machine must be kept free of oil, dirt, ice and without the seat belt fastened around the unsecured objects .
  • Page 22 Safety and close to the ground can be diffi- • Stop the engine and place the controls cult to see from the cab . in the lock-out position before mounting attachments . Check that attachments are • Always look in the direction of securely fastened to the lift arm before travel, including reverse .
  • Page 23: Applications With Load-Handling Devices

    Safety to fall off the attachment, or cause the • In cold weather, avoid sudden travel machine to tip over . movements and stay away from even slight slopes . The machine can slide • Slow down the work cycle and use slower sideways on icy slopes .
  • Page 24: Parking The Machine

    Safety • The machine may be moved with a raised Electrical Energy load only if the path of the machine is • Stay away from high-voltage lines . level . Electrocution can result from contact or • Persons attaching or securing loads may proximity to high-voltage electric lines .
  • Page 25: Maintenance And Service Safety Practices

    Safety Maintenance and Service Safety In addition, it is recommended that a softer (chip-resistant) material be used Practices to cushion the blow, otherwise, serious • Only trained and authorized personnel, injury to the eyes or other parts of the with a full awareness of safe procedures, body could result .
  • Page 26 Safety potentially fire-related components as • Always use proper tools while working on the machine . Incorrect tools could soon as they begin to show signs of break or slip, causing injury, or they deterioration: may not adequately perform intended Fuel system flexible hoses, fuel tank •...
  • Page 27: Battery Hazards

    Safety Battery Hazards Anyone swallowing battery acid must have immediate medical aid . Call the • Use the battery disconnect switch, or Poison Control Center at 1-800-222-1222 disconnect the negative battery cable in the United States . from the negative battery terminal, before performing electrical service or electrical Fire Hazards welding on the machine .
  • Page 28: Additional Safety Equipment

    Safety not wear polyester, or polyester-blend Crystalline Silica Exposure clothing while fueling . Before fueling, Exposure to crystalline silica (found in sand, touch the metal surface of the machine soil and rocks) has been associated with away from the fuel fill to dissipate any silicosis, a debilitating and often fatal lung built-up static electricity .
  • Page 29 1. Manufacturer: Manitou Equipment America, LLC 2. Address: One Gehl Way West Bend, WI 53095 U.S.A 3. Technical Construction File Location: Manitou Interface and Logistics Europe 4. Authorized Representative: Manitou Interface and Logistics Europe 5. Address: Rue DesAndains 2 Perwez, 1360...
  • Page 30: Decals

    Chapter 3 DECALS General Information decal . Remove the smaller portion of the decal backing paper and apply the • The machine has decals that provide exposed adhesive to the clean surface, safety information and precautions . These maintaining proper position and align- decals must be kept legible .
  • Page 31 Decals Fig. 4 - Safety and Information Decals Inside the Cab Common Decals (Located on the bottom of the side panels behind the tracks (both sides), and at the front of each pontoon on the outside face (both (Located next to the fuel filler neck) sides) Tie-down point .
  • Page 32 Decals (Located near the fuel filler neck) (Located on the inside of the left lift arm IMPORTANT: DIESEL FUEL pillar .) REQUIREMENTS: • Use only Ultra-Low Sulfur Diesel (ULSD) Service Decal fuel . • Use of diesel fuel with more than 15 PPM of ANSI-Style Decals sulfur will damage the engine .
  • Page 33 Decals • Inspect work area; avoid all hazards DANGER: AVOID INJURY OR DEATH • Look in the direction of travel; Keep children • Keep out from under work tool, unless lift an bystanders away . arm is supported . • No riders! Never use work tool as work •...
  • Page 34 Decals (Located under the ROPS/FOPS seat pan) (Located on the rear window) WARNING: Crush Hazard Designates emergency egress location . • Be sure lock mechanism is securely engaged before working under ROPS/FOPS . • Read instructions for use in Operator’s Manual .
  • Page 35 Decals (Located on the front of the machine) (Located on ROPS/FOPS left panel) WARNING: AVOID INJURY OR DEATH WARNING: • Before operating with attachment, check • This product can expose you to lead which engagement of loader attachment bracket is known to the State of California to cause locking pin to the attachment .
  • Page 36 Decals (Located on the rear face of the lower left (Located on ROPS/FOPS left panel) riser) WARNING: AVOID INJURY OR DEATH WARNING: • Maintain 3-point contact during entry and exit After weight kit is installed, the rear of loader • Inspect work area; avoid all hazards must be blocked when the ROPS is rolled •...
  • Page 37 Decals • Do not exceed Rated Operating Load . • Avoid steep slopes and high speed turns . • Travel up and down slopes with heavy end uphill . (Located on ROPS/FOPS left panel) WARNING: AVOID INJURY OR DEATH Always follow “Mandatory Safety Shutdown (Located on front of the machine) Procedure .”...
  • Page 38 Decals (Located behind the operator’s seat) (Located on lift arm support device, machine left side) WARNING: AVOID INJURY OR DEATH • Read Operator’s Manual and all safety signs WARNING: Crush Hazard before using machine . • Be sure lock mechanism is securely engaged •...
  • Page 39 Decals 50352526 (Located on the front of the machine) (Located on the fuel tank, inside the engine compartment) WARNING: AVOID INJURY OR DEATH • Before operating with attachment, check WARNING: HOT SURFACE engagement of loader attachment bracket • Do not touch hot engine or hydraulic system locking pin to the attachment .
  • Page 40: Specifications

    Chapter 4 SPECIFICATIONS Fluids/Lubricants Types and Capacities For information about fluids and lubricants, including types, capacities, and other specifica- tions, refer to the Lubrication Section on page 101 . Component/Application Type Quantity Hydraulic Oil Reservoir Tank 30.0 L (8 U.S. gallons) XPRT™, or Petro Canada HVI60, Mobil Hydraulic System –...
  • Page 41: Dimensions

    Specifications Dimensions [M] [O] Fig. 6 - Dimensions Overall Operation Height – Fully Raised 3650 mm (143.7 in.) Height to Hinge Pin – Fully Raised 2769 mm (109.0 in.) Reach - Fully Raised 673.1 mm (26.5 in.) Dump Angle - Fully Raised 38°...
  • Page 42: Payloads/Capacities

    Specifications Ground Clearance 191 mm (7.5 in.) Track Gauge 1039 mm (40.9 in.) Track Shoe Width 249 mm (9.8 in.) Crawler Base 1283 mm (50.5 in.) Overall Width (w/o Bucket) 1290 mm (50.8 in.) Bucket Width 1372 mm (54.0 in.) Clearance Radius –...
  • Page 43: Weights

    Specifications Weights (shown with standard options) 1050RT Operating Mass 2141 kg (4720 lbs.) Maximum Permissible Weight 2617 kg (5770 lbs.) Shipping Weight 1928 kg (4250 lbs.) Equipped with standard bucket, driver and full fluids. Without operator and driver; 10% fuel. Operating mass and a full bucket.
  • Page 44 Specifications 1050RT Exhaust Emission Compliance (DPF) / EPA Tier 4, EU Stage 5 (DPF) Non-DPF) / EPA Interim Tier 4, Stage 3A (Non-DPF) Applied Regulation EPA Tier 4 / EU Stage 5 Displacement 1,64 L (100 in Bore and Stroke 88 x 90 mm Compression Ratio 19.1:1...
  • Page 45: Hydraulic System

    Specifications Hydraulic System 1050RT Drive Speed 9.6 - 10.4 kph (6.0-6.5 mph) Hydrostatic Drive Motors Maximum Working Pressure 420 Bar (6091 psi) Table 9 - Hydraulic System: Drive Hydraulics 1050RT Main Relief Valve Pressure 195 bar (2828 psi) System Relief Pressure @ Quick Couplers 189.6 Bar (2750 psi) Total Flow @ 2500 rpm (Theoretical) 55 L/Min (14.5 Gpm)
  • Page 46: Vibration Levels

    Specifications Vibration Levels 1050RT Whole-Body Vibration (ISO 2631-1) Mechanical Suspension Seat 0.98 m/s Mechanical Suspension Seat - Joystick Only 1.06 m/s Hand-Arm Vibration (ISO 5349-1) T-Bar 3.92 m/s Hand/Foot 4.31 m/s Joystick 4.55 m/s Table 12 - Vibration Levels 50950436/H0521 Printed in U.S.A.
  • Page 47: Standard And Optional Features

    Specifications Standard and Optional Features Standard Features ► Top and Rear Windows ► Control Types: T-Bar and Hand/Foot ► Fuel Gauge ► DPF Exhaust - Spark Arrestor Compliant ► Horn ► Headliner and Acoustical Interior ► Deluxe Sound Package ► Adjustable Seat ►...
  • Page 48: Common Materials And Densities

    Specifications Common Materials and Densities Density Material kg/m lbs./ft Ashes 560-800 35-50 Brick-common 1792 Cement 1760 Charcoal Clay, wet-dry 1280-1600 80-100 Coal 848-1008 53-63 Concrete 1840 Cinders Coal-anthracite 1504 Coke Earth-dry loam 1121-1442 70-90 Earth-wet loam 1281-1602 80-100 Granite 1488-1776 93-111 Gravel-dry 1602...
  • Page 49 Specifications Direct and/or Indirect Visibility Tested in accordance with ISO 5006: 2017. The machine has been subjected to a static visibility assessment with the lift structure in a carry position or 200 mm (7-7/8 in.) above the ground. The test simulates operator visibility from the operator’s position: •...
  • Page 50: Indicators And Controls

    Chapter 5 INDICATORS AND CONTROLS Fig. 7 - Operator Controls (Hand/Foot Control Option Shown) Item Description Ignition Key switch Controls ignition, engine start and run. Displays operation status messages and configures perfor- Information Center Electronic Display mance options. Fuel Gauge Displays amount of fuel in the fuel tank.
  • Page 51: Display(S)

    Indicators and Controls Display(s) Information Center Electronic Display The information center electronic display is located on the right door pillar . It provides the following functionality: • Displays operational status such as engine RPM, coolant temperature and service hours . •...
  • Page 52 Indicators and Controls O. Regen/Return Button – Used for different func- tions depending upon screen and context: • Switches to the Regen display mode if the R. Regen Inhibit Button – Press for 5 seconds to symbol is displayed on the screen. Also initiates inhibit DPF reset regeneration.
  • Page 53 Indicators and Controls Diesel Particulate Filter (DPF) regeneration. See “Diesel Particulate Filter (DPF) Regeneration Procedures” on page 90. Coolant temperature. Strike-through line through the symbol is displayed in red when DPF regeneration is inhibited. Diesel Particulate Filter (DPF) regeneration inhibit (DPF Models). Percentage of engine power See “Diesel Particulate Filter based on load.
  • Page 54 Indicators and Controls Information Center Electronic Display Screens NOTE: Values may not display for all parameters, depending upon installed options and equipment. Table 14 - Status, Maintenance and Error Code Screens Display Mode Description Dual Gauge Display Accumulated operation time. NOTE: Time is displayed in hours, and accumulates when the engine is running.
  • Page 55 Indicators and Controls Table 14 - Status, Maintenance and Error Code Screens Display Mode Description Single Gauge Display Displays single real time operating parameters. Switch between parameters using the navigation button (M, Fig. 8). Used for various functions, depending upon screen and context. 1234.5 Regeneration Screens n/min...
  • Page 56 Indicators and Controls Table 14 - Status, Maintenance and Error Code Screens Display Mode Description DM1 Screen 0 of 0 Displays engine, drive system, control, and SPN: 0 safety system error code message information. Number of available messages is displayed at FMI: 0 the top left of the screen (T).
  • Page 57: Switch Panel

    Indicators and Controls Switch Panel Fig. 9 - Instrument Panel 50950436/H0521 Printed in U.S.A.
  • Page 58 Indicators and Controls Instrument Panel The instrument panel contains the following switches and indicators . Symbols on the panel rep- resent various functions and conditions, and are visible only when indicator lamps are on Key switch – In a clockwise rotation, these positions are: OFF Position –...
  • Page 59: Operator's Seat

    Indicators and Controls 13 . Light Switch – Controls all the lights on Engine throttle is controlled with both a knob the loader . Symbols denote the four posi- (I, Fig . 10) and a pedal (J, Fig . 11) . tions of the light switch .
  • Page 60: Travel Controls

    Indicators and Controls Travel Controls Emergency Lift Arm Lower Forward, reverse, and turning functions are performed using the control handles . Lift Arm Float Never use the float mode with the attachment raised, because this will cause the lift arm to lower very rapidly. The float mode can be used where the engine has stopped, is unable to Make sure the bucket is lowered to the...
  • Page 61: Horn

    Indicators and Controls Horn Windshield Wiper/Washer On hand/foot loaders, pressing the right button on the left control handle sounds the horn . On T-bar loaders, pressing the bottom button on the left control handle sounds the horn . Cab Heat (Option) Fig.
  • Page 62: Beacon (Option)

    Indicators and Controls Beacon (Option) Hydraglide Ride Control System (Option) When Hydraglide™ ride control is activated, the lift arm may drop slightly without a load, or several inches with a heavy load. Do not use Hydraglide™ when using pallet forks. Fig.
  • Page 63 Indicators and Controls 50950436/H0521 Printed in U.S.A.
  • Page 64: Operation

    Know how to stop the machine before Windows, lights, and starting. steps clean? Use only Manitou-approved accesso- “Connecting/ ries or referral attachments. Manitou Attachment securely Disconnecting Group cannot be responsible for safety fastened to hitch? Attachments” on page if the machine is used with non-ap- proved accessories or attachments.
  • Page 65: Before Operation

    OPERATION Before Operation Seat Belt Cab Entry and Exit ALWAYS fasten the seat belt securely and properly. Never operate the machine without the seat belt fastened around the operator. Keep the seat belt clean; dirt can impair seat belt operation. Check seat belt condition regularly and have damaged or worn belts immediately repaired by an authorized dealer.
  • Page 66: Starting The Engine

    OPERATION Before starting the engine, sit in the operator’s seat and lower the restraint bar . Close the swing-out door (if equipped) . IMPORTANT: The engine cannot be started if the restraint bar is in the raised position, the cab swing-out door is open (if equipped), or the operator is not in the seat.
  • Page 67 OPERATION All controls must be within easy reach. The operator must be able to move the throttle pedal and the control joysticks through the complete range of motion. Fasten the seat belt . Fig. 20 - Ignition Switch NOTE: When the key is turned clockwise to the first detent, seat belt indicator acti- vates and a tone sounds for 5 seconds as Always fasten the seat belt before oper-...
  • Page 68: Engine Warm Up

    OPERATION in temperatures below -10°C (14°F) . Contact Engine Warm Up your dealer for engine heater options . NOTE: In ambient temperatures below -10° C (14° F), an engine block heater is recommended to reduce starter load and aid engine warm up. Starting the machine Operating the work hydraulics before at these temperatures without a block the hydraulics are warmed up is...
  • Page 69: Run-In Period

    OPERATION Run-In Period Safety Interlock System (Hydraloc™) The performance and service life of the machine is heavily dependent on using the machine carefully during its first 100 operating hours . • Do not operate machine at the maximum NEVER defeat the safety interlock rated operating capacity .
  • Page 70: Travel Drive Operation

    OPERATION Travel Drive Operation Never allow anyone to enter inside the turning radius and the machine path. Signal your intention to move by sounding the horn (option). Traveling should be performed with the attachment in transport position. Fig. 21 - T-Bar Controls Avoid sudden stops, starts or turns.
  • Page 71 OPERATION T-Bar Lift and Tilt Controls Moving the lift arm and tilting the attachment are accomplished by movement of the right T-bar . To raise the lift arm, pull the control straight rearward; to lower the lift arm, push the control straight forward . To tilt the attach- ment forward and downward, twist the control clockwise;...
  • Page 72 OPERATION Back-up Alarm A back-up alarm system is available which serves to warn people working in the area around the machine of the machine’s rearward Be sure the controls are in neutral movement . The back-up alarm is installed before starting the engine. Operate within the engine compartment on the inside the controls gradually and smoothly.
  • Page 73 OPERATION Joystick Controls The machine s equipped with joystick controls . On joystick-equipped machines, the left joystick controls the travel drive, and the right joystick controls the attachment lift and tilt . Fig. 23 - Joystick Hand Controls Table 15 - Joystick Control Functions Ref.
  • Page 74 OPERATION Joystick Drive Controls (Left Joystick) Forward, reverse, travel speed and turning Be sure the joystick controls are in neutral maneuvers are controlled using the left joystick before starting the engine. Operate the (Fig . 24) . controls gradually and smoothly. Excessive speed and quick control movements without regard for conditions and circumstances are hazardous and could result in loss of...
  • Page 75: Back-Up Alarm

    OPERATION To tilt the attachment forward and down, move the right joystick to the right . To tilt the attachment up and back, move the right joystick to the left . Do not rely exclusively on the backup alarm To lower the lift arm while tilting the to alert others.
  • Page 76 OPERATION undercarriage component wear. Avoid rubbing the sides of the tracks against walls or other vertical surfaces. If possible, avoid traveling over broken or jagged stone, metal objects, on It is impossible to estimate track life because other sharp objects that could damage track life is affected by operating conditions, or cut the tracks.
  • Page 77: Sprocket Tooth Wear And Track Life

    (C, Fig . 26) . Use the recycling-type materials . Rubber tracks are not sprocket tooth wear gauge (A - Manitou part intended for these surfaces . # 50323051), included with the machine, to...
  • Page 78: Lift Arm Operation

    OPERATION Always replace sprocket mounting hardware when replacing or re-attach- ing sprockets. Lift Arm Operation Do not lift loads exceeding rated operating capacity. See “Payloads/ Capacities” on page 39. Attachment Transport Position: Carry materials 200-300 mm (8-12”) Fig. 26 - Sprocket Tooth Wear Gauge above the ground, and adjust as necessary to clear obstacles .
  • Page 79: Lift Arm Lift Support

    OPERATION Lift Arm Lift Support Move the lift/tilt controls to verify that the controls do not cause movement of the lift arm and hitch plate . Raise the restraint bar to disable the A falling lift arm could result in severe hydraulic controls .
  • Page 80 Do not remove or modify the Roll-Over Protective Structure/Falling Object Protective Structure (ROPS/FOPS) A second person on the outside of unless instructed to do so in Manitou- the machine is required to assist with approved installation instructions. disengaging the lift arm support.
  • Page 81 OPERATION Raising ROPS/FOPS On machines equipped with a swing-out cab door, securely close and latch the door . Close the engine cover . Always secure the ROPS/FOPS to the Lift ROPS/FOPS up and tilt it back chassis with anchor bolts and washers until the self-actuating lock mechanism (A, Fig.
  • Page 82: Self-Leveling (Option)

    OPERATION Float Control Stay clear from underneath the ROPS/ Never use the float mode with the FOPS as it is tilted down. Injury to attachment raised, because this will limbs can result. cause the lift arm to lower very rapidly. The float mode can be used where the engine has stopped, is unable to Secure the ROPS/FOPS to the chassis...
  • Page 83: Powering Attachments With Hydraulic Function

    OPERATION The machine features a All-Tach™ attaching IMPORTANT: To check that the mechanism for mounting a bucket or other attachment is properly installed tilt the attachment forward slightly, apply down- attachment . Two latch levers engage the latch ward pressure to the attachment prior to pins to secure the attachment .
  • Page 84 OPERATION Route the hydraulic hoses so they do not get pinched when the attachment is tilted forward and back. Damaged or burst hydraulic hoses could result. IMPORTANT: Always check hydraulic function of the attachment before use, to Fig. 35 - Auxiliary Hydraulic Circuit make sure the hydraulic hoses have not Connections...
  • Page 85 OPERATION Auxiliary Hydraulics Operation Fig. 36 - T-Bar Auxiliary Hydraulics Fig. 38 - Joystick Auxiliary Hydraulics Control Pedal Control Rocker Switch For T-Bar controls, a foot pedal is used to con- trol the direction of hydraulic oil flow. Empty the attachment and lower it to the ground .
  • Page 86: Working With Buckets

    OPERATION IMPORTANT: Always check hydraulic function Working with Buckets of the attachment before use, to make sure Buckets are mainly used for digging, loosen- the hydraulic hoses have not been installed in ing, lifting, transporting and loading loose or reverse. solid materials .
  • Page 87 OPERATION Read the “Safety” section in this Avoid tilting a bucket back when the manual, starting on “Safety” on page lift arm is fully raised. Material may fall 15, before working with a bucket. over the rear of the bucket and onto the Pay special attention to the “During operator’s position.
  • Page 88 OPERATION Digging with a Standard Bucket Loading a Bucket Fig. 39 - Digging with a Bucket Fig. 40 - Loading a Bucket Approach the digging site with the Lower the bucket to the ground . lift arm slightly raised . Tilt the bucket forward until the cutting edge contacts the Tilt the bucket slightly forward so the ground .
  • Page 89 OPERATION Loading Trucks (or Hoppers) Tips When Loading Trucks Fig. 42 - Loading Trucks Fig. 41 - Dumping into a Truck (or The truck and machine working direction Hopper) should form an angle of 45° . IMPORTANT: When the self-leveling Only raise a full bucket to the height feature is on, the tilt angle of the attach- needed for dumping when you are driving...
  • Page 90 OPERATION Lower the bucket a few inches from the Grading Using Float ground . Slowly drive forward until the front edge of the bucket extends halfway over the edge of the hole or embankment . Tilt the bucket forward to dump the material .
  • Page 91: Working With Pallet Forks

    OPERATION Working with Pallet Forks DO NOT exceed pallet fork load center Read the “Safety” section in this and/or lifting capacity. Refer to the manual, starting on “Safety” on page pallet fork payload /capacities table on 15, before working with pallet forks. page 83.
  • Page 92 OPERATION Position the fork arms parallel to the ground . Make sure the fork arms are adjusted as Do not use bent, cracked, or otherwise far apart as possible, as allowed by the damaged fork arms/pallet forks. load, and are both the same distance away from the center-line of the load .
  • Page 93: Diesel Particulate Filter (Dpf) Regeneration Procedures

    OPERATION as shown in Fig . 27, to prevent spilling 21 . Slowly and carefully drive in reverse material .” on page 75 . away from the placed load until the lift arm can be lowered to transport posi- 13 . Carry the load as low as safely possible tion .
  • Page 94 OPERATION 25-30 minutes to complete . See “Stationary Regeneration” on page 92 . IMPORTANT: The machine cannot be operated and must be parked in a well-ventilated area away from flammable materials when stationary regeneration is in progress. 1234.5 There is a possibility of carbon monox- Fig.
  • Page 95 OPERATION and will force premature DPF filter core NOTE: DPF in-progress (elevated temperature) symbol (Q, Fig. 46) will not replacement. be displayed when reset regeneration is inhibited. Stationary Regeneration n/min Stationary regeneration may be periodically required to reduce DPF soot build-up . The fre- quency of stationary regeneration is dependent upon machine operation and engine load .
  • Page 96 OPERATION Forcing Stationary Regeneration Stationary regeneration can be performed at any time after 50 operating hours following the 22 % previous stationary regeneration . To perform stationary regeneration on-demand: Fig. 50 - Stationary Regeneration In-Progress Screen When all three check-marks (T, U & V) are displayed on the Stationary Regeneration screen, press and hold the button (W) until the Stationary...
  • Page 97: After Operation

    OPERATION After Operation compartments and the engine compartment . Take the keys with you . Jump-Starting Park the machine on firm, level ground. If the battery becomes discharged or does not have enough power to start the engine, use Raise the restraint bar to disable the jumper cables and the following procedure to hydraulic controls.
  • Page 98: Lifting The Machine Using A Crane

    OPERATION Connect the other end of the positive Lifting the Machine using a Crane jumper cable to the jumper vehicle’s battery positive (+) terminal . Connect the negative (-) jumper cable to Make sure the crane and the lifting the jumper vehicle’s battery negative (-) gear (cables, chains) have sufficient terminal .
  • Page 99: Towing / Transporting The Machine

    OPERATION Lower the lift arm . Observe all local regulations governing the loading and transporting of equipment Turn off the engine and remove the (Reference: U .S . Federal Motor Carrier Safety ignition key . Regulations, Section 392) . Ensure that the hauling vehicle meets all safety requirements Raise the restraint bar to disable the before loading the skid-steer machine .
  • Page 100: Loading And Transporting The Machine On A Transport Vehicle

    OPERATION Loading and Transporting the Machine on a Transport Vehicle Do not exceed the transport vehicle’s gross weight rating and the gross axle weight rating when loading and trans- porting the machine. The transport vehicle must have sufficient capacity for the size and weight of the machine. Fig.
  • Page 101 OPERATION Loading and Securing the Machine Raise the hitch plate/attachment enough so that it will not touch the loading ramps . Slowly and carefully drive the machine in reverse onto the transport vehicle, with Secure the loading ramps to the trans- the bucket end facing down the ramp .
  • Page 102: Long-Term Storage

    OPERATION IMPORTANT: Before transporting the recommendations from the Engine machine through heavy rain, close off Operator’s Manual .) the exhaust pipe with a cap or suitable Start the engine . Observe all gages . If all adhesive tape. gages are functioning properly and read- ing normal, move the machine outside .
  • Page 103 OPERATION Raise the restraint bar to disable the Machine Disposal hydraulic controls . Make sure all materials are disposed of in an Switch off all electrical switches. ecologically sound manner . Recycle the machine in accordance with the Unfasten the seat belt, remove the igni- current state of the art at the time of recycling .
  • Page 104: Lubrication

    Chapter 7 LUBRICATION Types of Lubricants IMPORTANT: Use of lubricants not corresponding to manufacturer recommendations may invalidate warranty claims. Always dispose of waste lubrication oils and hydraulic fluids according to environmental laws or take to a recycling center for proper disposal. DO NOT pour fluids onto the ground or down a drain.
  • Page 105 Lubrication Lubrication Points Wipe dirt from the fittings before and after applying grease to prevent contamination. Replace any missing or damaged fittings. Avoid excessive greasing to minimize dirt build-up . Fig. 57 - Grease Fitting On Hitch Pin Fig. 58 - Grease Fitting on Lift Arm Pivot 50950436/H0521 Printed in U.S.A.
  • Page 106 Lubrication Fig. 59 - Grease Fittings on Lift Cylinder Rod End Fig. 60 - Grease Fitting on Lift Cylinder Base End 50950436/H0521 Printed in U.S.A.
  • Page 107: Lubrication Schedule/Intervals

    Lubrication Lubrication Schedule/Intervals 50/1000 Prefilter Fig. 61 - Lubricating Service Locations Lubrication 10 Hours (or 50 Hours 250 Hours 1000 Hours Procedure Daily) (or Annually) Check Engine Oil Level Check Hydraulic Oil Level Grease Hitch, Hitch-related Cylinder Pivots and Latch Pins Grease Lift Arm Pins Change Engine...
  • Page 108: Filter Table

    Lubrication Filter Table Service Procedure Maximum Interval 50 Hours Hours (or every Hours (or Hours (or (or Daily week) every 6 Annually) months) Change hydraulic oil filter Change engine oil filter Change cab air filter, if applicable Change outer air cleaner filter ele- ment.
  • Page 109 50950436/H0521 Printed in U.S.A.
  • Page 110: Maintenance

    Chapter 8 MAINTENANCE Maintenance Schedule intervals would be impractical and is therefore not recommended . This Maintenance Interval Chart was IMPORTANT: Under severe operating developed to match the Service chapter of conditions, more frequent service than the this manual . Detailed information on each recommended intervals may be required.
  • Page 111 MAINTENANCE Table 16 - Leakage Test Service Procedure Maximum Interval 10 Hours (or 250 Hours 500 Hours (or Daily) Yearly) Check engine for oil/coolant leaks. Check cooling system for leaks. Check hydraulic system for leaks. Table 17 - Lubrication and Filter Changes Service Procedure Maximum Interval 10 Hours (or Daily)
  • Page 112: Engine Maintenance

    MAINTENANCE Engine Maintenance Wipe the dipstick with a clean cloth and replace it in the engine . Push it in until it is fully inserted . Check Engine Mounting Hardware Remove the dipstick again . The oil level All bolts that secure the engine mounting should be within the “Add”...
  • Page 113 MAINTENANCE Perform the “Mandatory Safety Changing Fuel Filter Shutdown Procedure” on page 16 . Wait until the engine has cooled, but is not completely cold . Oil will drain faster NEVER service the fuel system while and more completely if it is warm . smoking, while near an open flame, or Position a waste oil collection container after the engine has been operated and...
  • Page 114 . Replace the outer element . Along with a daily check of the restriction NOTE: Manitou Group does not recom- indicator, check the air cleaner intake hose and mend cleaning the outer element. clamps, and the mounting bracket hardware to be sure they are properly tightened .
  • Page 115: Dpf Exhaust System Service

    MAINTENANCE Inner Element NOTE: Replace the inner element only if it is dirty or if the outer element has been replaced three times. Before removing the inner element from the housing, clean out any dirt built up in the housing . Leave the inner element installed during this step to prevent debris from entering the engine intake manifold .
  • Page 116 MAINTENANCE diesel fuel, which is dyed red for identifica- Perform the “Mandatory Safety tion. It may take several fillings of the fuel Shutdown Procedure” on page 16 . tank before the red dye is purged from the Unlock fuel cap (E, Fig . 67) using the fuel system.
  • Page 117: Hydraulic System Maintenance

    MAINTENANCE Turn the fuel shut-off valve lever Inspect the water separator daily, or every day before use . The water separator is located (G) on the water separator to the OFF between the fuel tank and the main fuel filter position .
  • Page 118 MAINTENANCE Add hydraulic fluid as required. Replace the cap . Changing Hydraulic Oil and Filter NOTE: The hydraulic oil filter can be changed without changing the hydraulic oil or draining the hydraulic reservoir. Change the hydraulic oil filter after 500 hours or 1 year of use thereafter .
  • Page 119: Engine Cooling System

    MAINTENANCE IMPORTANT: Always dispose of hydrau- 13 . Add oil to the hydraulic system as lic fluids according to environmental laws required until the level reaches the FULL or take to a recycling center for proper marking on the dipstick . Replace and tighten the hydraulic oil dipstick/fill cap.
  • Page 120: Alternator/Fan Belt

    MAINTENANCE Open the rear door . Lift the engine cover . Fill the radiator fully and the recovery tank half full with the premixed coolant . Clean the radiator and oil cooler by blow- ing through the fins with high pressure Reinstall the radiator cap .
  • Page 121: Hydraulic Hose Maintenance

    MAINTENANCE Hydraulic Hose Maintenance Never weld or solder damaged or Hydraulic hoses and connections must leaking pressure tubes and/or screw be inspected by a trained technician connections. Always replace damaged before the first use of the machine, and hydraulic components. at least annually thereafter, for leaks Hydraulic hoses must be replaced and/or damage.
  • Page 122: Tracks

    MAINTENANCE Park the machine with one of the travel • Avoid traveling or turning on broken stone, motor drain/fill hole plugs (O, Fig. 75) at jagged rock, metal or other material that could the bottom . damage or cut the tracks . •...
  • Page 123 MAINTENANCE With the machine running and the drive rear idler wheel at using a pry bar and system not moving, remove tension cyl- your foot . inder stop (K, Fig . 76) on the side on the IMPORTANT: Guides on the inside of machine with the track to be replaced .
  • Page 124: Electrical System

    MAINTENANCE 13 . Start the machine, open the engine Battery compartment and press the track tension service switch (P, Fig . 77), to set the track tension cylinders into the operating (extended) position . Before servicing the battery or electri- cal system, disconnect the negative 14 .
  • Page 125 MAINTENANCE Fuses and Relays Never lay a metal object on top of a battery, because a short circuit can result. Battery acid is harmful to skin and fabrics. If acid spills, follow these first-aid tips: • If battery acid spills on any clothing, remove it immediately.
  • Page 126: Windshield Washer Reservoir

    MAINTENANCE Windshield Washer Reservoir Fig. 80 - Windshield Washer Reservoir Fill The windshield washer reservoir (R, Fig . 80) is located inside the engine compartment . Check the windshield washer reservoir level daily before starting the machine and fill if necessary .
  • Page 127: Maintenance Log

    MAINTENANCE Maintenance Log Date Hours Service Procedure 50950436/H0521 Printed in U.S.A.
  • Page 128: Maintenance Log

    MAINTENANCE Maintenance Log Date Hours Service Procedure 50950436/H0521 Printed in U.S.A.
  • Page 129: Maintenance Log

    MAINTENANCE Maintenance Log Date Hours Service Procedure 50950436/H0521 Printed in U.S.A.
  • Page 130: Maintenance Log

    MAINTENANCE Maintenance Log Date Hours Service Procedure 50950436/H0521 Printed in U.S.A.
  • Page 131 MAINTENANCE 50950436/H0521 Printed in U.S.A.
  • Page 132: Troubleshooting

    Chapter 9 TROUBLESHOOTING Engine Troubleshooting Problem Possible Cause Corrective Action Blown Fuse Check circuit and replace fuse. Dead Battery Charge or replace battery. Place battery disconnect switch into Battery disconnect switch in open closed position. Repair or replace if position or malfunctioning necessary.
  • Page 133 Troubleshooting Problem Possible Cause Corrective Action Pre-heating module malfunction; check Engine too cold / ambient temperature connection and voltage and charge too low / replace as necessary. Install block heater. Crankcase oil level incorrect Adjust oil level. With engine off, reposition shroud / Cooling air circulation restricted contact dealer.
  • Page 134: Indicator Lamp Troubleshooting

    Troubleshooting Indicator Lamp Troubleshooting Indicator Indicator Possible Cause Corrective Action Icon Description The engine Electronic Control Engine error Unit (ECU) has detected an Refer to the error codes section. indicator error condition Stop engine immediately. Check Engine oil pressure too low oil level and add oil if necessary.
  • Page 135: Seal And Hose Troubleshooting

    Troubleshooting Seal and Hose Troubleshooting Problem Possible Cause Corrective Action Loose hose connection(s) Tighten hose connection(s). Oil, coolant or fuel leakage Damaged seals or hoses Change seals / hoses as necessary Loose fittings Tighten hydraulic connections. Hydraulic fluid leakage Change seals, hoses or lines as Seal, hoses or line damaged necessary.
  • Page 136 Troubleshooting Problem Possible Cause Corrective Action Low engine speed Operate engine at higher speed. Allow longer warm-up or replace exist- Hydraulic oil viscosity is too heavy ing oil with proper viscosity oil. Check for control linkage restriction Control linkage is restricted and adjust.
  • Page 137 Troubleshooting Problem Possible Cause Corrective Action Bleed pilot control lines from the main Pilot control lines have air in them Slow or no response control valve. for bucket tilt, lift works Low charge pressure Contact your dealer. properly (Hand/Foot Linkage mis-adjusted between right Readjust for full travel without machines only) foot pedal and pilot valve...
  • Page 138: Hydrostatic Travel Drive System Troubleshooting

    Troubleshooting Hydrostatic Travel Drive System Troubleshooting Problem Possible Cause Corrective Action Allow longer warm-up or replace exist- Hydraulic oil viscosity is too heavy ing oil with the proper viscosity oil. No response from either hydrostatic drive Check for low oil level in the reservoir. Hydraulic oil supply is too low or the lift / tilt systems Add oil.
  • Page 139 Troubleshooting Problem Possible Cause Corrective Action Allow longer warm-up or replace exist- Hydraulic oil viscosity is too heavy ing oil with the proper viscosity oil. Cycle lift and tilt cylinders to maximum stroke and maintain pressure for a Hydrostatic (drive) Air in hydraulic system short time to clear air from system.
  • Page 140: Electrical Troubleshooting

    Troubleshooting Electrical Troubleshooting Problem Possible Cause Corrective Action Battery disconnect switch is in its Turn battery disconnect switch to its OFF position ON position. Battery terminals or cable loose or Clean battery terminals and cables and corroded re-tighten. Test battery. Recharge / replace as Electrical system does Battery malfunction necessary.
  • Page 141 Troubleshooting Problem Possible Cause Corrective Action Temperature sender malfunction Replace temperature sender. Loose wiring / terminal connections Check wiring connections. Coolant temperature Blown fuse Check circuit and replace fuse. gauge is inoperative Coolant temperature gauge Replace gauge. malfunction Loose wiring / terminal connections Check wiring connections.
  • Page 142: Error Codes

    Troubleshooting Error Codes 50950436/H0521 Printed in U.S.A.
  • Page 143 Troubleshooting 50950436/H0521 Printed in U.S.A.
  • Page 144 Troubleshooting 50950436/H0521 Printed in U.S.A.
  • Page 145 Troubleshooting 50950436/H0521 Printed in U.S.A.
  • Page 146 Troubleshooting 50950436/H0521 Printed in U.S.A.
  • Page 147 Troubleshooting P-CODE PART STATE P1673 EGR Low Pres. Sensor Malfunction Aftertreatment Error P1676 Intake Air Temp. Sensor Malfunction Aftertreatment Error P1674 Coolant Temp. Sensor Malfunction Aftertreatment Error P1677 Exhaust Temp. Sensor Malfunction Aftertreatment Error P1675 EGR Gas Temp Sensor Malfunction Aftertreatment Error 1209 P1679...
  • Page 148: Index

    T-Bar Controls ......57 Index Throttle Controls ......56 Travel Controls .
  • Page 149 Travel Motor Maintenance ..118 Using a Booster Battery MAINTENANCE ....107 (Jump-Starting) ......118 Adding Fuel .
  • Page 150 Removing Machine Disengage Parking Brake ... . 63 from Storage ......99 DPF Maintenance .
  • Page 151 Troubleshooting ....129 Safety ........15 Electrical Troubleshooting ..137 Additional Safety Equipment ..25 Engine Troubleshooting ... . 129 Applications with Load-Handling Devices .
  • Page 152: Torque Specifications

    Torque Specifications Use these torque values when tightening hardware (excluding: locknuts NOTE: and self-tapping, thread forming and sheet metal screws) unless specified otherwise. Hydraulic fittings with various seals (light application). All torque values are in Nm (lb.-ft.) unless marked otherwise. Straight pipe fitting with thread and screwed Non-return Identification...
  • Page 153 Hydraulic fittings with various seals (heavy application). All torque values are in Nm (lb.-ft.) unless marked otherwise. Straight pipe fitting with thread and screwed Non-return valve with Identification plug (GE) Thread elastic aid outside Ø Sealing Elastic seal O-ring washer seal M12X1.5 20 (15)
  • Page 154 With coarse-pitch thread. All torque values are in Nm (lb.-ft.) unless marked otherwise. Threads according to DIN 912, DIN 931, DIN Threads according to DIN 933, etc. 7984 Thread 10.9 12.9 10.9 5.5 (4.1) 8 (6) 10 (7) 5 (4) 7 (5) 10 (7) 14 (10)
  • Page 155 50950436/H0521 Printed in U.S.A.
  • Page 156 For Support and Service, Contact Your Dealer Manitou Group One Gehl Way, West Bend, WI 53095-0179 U.S.A. www.us.manitou.com / www.mustangmfg.com © 2021 All rights reserved...

This manual is also suitable for:

Mustang 1050rtMustang 1050rt eu

Table of Contents

Save PDF