Table of Contents
Advertisement
Quick Links
Advertisement
Table of Contents

Summary of Contents for Cambridge Scale Works SSCSW-20AT-B
-
Page 2: Table Of Contents
TABLE OF CONTENTS Meter connections ------------------------------------------------------------------ 3 1.0 Operation ------------------------------------------------------------------------ 4 1.1 Charging the battery --------------------------------------------------- 4 1.2 Key Functions ---------------------------------------------------------- 5 - 6 1.3 Error Messages --------------------------------------------------------- 6 2.0 Scale Procedure ----------------------------------------------------------------- 7 2.1 Software Navigation Flowchart -------------------------------------- 8 2.2 Scale Menu Definitions ----------------------------------------------- 9-11 3.0 Calibration Procedure ---------------------------------------------------------- 11 3.1 Calibration Menu Definitions ---------------------------------------- 11... -
Page 3: Meter Connections
METER CONNECTIONS To connect power via 110VAC cable to the SSCSW-20AT-B meter. First make sure the On/Off switch on the rear of the meter is in the OFF position. Connect the cable to a 110VAC outlet. Next, connect the other end to the cable to the the 3 pin power connector located on the rear of the Indicator. -
Page 4: Operation
1.0 OPERATION 1.1 Charging The Battery When t he b attery v oltage f alls t o 6 .5VDC, a s d escribed p reviously, b At L O ... -
Page 5: Key Functions
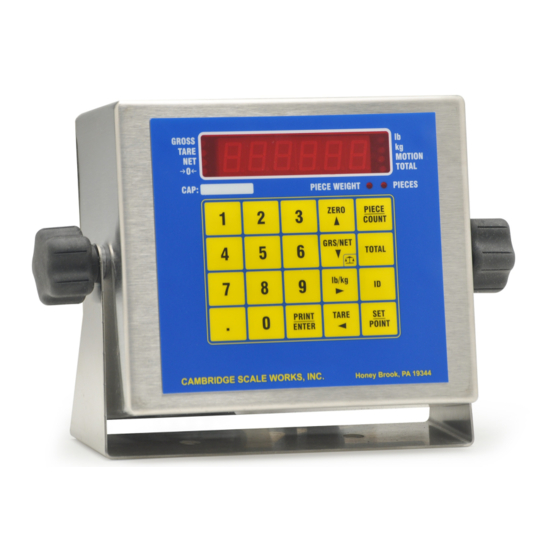
1.0 OPERATION 1.2 Key Functions Numeric Keys (0-9, .) Used to enter numeric values and choices. ZERO Brings the scale to a zero balance reading. If the ZERO is pressed and held for 5 seconds the Calibration zero value will be displayed. GRS/NET Toggles the display between Gross weight and Net weight. -
Page 6: Error Messages
1.2 Key Functions Continued: When the ID key is pressed, the last 6 digits of an ID number will be displayed. To clear an ID number, press ID, then while the current ID number is displayed, press Zero. To enter a new ID number, press the ID key and enter a value up to 20 digits then press PRINT/ENTER. -
Page 7: Scale Procedure
2.0 SCALE PROCEDURE: 2.1 Software Navigation Flowchart SCALE CALIBRATION TEST RS-232 (0) = Ntep Show Raw 0 -7 Software 1 = N0 Counts then Version Ntep Zero & clear Com 1 Baud Version 2 = Angle “0” 1 to Illuminate Show Raw 0 –... -
Page 8: Software Navigation Flowchart
1 to 99 2.1 Software Navigation Flowchart Divisions Zero Band 0 to 99 Updates Zero Delay 0 = .5 Div. Zero (1) = 1 Div. Tracking 2 = 3 Div. Ntep, no,angle Tracking (Ntep) Delay (0) = lb/kg 1 = lb only lb/kg 2 = kg only 1 –... -
Page 9: Scale Menu Definitions
2.2 Scale Menu Definitions Enter Calibration / Setup mode by pressing and holding the GRS/NET key until Parameter and calibration event counters are displayed, then release the key. When code is displayed, enter in sequence TARE, lb/kg, GRS/NET, and PRINT/ENTER. ScAlE will be displayed. - Page 10 2.2 Scale Menu Definitions Continued: Motion Normal (Default) Display Blank Dashes Press the right arrow key to enter. Use the numeric keypad to enter the desired selection (0, 1, or 2), then press the PRINT/ENTER key to save and exit. S9 will be displayed.
-
Page 11: Calibration Procedure
2.2 Scale Menu Definitions Continued: enter the value, then press the PRINT/ENTER key to save and exit. S17 will be displayed. S18 Angle Limit 0 to 9 Degrees. 6 (Default). Press the right arrow key and use the keypad to enter a value, then press the PRINT/ENTER. -
Page 12: Calibration
3.2 Calibration: Press and hold the GRS/NET key, as described previously in section 2.2. ScAlE will be displayed. Press the lb/kg key to move right until CalIb is displayed. Press the GRS/NET key to move down, will be displayed. Press the lb/kg key to move right, the raw counts will be displayed. -
Page 13: Quick Calibration Linearity Correction
3.4 Quick Calibration Continued: Press the lb/kg key to enter C3. The last span weight will flash, then the current weight on the scale will be displayed. Place a known weight, as close to the capacity as possible, on the scale. Using the numeric keypad enter the correct value for the known weight. - Page 14 4.1 Communications Menu Definitions Continued: the desired selection (0 - 3), then press the PRINT/ENTER key to save and exit. R2 will be displayed. Output 0 Output on command. Standard Print. (Default) Type Output as selected by R2 Output Format. If “Q” is received COM1 on the serial port the scale will output the same as if the print key is pressed.
- Page 15 4.1 Communications Menu Definitions Continued: entering the code, the display will advance to the next character to be edited. The left and right arrow keys can be used to go back and adjust codes that have been entered incorrectly. When the code is entered, press PRINT/ENTER to save the data.
- Page 16 4.1 Communications Menu Definitions Continued: Used for QSI Terminal. Press the right arrow key to enter. Use the numeric key to enter the desired selection (0 - 3), then press the PRINT/ENTER key to save and exit. R8 will be displayed. Time &...
- Page 17 Figure 4.1 4.1.a Completed Worksheet Header message work sheet (sp) (sp) (sp) (sp) (sp) (sp) (sp) (sp) Footer message work sheet (sp) (sp) (sp) (sp) (sp)
- Page 18 4.1.b Blank Worksheet Header message work sheet Footer message work sheet...
-
Page 19: Sample Tickets
Figure 4.1.c Sample Ticket Cambridge Scale Works, Inc. 115 West Mary Street Cumberland MD 21502 3:45 pm 05/15/2007 Id# 1234567890 Gross(lb): 1200 Tare(lb): Net(lb): 1000 Avg Pc Wt(lb) .500000 Pieces 2000 Weigh From Scale S/N: 07-12730 Figure 4.1.d Sample Ticket Cambridge Scale Works, Inc. -
Page 20: Testing Procedure
5.0 TESTING PROCEDURES 5.1 Testing Menu Definitions: Software Displays the software version. Press PRINT/ENTER to exit. Version Display Flashes all display segments then all indicating Enunciators. Press PRINT/ENTER to exit. Keys Press each key to display the row and column of that key. Press the PRINT/ENTER to exit. -
Page 21: Troubleshooting
6.0 Troubleshooting Guide Error Message Description Possible Solution Or Problem Err d - More than 5000 scale divisions have been selected in Ntep or Angle Mode. - Zeroing a weight larger than scale capacity. The scale is in an over - Check signal / load cell cable for damage or load condition. - Page 22 6.0 Troubleshooting Guide Continued: Error Message Description Possible Solution Or Problem -Check for any Debris interfering with the Weights will not scale structure. Repeat. -Verify that each load cell responds equally to an applied weight. Unstable -Check signal / load cell cable for damage or loose connections Readings -Check for any Debris interfering with the...
-
Page 23: Warranty
If at any time and you require assistance with your Model: SSCSW-20AT-B Indicator: End User please contact your servicing scale dealer. Authorized Cambridge Dealer/ Distributor please contact: CAMBRIDGE SCALE WORKS, INC. 115 West Mary Street Cumberland, MD 21502 Phone: (301) 724-4082 Fax: (301) 724-4964...