
Related Manuals for PREMIER TECH PT-PC2C

Summary of Contents for PREMIER TECH PT-PC2C
- Page 1 Instruction Manual / Installation Manual Built in 2 Burners Ceramic Hob MODEL: PT-PC2C Built in 4 Burners Ceramic Hob MODEL: PT-PC4C DADO SRL Via Petrara 81, 89124 Reggio Calabria (RC) Italy Piva/Vat IT 02681390809...
- Page 2 Safety Warnings Your safety is important to us. Please read this information before using your cooktop. Installation Electrical Shock Hazard • Disconnect the appliance from the mains electricity supply before carrying out any work or maintenance on it. • Connection to a good earth wiring system is essential and mandatory. •...
- Page 3 Operation and maintenance Electrical Shock Hazard • Do not cook on a broken or cracked cooktop. If the cooktop surface should break or crack, switch the appliance off immediately at the mains power supply (wall switch) and contact a qualified technician. •...
- Page 4 • Never leave any objects or utensils on the appliance. • Never use your appliance for warming or heating the room. • After use, always turn off the cooking zones and the cooktop as described in this manual (i.e. by using the touch controls). •...
- Page 5 Children less than 8 years of age shall be kept away unless continuously supervised. •This appliance can be used by children aged from 8 years and above and persons with reduced physical, sensory or mental capabilities or lack of experience and knowledge if they have been given supervision or instruction concerning use of the appliance in a safe way and understand the hazards involved.
-
Page 6: Product Overview
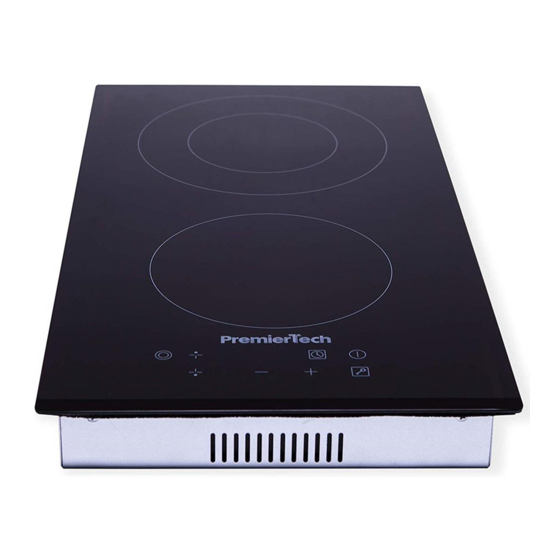
Product Overview Model: PT-PC2C Top View 1. max. 1200 W zone 2. max. 2000/1000 W zone 3. Glass Plate 4. Control panel Control Panel 1.Heating zone selection controls 2.Timer control 3.Power / Timer regulating controls 4.keylock control 5.ON/OFF control 6.Dual zone control... - Page 7 Model: PT-PC4C Top View 1. max. 1800W zone 2. max. 1200 W zone 3. max. 2200/1000 W zone 4. max. 1200 W zone 5. Glass plate 6. Control panel Control Panel 1.Heating zone selection controls 2.Timer control 3.Power / Timer regulating controls 4.keylock control 5.ON/OFF control 6.Dual zone control...
-
Page 8: Product Information
Product Information The microcomputer ceramic cooker hob can meet different kinds of cuisine demands because of resistance wire heating, micro-computerized control and multi-power selection, really the optimal choice for modern families. The ceramic cooker hob centers on customers and adopts personalized design. The hob has safe and reliable performances, making your life comfortable and enabling to fully enjoy the pleasure from life. -
Page 9: Choosing The Right Cookware
Choosing the right Cookware Do not use cookware with jagged edges or a curved base. Make sure that the base of your pan is smooth, sits flat against the glass, and is the same size as the cooking zone. Always centre your pan on the cooking zone. Always lift pans off the ceramic hob –... -
Page 10: When You Have Finished Cooking
• By holding down either of these buttons, the value will adjust up or down. For Model PT-PC2C 5.When zone 2 is working, activate dual zone by pressing When dual zone is working, turning off it by pressing For Model PT-PC4C 5.When zone 3 is working, activate dual zone by pressing... -
Page 11: Locking The Controls
2. Turn the cooking zone off by touching the “-” and scrolling down to “0”. 3. Turn the whole cooktop off by touching the “ON/OFF” control. 4.Beware of hot surfaces “H” will show which cooking zone is hot to touch. It will disappear when the surface has cooled down to a safe temperature. -
Page 12: Over Temperature Protection
2. Touch and hold the keylock control for a while . 3. You can now start using your ceramic hob. When the hob is in the lock mode, all the controls are disable except the ON/OFF you can always turn the ceramic hob off with the ON/OFF control in an emergency, but you shall unlock the hob first in the next operation. - Page 13 Note: you can use the minute minder even if you’re not selecting any cooking zones. 2. Touch timer control, the minder indicator will start flashing and “30” will show in the timer display. 3. Adjust the timer setting by touch the “-“or “+” controls.
-
Page 14: Setting The Timer To Turn One Cooking Zone Off
Setting the timer to turn one cooking zone off 1. Touching the heating zone selection control that that you want to set the timer for. 2. Touch timer control, the minder indicator will start flashing and “30” will show in the timer display. - Page 15 5. When the time is set, it will begin to count down immediately. The display will show the remaining time and the timer indicator flash for 5 seconds. NOTE: The red dot next to power level indicator will illuminate indicating that zone is selected. 6.
-
Page 16: Cooking Guidelines
NOTE: If you want to change the time after the timer is set, you have to start from step 1. Cooking Guidelines Cooking Tips • When food comes to the boil, reduce the temperature setting. • Using a lid will reduce cooking times and save energy by retaining the heat. •... -
Page 17: Heat Settings
For stir-frying 1. Choose an ceramic compatible flat-based wok or a large frying pan. 2. Have all the ingredients and equipment ready. Stir-frying should be quick. If cooking large quantities, cook the food in several smaller batches. 3. Preheat the pan briefly and add two tablespoons of oil. 4. -
Page 18: Care And Cleaning
Care and Cleaning What? How? Important! Everyday soiling on 1. Switch the power to the • When the power to the cooktop is glass (fingerprints, cooktop off. switched off, there will be no ‘hot marks, stains left by 2. Apply a cooktop cleaner while surface’... -
Page 19: Hints And Tips
This is normal for cookware and crackling or clicking construction of your cookware does not indicate a fault. noises. (layers of different metals vibrating differently). Technical Specification Cooking Hob PT-PC2C PT-PC4C Cooking Zones 2 Zones 4 Zones Supply Voltage 220-240V~ 220-240V~ Installed Electric Power... -
Page 20: Selection Of Installation Equipment
W(mm) H(mm) D(mm) A(mm) B(mm) X(mm) PT-PC2C 50 mini PT-PC4C 50 mini Under any circumstances, make sure the ceramic cooker hob is well ventilated and the air inlet and outlet are not blocked. Ensure the ceramic cooker hob is in good work state. -
Page 21: Before Locating The Fixing Brackets
A(mm) B(mm) C(mm) 50 mini 20 mini Air intake Air exit 5mm Before locating the fixing brackets The unit should be placed on a stable, smooth surface (use the packaging). Do not apply force onto the controls protruding from the hob. Fix the hob on the work surface by screw four brackets on the bottom of hob (see picture) after installation. - Page 22 Screw Bracket Screw hole Bottom case Cautions 1. The ceramic cooker hob must be installed by qualified personnel or technicians. We have professionals at your service. Please never conduct the operation by yourself. 2. The ceramic cooker hob shall not be mounted to cooling equipment, dishwashers and rotary dryers.
- Page 23 Connecting the hob to the mains power supply The power supply should be connected in compliance with the relevant standard, or a single-pole circuit breaker. The method of connection is shown below. Model: PT-PC2C Model: PT-PC4C...
- Page 24 1. If the cable is damaged or needs replacing, this should be done by an after-sales technician using the proper tools, so as to avoid any accidents. 2. If the appliance is being connected directly to the mains supply, an omnipolar circuit breaker must be installed with a minimum gap of 3mm between the contacts.
Need help?
Do you have a question about the PT-PC2C and is the answer not in the manual?
Questions and answers