Advertisement
Quick Links
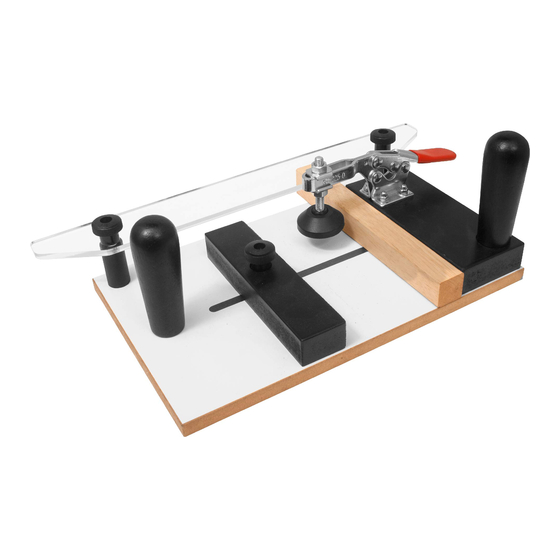
Rail Guide Coping Sled PRO
Turn o Power
Ear Protection
Disconnect
Always wear
saw from
proper ear
power source
protection when
before fitting
working with
or removing
machinery.
insert.
Exploded View & Parts List
1
9
4
7
10
12
11
Clean, Square Cuts Everytime
Safety First
CAUTION
Sharp
Use caution when han-
dling sharp objects (saw
blades, router bits, drill
bits and so on). Use pro-
tective gloves whenever
possible.
15
16
9
10
9
6
13
14
Respiratory
Eye Protection
Protection
Always wear
Always wear
proper eye
proper respiratory
protection
protection when
when working
working near
with machinery
airborne dust
and tools.
particles.
5
8
17
3
2
13
12
Version 1.0
Please read and fully understand
any and all safety materials that
came with your power tools or
machinery before operation. Always
follow all safety guidelines set in
place by the power tool or machine
manufacturer.
PARTS LIST - Coping Sled Pro
No. Description
1
Clear Acrylic Fence Guide
2
Coping Sled Base
3
Fixed Fence
4
Adjustable Fence
5
Toggle Clamp
6
Sacri cial Wood Backer Block
7
Post Handle Front
8
Post Handle Back
9
1" Threaded Round Knob
10
Black Bushing
11
1" x 5/16 tpi T-bolt
12
2½" x 5/16 tpi T-bolt
13
1¾" x 5/16 tpi T-bolt
14
1¾" x 24 tpi bolt
15
Capped Nut
16
Steel Washer
17
1¾" Wood Screws
Quantity
1
1
1
1
1
1
1
1
3
2
1
2
2
4
4
4
2
Advertisement

Subscribe to Our Youtube Channel
Related Manuals for FULTON Rail Guide Coping Sled Pro

Summary of Contents for FULTON Rail Guide Coping Sled Pro
- Page 1 Rail Guide Coping Sled PRO Clean, Square Cuts Everytime Version 1.0 Safety First Please read and fully understand any and all safety materials that CAUTION Respiratory Turn o Power Ear Protection Eye Protection Sharp Protection came with your power tools or...
- Page 2 Basic Assembly Lay the Rail Coping Sled Pro on its side and secure the Tog- gle to the Fixed Fence using the wrench provided and a • Assemble the Rail Coping Sled Pro as shown in the exploded philips head screw driver (not included). drawing.
- Page 3 Use a combination or engineer’s square to verify that the Sacrificial Wood Backer Block remained square to the rout- er table fence. Your Rail Guide Coping Sled Pro is now setup for your first cope cut. Secure your project project piece into the sled and make your cuts! If necessary, repeat the router bit height setup process un- til the stile and rail mate perfectly as shown below.
Need help?
Do you have a question about the Rail Guide Coping Sled Pro and is the answer not in the manual?
Questions and answers