Table of Contents
Advertisement
Quick Links
Advertisement
Table of Contents

Related Manuals for Harper&Bright Designs PP189768BAA


Summary of Contents for Harper&Bright Designs PP189768BAA
- Page 1 Operation Instructions PP189768BAA/DAA Lift Chair ~ 1 ~...
- Page 2 ~ 2 ~...
- Page 3 NOTE Please don’t cut the plastic ribbon. ~ 3 ~...
- Page 4 ELECTRIC LIFTING & RECLINING Operation Instructions Plug the direct current end of the cord into the AC Adapter outlet, then insert the AC adapter plug into a wall outlet for power. Press the button to recline the chair back and foot-rest. ...
-
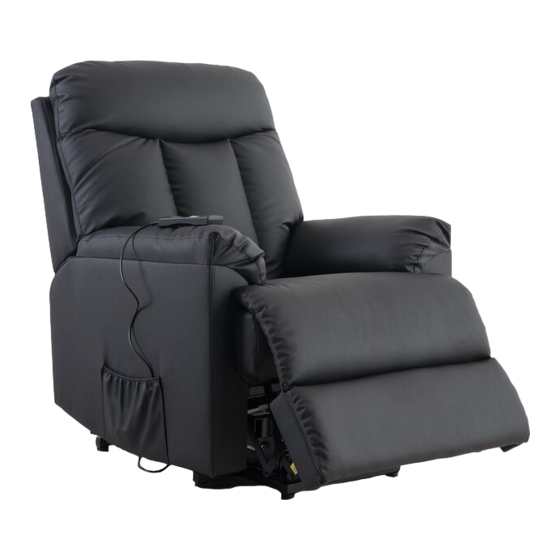
Page 5: Product Features
PRODUCT FEATURES Power Reclining Power Lifting IMPORTANT SAFETY INSTRUCTIONS When using an electrical appliance, basic precautions should always be followed, including: Always unplug the lift chair from the power source after use, and before cleaning. Do not touch lift chair if large amounts of liquid have spilled on it. ... - Page 6 HEALTH CAUTION If you have any concerns regarding to your health, consult your doctor before using this product. Individuals with pacemakers should not use this product. If you have pain in a muscle or joint after using for a prolonged period ...
-
Page 7: Technical Specifications
OPERATING INSTRUCTION Press the button to make the sofa lifted. Press the button to recline the sofa. TECHNICAL SPECIFICATIONS Model: PP189768BAA/DAA Rated Voltage :100V-240V~ Rated Frequency :50Hz/60Hz ~ 5 ~... - Page 8 Assembly Instructions GENERAL ASSEMBLY INFORMATION GUIDE Please read the following instructions prior to assembling this product: 1. To avoid damage, assemble this product on a non-abrasive surface such as carpet. 2. Make sure all bolts are tightly fastened before use. 3.
-
Page 9: Parts List
Parts List QTY 1 pc QTY 1pc QTY 2 pcs QTY 4 pcs QTY 1pc QTY 4 pcs QTY 1pc QTY 1pc ~ 7 ~... - Page 10 Step 1 Place the Seat (B) on its back on a flat smooth surface. Take out the bag which holds a rectangle box. Take out the transformer (C 1pc) &weir plug (D 1pc) & remote control (E 1 pc ) 1 pc 1 pc ~ 8 ~...
- Page 11 Step 2 Place the main seat (A) on it’s back, and fixing the two universal wheel with bolts as below: Front Back ~ 9 ~...
- Page 12 Step 3 Attach backrest (B) to main frame (A) by aligning the metal grooves on backrest to brackets on the main frame as shown. Ensure the backrest (B) slides down fully over the brackets on the main frame (A). ~ 10 ~...
- Page 13 Step 4 Attach the transformer (F) to the plug on the back of seat (A). Connect the transformer (F) with the wire plug (G) and insert the wire plug into a wall outlet for power. ③ Attach adhesive strip on the backrest (B) to the lower backs of main frame (A) as below: ④Attach the remote control(H) to the plug in the pocket.
- Page 14 Warnings Sit down in the chair gently. To avoid tipping over, do not throw yourself into the chair. Move the chair into the reclining position slowly, making sure that no children or pets are in close proximity. Do not allow children to play on or around the chair, particularly when it is in an open position.
-
Page 15: How To Disassemble
How to Disassemble Please find a strong tool to prod the small piece of metal grooves, then the backrest will be pulled out. The tool is not included. ~ 13 ~...