Advertisement
Quick Links
© 2010 KidKraft, LP
Please retain this information
for future reference
OBSERVE THE FOLLOWING STATEMENTS
AND WARNINGS TO REDUCE THE
LIKELIHOOD OF SERIOUS OR FATAL INJURY:
- Do not leave children unattended.
- Do not allow children to sit, stand, play or climb on any elevated
surface. Doing so may cause the product to become unstable.
- Do not leave standing water while not in use.
- Tightly secure connections. Advise children not to use product until
properly assembled.
- Inspect the product periodically for loose or damaged components.
- Instruct children not to use the playhouse in a manner other than
intended.
- Dress children appropriately with well-fitting shoes and no loose-fitting
clothing.
- Do not attach items to the equipment that are not specifically
designed for use with the playhouse, such as, but not limited to, jump
ropes, clothesline, pet leashes, cables and chain as they may cause
a strangulation hazard.
- Instruct children to remove any bike or other sports helmets prior to
playing in the playhouse.
WARNING:
The toy is to be assembled by an adult.
In unassembled state contains potentially
hazardous sharp edges and small parts,
so please keep out of baby's reach.
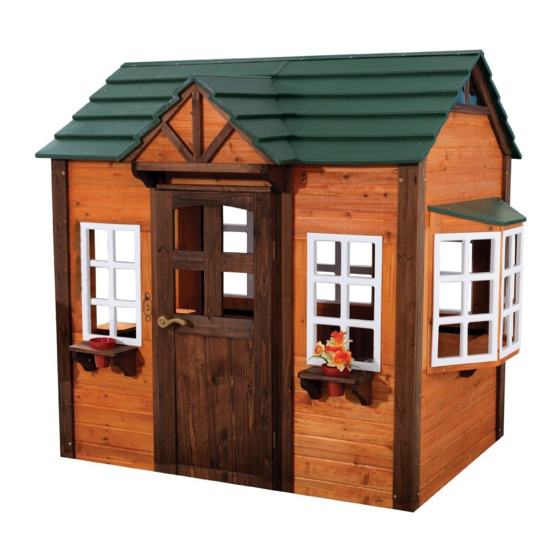
My Woodland Playhouse
Assembly Instructions
KidKraft Item #00155
To order replacement parts,
please visit www.kidkraft.com
***Requires 2 people for assembly.
INSTALLATION
- Place the playhouse on
level ground, not less than
6 ft (1.8 m) from any
structure or obstruction such
as a fence, garage, house,
overhanging branches,
laundry lines, or electrical
wires.
Customer Service
1-800-933-0771
www.kidkraft.com
Before calling customer service,
please locate the batch code number
(example: 2693/65006/04) found on
the bottom or back of your product.
WARNING:
CHOKING HAZARD
Small parts and sharp points, not
suitable for children under 3 years.
2-10 years
Advertisement

Related Manuals for KidKraft My Woodland Playhouse


Summary of Contents for KidKraft My Woodland Playhouse
- Page 1 My Woodland Playhouse Assembly Instructions KidKraft Item #00155 © 2010 KidKraft, LP To order replacement parts, Please retain this information please visit www.kidkraft.com for future reference 2-10 years ***Requires 2 people for assembly. OBSERVE THE FOLLOWING STATEMENTS AND WARNINGS TO REDUCE THE...
- Page 2 My Woodland Playhouse Assembly Instructions KidKraft Item #00155 © 2010 KidKraft, LP To order replacement parts, Please retain this information please visit www.kidkraft.com for future reference PARTS LIST: Blue Before calling customer service, please Customer Service locate the batch code number...
- Page 3 My Woodland Playhouse Assembly Instructions KidKraft Item #00155 © 2010 KidKraft, LP HARDWARE A. Cross Dowel Bolt Allen Wrench x 1 piece E. Wood Screw I. Washer x 2 pieces x 22 pieces x 4 pieces The following tools (1 1/8 inches / 28 mm) J.
- Page 4 My Woodland Playhouse Assembly Instructions KidKraft Item #00155 © 2010 KidKraft, LP Step 2 Step 3 Customer Service 1-800-933-0771 www.kidkraft.com...
- Page 5 My Woodland Playhouse Assembly Instructions KidKraft Item #00155 © 2010 KidKraft, LP Step 4 Step 5 Customer Service 1-800-933-0771 www.kidkraft.com...
- Page 6 My Woodland Playhouse Assembly Instructions KidKraft Item #00155 © 2010 KidKraft, LP Step 6 Step 7 Customer Service 1-800-933-0771 www.kidkraft.com...
- Page 7 My Woodland Playhouse Assembly Instructions KidKraft Item #00155 © 2010 KidKraft, LP Step 8 Step 9 Customer Service 1-800-933-0771 www.kidkraft.com...
- Page 8 My Woodland Playhouse Assembly Instructions KidKraft Item #00155 © 2010 KidKraft, LP Step 10 Step 11 Customer Service 1-800-933-0771 www.kidkraft.com...
- Page 9 My Woodland Playhouse Assembly Instructions KidKraft Item #00155 © 2010 KidKraft, LP Step 12 Blue Push sink (part 93) down until it clicks into place. To Remove Sink: The sink may only be removed by an adult. Hold the tabs and lift through the hole to release.
- Page 10 My Woodland Playhouse Assembly Instructions KidKraft Item #00155 © 2010 KidKraft, LP Step 13 Step 14 Customer Service 1-800-933-0771 www.kidkraft.com...
- Page 11 My Woodland Playhouse Assembly Instructions KidKraft Item #00155 © 2010 KidKraft, LP Step 15 Step 16 Customer Service 1-800-933-0771 www.kidkraft.com...
- Page 12 My Woodland Playhouse Assembly Instructions KidKraft Item #00155 © 2010 KidKraft, LP Step 17 Step 18 Customer Service 1-800-933-0771 www.kidkraft.com...
- Page 13 My Woodland Playhouse Assembly Instructions KidKraft Item #00155 © 2010 KidKraft, LP Step 19 Step 20 Customer Service 1-800-933-0771 www.kidkraft.com...
- Page 14 My Woodland Playhouse Assembly Instructions KidKraft Item #00155 © 2010 KidKraft, LP Step 21 Step 22 Customer Service 1-800-933-0771 www.kidkraft.com...
- Page 15 My Woodland Playhouse Assembly Instructions KidKraft Item #00155 © 2010 KidKraft, LP Step 23 Step 24 Customer Service 1-800-933-0771 www.kidkraft.com...
- Page 16 My Woodland Playhouse Assembly Instructions KidKraft Item #00155 © 2010 KidKraft, LP Step 25 Step 26 Customer Service 1-800-933-0771 www.kidkraft.com...
- Page 17 My Woodland Playhouse Assembly Instructions KidKraft Item #00155 © 2010 KidKraft, LP Step 27 Step 28 Customer Service 1-800-933-0771 www.kidkraft.com...
- Page 18 My Woodland Playhouse Assembly Instructions KidKraft Item #00155 © 2010 KidKraft, LP Step 29 Step 30 Fold down top of part 27 after assembly Customer Service 1-800-933-0771 www.kidkraft.com...
- Page 19 My Woodland Playhouse Assembly Instructions KidKraft Item #00155 © 2010 KidKraft, LP Step 31 Step 32 Customer Service 1-800-933-0771 www.kidkraft.com...
- Page 20 My Woodland Playhouse Assembly Instructions KidKraft Item #00155 © 2010 KidKraft, LP Step 33 Step 34 Repeat step 33 for the other side of the roof. Customer Service 1-800-933-0771 www.kidkraft.com...
- Page 21 My Woodland Playhouse Assembly Instructions KidKraft Item #00155 © 2010 KidKraft, LP Step 35 N N N N N N N Step 36 Be sure the roof top (part 37) is on the top of roof panels (parts 34 &...
- Page 22 My Woodland Playhouse Assembly Instructions KidKraft Item #00155 © 2010 KidKraft, LP Step 37 Step 38 Customer Service 1-800-933-0771 www.kidkraft.com...
- Page 23 My Woodland Playhouse Assembly Instructions KidKraft Item #00155 © 2010 KidKraft, LP Step 39 Step 40 Customer Service 1-800-933-0771 www.kidkraft.com...
- Page 24 My Woodland Playhouse Assembly Instructions KidKraft Item #00155 © 2010 KidKraft, LP Doorbell Battery Instructions: - Locate the Battery Compartment Prior To Use: underneath the doorbell (part 44) - Pull the tab outward to remove and activate play mode. - Three (3) LR44 Battery (1.5 Volt) are included in each piece.
- Page 25 My Woodland Playhouse Assembly Instructions KidKraft Item #00155 © 2010 KidKraft, LP To replace battery: -Replace old batteries with three (3) new LR44 batteries (1.5 Volt). Step 2 -Be sure the positive (+) side is facing up. Step 3 -Screw the cover back into place with a Phillips head screwdriver.