Advertisement
Quick Links
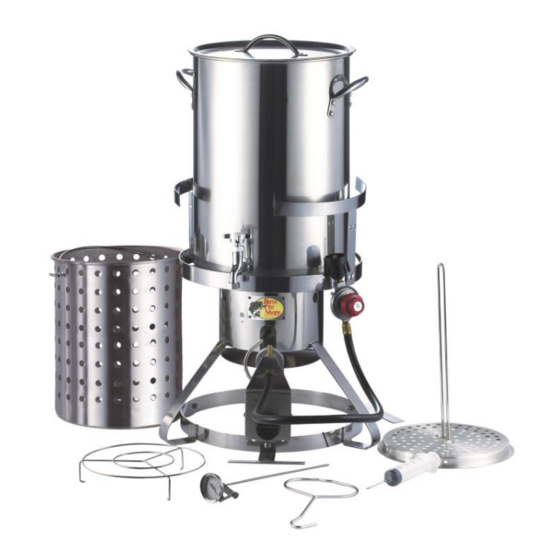
Stainless Steel
3 IN 1 Combo Cooker
Model # TF4039-013426-RO
Assembly, Use and Care Manual
Tools required:
Phillips screwdriver / Adjustable wrench
To installer or person assembling this appliance: Leave this manual with this
appliance for future reference.
This instruction manual contains important information necessary for the
proper assembly and safe use of the appliance.
Read and follow all warnings and instructions before assembling and using the
appliance.
Follow all warnings and instructions when using the appliance.
Keep this manual for future reference.
TF4039-013426-RO English
For Outdoor Use Only
1
20190717 Ver.1
Advertisement

Summary of Contents for Rankam TF4039-013426-RO
- Page 1 Stainless Steel 3 IN 1 Combo Cooker For Outdoor Use Only Model # TF4039-013426-RO Assembly, Use and Care Manual Tools required: Phillips screwdriver / Adjustable wrench To installer or person assembling this appliance: Leave this manual with this appliance for future reference.
- Page 2 Do not attempt to extinguish an oil or grease fire with water. Failure to follow these instructions could result in fire, explosion or burn hazard which could cause property damage, personal injury or death. TF4039-013426-RO English 20190717 Ver.1...
-
Page 3: Prop 65 Warning
Warning: Indicates a potentially hazardous situation which, if not avoided, will result in death or serious injury. CAUTION Caution: Indicates a potentially hazardous situation or unsafe practice which, if not avoided, may result in minor or moderate injury. TF4039-013426-RO English 20190717 Ver.1... - Page 4 Do not move the appliance when in use. Allow the cooking vessel to cool to 115°F (45°C) before moving or storing. Do not leave the appliance unattended, keep children and pets away from the appliance at all times. Please wear gloves while assembling the fryer. TF4039-013426-RO English 20190717 Ver.1...
- Page 5 Clean and inspect the regulator and hose assembly before each use of the appliance. If there is evidence of abrasion, wear, cuts or leaks, the hose must be replaced prior to the appliance being put into operation. TF4039-013426-RO English 20190717 Ver.1...
- Page 6 Never drop food or accessories into hot cooking liquid. Lower food and accessories slowly into the cooking liquid in order to prevent splashing or overflow. When removing food from the appliance care should be taken to avoid burns from hot cooking liquids. TF4039-013426-RO English 20190717 Ver.1...
- Page 7 UL listed Overfill Protection Device (OPD). This OPD safety feature is identified by a unique triangular hand wheel. Use only tanks equipped with this type of valve. LP tank must be arranged for vapor withdrawal and include collar to protect LP tank valve. TF4039-013426-RO English 20190717 Ver.1...
- Page 8 Use a clean paint brush and 50/50 soap and water solution. Use mild soap and water. Do not use household cleaning agents. Damage to gas train components can result. Brush soapy solution onto all weld seams and entire valve area. TF4039-013426-RO English 20190717 Ver.1...
- Page 9 Turn the coupling nut clockwise to tighten to a full solid stop. The regulator will seal on the back-check feature in the LP tank valve, resulting in some resistance. An additional one-half to three quarters turn is required to complete connection. Tighten by hand only – do not use tools. TF4039-013426-RO English 20190717 Ver.1...
- Page 10 Customer Service Center at 1-888-837-1380. Use only replacement parts specified by manufacturer. Always close LP tank valve after performing tank leak test by turning hand wheel clockwise. TF4039-013426-RO English 20190717 Ver.1...
- Page 11 After burner is lit, continue to HOLD the push button for 10 seconds and then release. Holding push button of safety valve for less than 10 seconds will cause burner flame to go out. TF4039-013426-RO English 20190717 Ver.1...
- Page 12 Adjust the air damper by turning it clockwise or counterclockwise until the desired flame is achieved. Turning LP Cooker Off Turn all knobs to OFF position, Turn LP tank OFF by turning hand-wheel clockwise to a full stop. TF4039-013426-RO English 20190717 Ver.1...
- Page 13 Store appliance indoors ONLY if LP tanks turned off and disconnected, removed form appliance and stored outdoors. To keep the appliance clear and free from gasoline and other flammable vapors and liquids. TF4039-013426-RO English 20190717 Ver.1...
- Page 14 Burner: Wire brush loose corrosion from burner exterior. Clean clogged gas port holes with an opened paper clip. Replace corroded or damaged burners that would emit excess gas. Cooking surfaces, pots and pans: Clean the cooking surface with soapy water and a nylon cleaning pad. TF4039-013426-RO English 20190717 Ver.1...
- Page 15 Product Diagram TF4039-013426-RO English 20190717 Ver.1...
- Page 16 10. 30QT Turkey 11. Pot Lid 12. Strainer / Steamer Basket 1 pc 1 pc 1 pc 1 pc 13. Turkey Stand 14. Turkey Hook 15. Regulator 16. Thermometer Hook 1 pc 1 pc 1 pc 1 pc TF4039-013426-RO English 20190717 Ver.1...
- Page 17 17. Injector 18. Steamer Grid 1 pc 1 pc Hardware List Item No. Item Name Diagram Qty. Bolt M6 x 12 Flange Lock Nut M6 TF4039-013426-RO English 20190717 Ver.1...
- Page 18 4. Assemble the legs (2) to stand ring (3) by using bolts M6x12 (A) and flange lock nuts M6 (B). Install the small T-support legs (4) and (5) onto the stand ring (3) with bolts M6x12 (A) and flange lock nuts M6 (B). TF4039-013426-RO English 20190717 Ver.1...
- Page 19 Mount the adjustable pot tip guard (6) on to welded stand (1) by bolts M6x12 (A) and flange lock nuts M6 (B). Press and fix the U-shaped end of hook (15) into the slot on regulator. TF4039-013426-RO English 20190717 Ver.1...
- Page 20 Unscrew the Cap End. Turn counter-clockwise to “OPEN” the spigot. The oil / water will flow out through the spigot. After vessel cleaning, the Cap End must be tightly screwed and turned clockwise to “Close” the spigot. Cap End TF4039-013426-RO English 20190717 Ver.1...
- Page 21 18 pounds. The USDA recommends thawing 24 hours (1 day) for every 4-5 pounds in refrigerator. Insert the Turkey stand up through the cavity of turkey so that the legs are at the top. TF4039-013426-RO English 20190717 Ver.1...
- Page 22 Also, place the tank and hose so that they are not located directly next to the fryer (see photo). Center the pot over the burner on the cooker. Fill the pot to the mark with peanut oil. Remove the butcher’s tape from the pot. TF4039-013426-RO English 20190717 Ver.1...
- Page 23 Adjust the burner to maintain 325°F. Monitor the fryer during the entire process to assure a safe frying experience. Do not leave fryer unattended. Cook until a golden brown color is achieved. Normal cooking time is 3 1/2 minutes per pound. TF4039-013426-RO English 20190717 Ver.1...
- Page 24 Using a meat thermometer, check for an internal meat temperature of 180°F. Remove turkey fry accessory and allow the turkey to “rest” for 15 minutes to allow the juices to settle into the turkey. Slice and serve! TF4039-013426-RO English 20190717 Ver.1...
- Page 25 Move out of wind and restart. Timer has completed its cycle. Each cycle of timer is 15 minutes, after 15 minutes, the burner will go off automatically. Please re-set the timer. TF4039-013426-RO English 20190717 Ver.1...
- Page 26 LP tank valve. Disconnect the regulator from the LP tank and wait one minute. Reconnect the regulator control valve to the LP tank valve and slowly open the LP tank valve until it is fully open. TF4039-013426-RO English 20190717 Ver.1...
-
Page 27: Limited Warranty
18/F., New Lee Wah Centre, 88 Tokwawan Road, Kowloon, Hong Kong For assistance, contact customer service at customerservice@rankam.com or at 1 – 888 – 837 – 1380, 8:00am – 5:00pm, Pacific Standard time, Monday to Friday Manufactured for Bass Pro Shops 2500 E. - Page 28 TF4039-013426-RO English 20190717 Ver.1...
Need help?
Do you have a question about the TF4039-013426-RO and is the answer not in the manual?
Questions and answers