
Related Manuals for JFM Engineering SuperMasterCharger

Summary of Contents for JFM Engineering SuperMasterCharger
- Page 1 Tutorial SuperMasterCharger Battery Charger-Analyzer Preliminary – V0.9 SMC Tutorial...
-
Page 2: Receiving Inspection
Receiving – Inspection 1. Unpacking the unit 1. Caution! Heavy equipment. 2. Verify that the following are in the package: • Charger-Analyzer • Accessory Kit containing: – Battery Cable – Temp-Plate – Single Cell Adaptor – Spare Parts • Operator Manual, Commands Sheet, and various certificates 3. -
Page 3: Installation
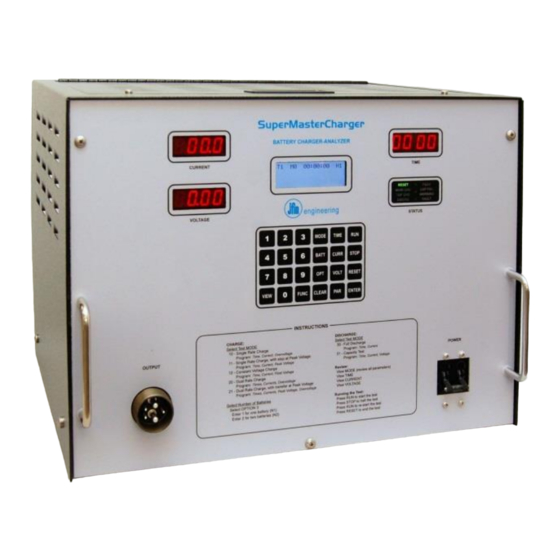
Installation 1. Place the Charger-Analyzer on a suitably strong bench 1. Caution! Heavy equipment (175 lb. – 79.3 Kg) 2. Connect to a dedicated (not shared) outlet with 208V/230V/240V with 30A capability (with motor load rated circuit breaker) 1. In the US, use a NEMA-630R receptacle 2. - Page 4 Installation (continued) 3. Connect the Battery Cable to the Front Panel and connect the Temp-Plate sensing cable 4. Connect the Temp-Plate sensing cable extension to the Temp-Plate • Note that there are two DB9 cables in the Temp-Plate. Connect to either one (the other one is used by the BTAS-16) 5.
- Page 5 Installation (continued) 6. Turn Power ON 7. Observe the following: • Meters and Timer indicators are ON • Ammeter reads zero and Voltmeter reads about 0.2V • Status indicators show RESET (green) SMC Tutorial...
-
Page 6: Operating Introduction
Operating Introduction 1. Tutorial for the operation of the SMC Battery Charger-Analyzer 2. Refer to the Operator’s Manual for complete details on the operation of the instrument Section 5 – Controls and Displays Section 6 – Modes of Operation ... - Page 7 Warnings (general) 1. This tutorial is intended for professional personnel experienced in the testing of aircraft batteries 2. Refer to the Operator’s Manual for complete details on the operation of the instrument 3. Information provided on battery testing is solely as an operational reference - Refer to the manufacturer’s battery manual and/or CMM for battery specific information...
- Page 8 Warnings (specific) 1. Observe precautions when handling batteries 1. Batteries are heavy 2. Batteries will generate extremely high currents if shorted • Tools can easily be dropped shorting several cells 2. Follow battery test procedures as outlined in the CMMs and OMMs provided by the manufacturers. 3.
-
Page 9: Basic Information
Basic Information 1. The SMC Battery Charger-Analyzer operates based on programmed battery test profiles 2. A battery test profile is based on the following parameters: Test Mode (type of test) Time Duration (s) Current (s) Voltage (s) 3. -
Page 10: Keypad Functions
Keypad Functions 1. Numeric Keys 0 through 9 for the entry of parameters 2. Other Keys VIEW • For the review of programmed information FUNCTION • For special operations such as different Timer Speed and other (see the Commands sheet) •... - Page 11 Keypad Functions (continued) Other Keys (continued) CLEAR • Clears the screen and incomplete entries (does not clear previously entered information – if in doubt, reprogram) • Clears a FAULT condition (error message and alarm) TIME • Time duration(s) for the selected test ...
- Page 12 Keypad Functions (continued) Other Keys (continued) • Starts a TEST and Re-Starts a TEST if it has been stopped STOP • Stops a TEST (puts the operation on hold) • Can be re-started by pressing RUN RESET •...
- Page 13 Keypad Notes 1. Press CLEAR before a new entry Note: CLEAR solely clears the screen and not previously made entries 2. Press ENTER to complete each entry 3. Press VIEW to verify what has been entered 4. Re-program as needed SMC Tutorial...
- Page 14 Programming the Test Mode 1. Press MODE 00:00:00 Test Mode #:__ 2. Enter the MODE required for the test (consult the Commands Sheet) 00:00:00 Test Mode #:10 ress ENTER after entering the MODE number Verify that the screen shows the selected MODE •...
- Page 15 Charge Test Modes 1. 10 - Single Rate Charge Constant Current Charge with optional Stop at an Overvoltage 2. 11 - Single rate Charge with stop on Peak Voltage Constant Current Charge with stop at a peak battery voltage 3.
- Page 16 Discharge Test Modes 1. 30 – Discharge Constant Current Discharge ( no voltage limit) 2. 31 - Capacity Test Constant Current Discharge with stop (Capacity Failure) at below the test voltage. 3. 32 – Constant Resistance Discharge Capacity Test ...
-
Page 17: Programming Time
Programming TIME 1. Press TIME (in mode 20 and 21 enter TIME 1 and TIME 2) M10 00:00:00 Time: __:__ 2. Enter up to four digits The format is HH:MM (hours and minutes) M10 00:00:00 Time: 01:00 • The example shows 1 hour and 0 minutes SMC Tutorial... - Page 18 Programming CURRENT 1. Press CURRENT (in mode 20 and 21 enter CURRENT 1 and CURRENT 2) M10 00:00:00 Current: __._ 2. Enter up to three digits The format is XX.X Amps M10 00:00:00 Current: 10.0 • The example shows 10.0 Amps SMC Tutorial...
- Page 19 Programming VOLTAGE 1. Press VOLTAGE (in mode 20 and 21 enter VOLTAGE 1 and VOLTAGE 2) M10 00:00:00 Voltage: __.__ 2. Enter up to four digits The format is XX.XX Volts M10 00:00:00 Voltage: 34.00 The example shows 34.00 Volts SMC Tutorial...
- Page 20 Programming VOLTAGE (continued) 1. For MODE 10, VOLTAGE is Overvoltage, the voltage at which the battery is above the maximum charge voltage 2. For MODE 11, VOLTAGE is the Peak Voltage at which the charge will stop 3. For MODE 12, VOLTAGE is the Float Voltage 4.
- Page 21 Programming the Number of Batteries (continued) 1. Optional, normally set to automatic Press OPTION M10 00:00:00 Option: __ Press 2 followed by ENTER M10 00:00:00 Auto nBA: 1=ON 0=OFF OPTION VALUE: __ Press 1 for Automatic or 0 for Manual SMC Tutorial...
- Page 22 Programming the Number of Batteries (continued) 1. If set to Manual: 2. Select OPTION 3 (One battery) Press OPTION M10 00:00:00 Option: __ Press 3 followed by ENTER M10 00:00:00 Number of Batteries OPTION VALUE: __ Press 1 M10 00:00:00 Number of Batteries N VALUE: 1...
- Page 23 Programming the Number of Batteries (continued) Press ENTER • Verify that the number changed from N0 to N1 (upper right hand corner of the screen) Verify that the available AC voltage is displayed M10 00:00:00 Checking AC Voltage N VALUE: 1 M10 00:00:00 Checking AC Voltage...
- Page 24 Verifying Programmed Parameters 1. Press VIEW then press MODE 00:00:00 Test Mode – 10 T=01:00 After three seconds: 00:00:00 C=10.0 V=34.00 • This shows that the Test Mode is 10, the Time is 1:00, the Current is 10.0A and the Voltage is 34.00V SMC Tutorial...
- Page 25 Saving the Programmed Battery Test Profile 1. Press Battery M10 00:00:00 BATTERY: 1=View 2=Load 3=Store 2. Press 3 to select storing the information M10 00:00:00 BATTERY - 3=Store BATTERY #: __ 3. Enter 1 to save it as Battery #1 ...
- Page 26 Viewing Programmed Battery Test Profiles 1. Press Battery M10 00:00:00 BATTERY: 1=View 2=Load 3=Store 2. Press 1 to view stored profiles M10 00:00:00 BATTERY - 1=View BATTERY #: __ 3. Enter 1 to view what is stored as Battery #1 ...
- Page 27 Viewing a Programmed Battery Test Profile 1. Press Battery M10 00:00:00 BATTERY: 1=View 2=Load 3=Store 2. Press 1 to view a profile M10 00:00:00 BATTERY - 2=Load BATTERY #: __ 3. Enter the Battery # The processor shows the parameters stored ...
- Page 28 Loading a Programmed Battery Test Profile 1. Press Battery M10 00:00:00 BATTERY: 1=View 2=Load 3=Store 2. Press 2 to load a profile M10 00:00:00 BATTERY - 2=Load BATTERY #: __ 3. Enter the Battery # Select VIEW MODE to verify the profile that has been loaded ...
- Page 29 Running a Battery Test Profile 1. Press VIEW MODE to verify the Test Parameters 2. Connect the Battery Cable to the Battery(ies) 1. If working on one battery, connect one plug to the battery and the other one to the shorting receptacle on the Temp-plate.
- Page 30 Running a Battery Test Profile (continued) 3. Press RUN to start and observe the following: 1. The Green Status indicator will indicate the type of test 2. The Colon in the Timer will flash once per second and the elapsed time will be shown •...
- Page 31 Running a Battery Test Profile (continued) 4. Warnings 1. Do not disconnect the battery while a test is running 2. Operate in a well ventilated location SMC Tutorial...
-
Page 32: Error Messages
Error Messages 1. Error messages are generated whenever the processor determines that the battery has failed a test or that there are internal operational discrepancies. 2. A steady beep is associated with all error messages and a steady display of the associated status indicator. - Page 33 Error Messages (continued) 5. With some type of error conditions, it is possible to re-start operation without losing the accumulated time. 1. Press CLEAR • The alarm will turn-off 2. Correct the error (no connection, wrong value programmed, etc.) 3. Press RUN to resume operation 4.
- Page 34 Revisions V0.8 – 8 September 2016 – Preliminary Release SMC Tutorial...
Need help?
Do you have a question about the SuperMasterCharger and is the answer not in the manual?
Questions and answers