Table of Contents
Advertisement
Quick Links
ELECTRIC INSERT FIREPLACE HEATER
OWNERS MANUAL
BS1250PANO
BS1500PANO
Model Numbers:
Costa Discovery & Discovery XL
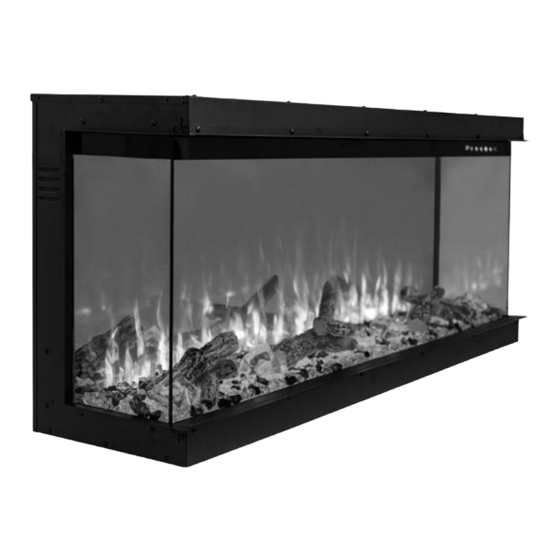
49"/59" Three sides Viewing Electric Fire
AC 220-240V 50Hz 1400-1600W
Read and understand this entire owner's manual, including all safety
information, before plugging in or using this product. Failure to do so could
WARNING
result in fire, electric shock, or serious personal injury.
Keep this owner's manual for future reference. If you sell or give this
CAUTION
product away, make sure this manual accompanies thisproduct.
Advertisement
Table of Contents

Summary of Contents for Costa Discovery
- Page 1 OWNERS MANUAL BS1250PANO BS1500PANO Model Numbers: Costa Discovery & Discovery XL 49”/59” Three sides Viewing Electric Fire AC 220-240V 50Hz 1400-1600W Read and understand this entire owner’s manual, including all safety information, before plugging in or using this product. Failure to do so could WARNING result in fire, electric shock, or serious personal injury.
-
Page 2: Important Safety Information
IMPORTANT SAFETY INFORMATION! WARNING When using electrical appliances basic precautions should always be followed to reduce the risk of fire, electric shock and injury to persons, including the following: Read all instructions before using this heater. ⚫ This heater is hot when in use. To avoid burning, do not touch hot surface. If provided, use handles ⚫... -
Page 3: Parts And Hardware
Preparation This product includes a GLASS panel! Always use extreme caution when handling glass. Failure to do so could result in personal injury or property damage. Remove all parts and hardware from the carton and place them on a clean, soft, dry surface. Parts and assembly steps are grouped for free-standing or wall-hanging use. -
Page 4: Installation And Assembly
38.1cm 19.5cm 60" 13" 21.2" 58.8" 12.5" 3.5" 58.6" 15" 7.7" Discovery XL 152.4cm 33.2cm 54cm 149.4cm 31.7cm 148.9cm 38.1cm 19.5cm Installation and Assembly Your appliance is a recessed and/or mantel installed appliance. Select a suitable location that is not susceptible to moisture and is away from drapes, furniture and high traffic areas. -
Page 5: Installation For 3 Sided Viewing
Installation for 3 Sided Viewing 1. The fireplace is fixed with fending bars and panels on the left and right side. - Page 6 2. Take off the fending bars and panels if you want to view the fire from three sides. 3. Fix back the fending bars after the panels are removed.
- Page 7 4. Remove the screws from the fireplace as shown in the picture below. 5. Fix the brackets with the screws in the previous step.
- Page 8 124cm 54.5cm 34cm 58.8" 21.5" 13.4" Discovery XL 149.4cm 54.5cm 34cm 7. Insert the fireplace into the wall opening. Drive the mounting screws into the brackets and the wall studs. Plug in and check if the fireplace works properly. If so, move on to next step.
- Page 9 8. Cover the glass panel with protective plastic bag and install plywood or drywall. 9. Decorate the plywood or drywall with glazed tile, wallpaper, etc.
- Page 10 Installation for Front and Right Side Viewing 1. To view the fireplace from front and right side, you need to take off the fending panel on the right side and keep the left side close to a wall. 2. Remove the 7 screws on the right side. Take off the fending bar and panel.
- Page 11 3. Fix back the fending bar after the panel is removed. 4. Remove the screws from the fireplace as shown in the picture below.
- Page 12 5. Fix the brackets with the screws in the previous step. 6. Make an opening for the fireplace according to requested measurement. Model Number 48.8" 21.5" 13.4" Discovery 124cm 54.5cm 34cm 58.8" 21.5" 13.4" Discovery XL 149.4cm 54.5cm 34cm...
- Page 13 7. Insert the fireplace into the wall opening. Drive the mounting screws into the brackets and the wall studs. Plug in and check if the fireplace works properly. If so, move on to next step. 8. Cover the glass panel with protective plastic bag and install plywood or drywall.
- Page 14 9. Decorate the plywood or drywall with glazed tile, wallpaper, etc.
- Page 15 Installation for Front and Left Side Viewing 1. To view the fireplace from front and left side, you need to take off the fending panel on the left side and keep the right side close to a wall. 2. Remove the 7 screws on the right side. Take off the fending bar and panel.
- Page 16 3. Fix back the fending bar after the panel is removed. 4. Remove the screws from the fireplace as shown in the picture below.
- Page 17 5. Fix the brackets with the screws in the previous step. 6. Make an opening for the fireplace according to requested measurement. Model Number 48.8" 21.5" 13.4" Discovery 124cm 54.5cm 34cm 58.8" 21.5" 13.4" Discovery XL 149.4cm 54.5cm 34cm...
- Page 18 7. Insert the fireplace into the wall opening. Drive the mounting screws into the brackets and the wall studs. Plug in and check if the fireplace works properly. If so, move on to next step. 8. Cover the glass panel with protective plastic bag before install plywood or drywall. 9.
- Page 19 Decorative Crystal & Log Embers Installation Use a screwdriver to take off the 4 screws.(as shown in diagram) Have two people take out the glass panel and move it to a clean soft place to avoid scratching.
- Page 20 Place the decorative crystals/pebbles on the media tray. Apply an even layer from side to side. Figure 1. Figure 1. Figure 2. Put the drift wood logs on the surface of all crystals and put the 4 pieces big crystals between the Gap of each log sets.
-
Page 21: Methods Of Operation
Operation Read and understand this entire owner’s manual, including all safety information, before plugging in or using this product. Failure to do so could result in electric shock, fire, serious injury, or death. Power Plug the power cord into a 220-240 Volt 10 Amp grounded outlet (see IMPORTANT SAFETY INFORMATION on Pages 2 and 3). -
Page 22: Touch Panel Operation
Touch Panel Operation Control Panel / Remote Control Operation BUTTON FUNCTION ACTION & INDICATION ON: Enables control panel functions and 1. Press once. Indicator light turns on. Power remote control. Turns on flame effect. turns on. All functions enabled. OFF: Disables control panel functions and 2. -
Page 23: Remote Control Operation
TIMER button: Controls timer settings to turn 1. Press once. Indicator light turns on. Timer is off fireplace at selected time. set to 0.5 hours. Settings range from 0.5 hours to 7.5 hours. 2. Press again until desired setting is reached. - Page 24 TIMER SETTINGS ON REMOTE CONTROL : Timer: Displays current day, time, and week. Press to enter or confirm timer settings. Settings: Press to move to next step (use with Timer button). Press to confirm week timer. Back: Press to clear timer settings. Press to return to the previous step (use with Settings button).
- Page 25 1 Set current day and time Press once. When “MON” (Monday) begins flashing, use to select the current day. Press . When the hour digits begin flashing, use to select the current hour. Press to select the current minute. again. When the minute digits begin flashing, use Press again.
- Page 26 To improve operation, aim the remote control at the front of the fireplace. DO NOT press the buttons too quickly. Give the unit time to respond to each command.
-
Page 27: Temperature Limiting Control
Temperature Limiting Control This heater is equipped with a Temperature Limiting Control. Should the heater reach an unsafe temperature, the heater will automatically turn OFF. To reset: 1. With the POWER switch in the OFF position,unplug the power cord from the outlet. 2. -
Page 28: Care And Maintenance
Care and Maintenance Cleaning ALWAYS turn the fireplace OFF and unplug the power cord from the outlet before cleaning, performing maintenance, or moving this fireplace. Failure to do so could result in electric shock, fire, or personal injury. NEVER immerse in water or spray with water. Doing so could result in electric shock, fire, or personal injury. -
Page 29: Troubleshooting
Troubleshooting WARNING DISCONNECTED THE APPLIANCE COMPLETELY AND LET COOL PRIOR TO ANY SERVICE. ONLYA QUALIFIED SERVICE PERSON SHOULD SERVICE AND REPAIR THIS ELECTRIC APPLIANCE. Problem Possible Cause Solution 1. Reset switch by turning main 1. Fireplace turns off 1. Fireplace has overheated and will not turn on. - Page 30 1. Thermal switch has been 1. Turn unit off and unplug unit 7. Heater does not tripped. for 10 minutes. Plug back in and provide heat when turn unit on. If plug cannot be turned on. reached, follow directions for tripped circuit breaker.
Need help?
Do you have a question about the Discovery and is the answer not in the manual?
Questions and answers