Table of Contents
Advertisement
Available languages
Available languages
Quick Links
Advertisement
Table of Contents

Related Manuals for Steren COM-564

Summary of Contents for Steren COM-564
-
Page 2: Main Characteristics
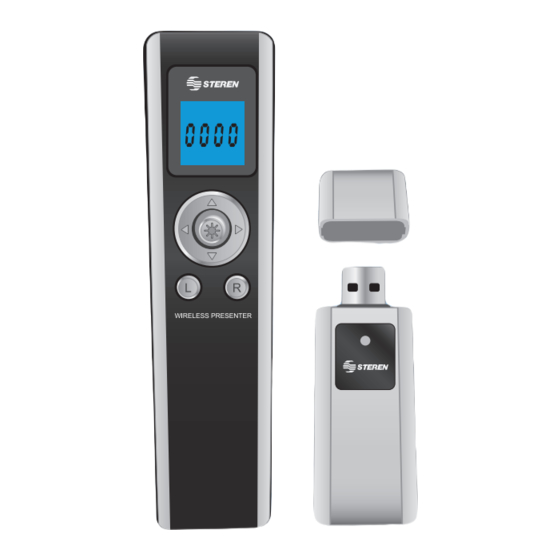
Before using your new RF presenter wireless laser and Before using your new RF presenter wireless laser and mouse read this instruction manual to prevent any damage. mouse read this instruction manual to prevent any damage. Put it away in a safe place for future references. Put it away in a safe place for future references. - Page 3 7.- Settings Use this option to confi gure different parameters 8.- Page Up Up one page 9.- Page down Down one page 10. Blank Screen Press this button to put a blank screen during a presentation. Press once again to back to presentation mode. 11.
-
Page 4: Battery Installation
BATTERY INSTALLATION Your new device is powered by two AAA batteries. Please, insert the batteries before to use the presenter. To place the batteries, remove the cover and insert 2 new batteries, pay attention to polarity. Then replace the battery cover. If you see that the operating range is becoming weak, you must replace the battery. -
Page 5: Alarm / Clock Set
6.- Unplug the receiver from the computer, after their use. HOW TO USE THE MOUSE This device can be used as a wireless mouse, includes forward, backward buttons, and the left and right buttons such as a mouse, even you can control and move the pointer through the screen. - Page 6 FIXED TIMING ALARM Use this function to activate alarms with a predetermined intervals of time. This device includes 5 different intervals of time, in the screen you will see the numbers from 1 to 5, which correspond to some periods of time: 1: 3 minutes 2: 5 minutes 3: 10 minutes...
-
Page 7: Specifications
5.- Repeat step 4 if you want to store up to 5 different intervals of time. 6.- After stored the 5 memories, use the Movement Arrow control (left/right) to see the recorded times. 7.- If you want to leave this mode, press S. If you use the chronometer, the settings stored in the fi... - Page 9 Antes de utilizar su nuevo Apuntador Láser, lea este Antes de utilizar su nuevo Apuntador Láser, lea este instructivo para evitar cualquier mal funcionamiento. instructivo para evitar cualquier mal funcionamiento. Guárdelo para futuras referencias. Guárdelo para futuras referencias. IMPORTANTE Nunca apunte el rayo láser directamente a los ojos. Siempre utilice un paño suave, limpio y seco para limpiar el equipo.
- Page 10 6.- Botón derecho del ratón Este botón tiene la misma función que en el ratón 7.- Ajustes Permite entrar al modo de confi guración 8.- Página arriba Sube una página 9.- Página abajo Baja una página 10. Página en blanco Presione este botón para poner en blanco la pantalla de visual- ización de Power Point.
-
Page 11: Instalación De Batería
INSTALACIÓN DE BATERÍA Su nuevo apuntador y ratón funciona con dos baterías AAA. Asegúrese de que antes de comenzar a utilizar el equipo, haya instalado dos baterías nuevas. Simplemente retire la tapa del compartimiento e inserte las baterías nuevas, poniendo atención a la polaridad. -
Page 12: Uso Del Mouse
2.- Presione el botón de Reproducción para visualizar la presentación a pantalla completa. 3.- Utilice los botones de arriba / abajo para adelantar o regresar la pantalla. 4.- Si desea señalar algún punto en especial de la pantalla, pre- sione el botón de Apuntador, un haz de color rojo aparecerá. 5.- Si requiere poner una página en blanco durante la reproduc- ción, presione el botón Página en Blanco;... - Page 13 7.- En pantalla verá que los números comenzarán a parpadear, presione una vez más el botón del apuntador y repita los pasos 3 al 6 para confi gurar la hora actual. 8.- Recuerde presionar el botón del apuntador para guardar los cambios.
- Page 14 2.- Presione el botón del Apuntador para seleccionar un número o mueva el control de Movimiento a la derecha para seleccionar un número (intervalo de tiempo) y posteriormente el Apuntador para almacenarlo en memoria. 3.- Para salir del modo de ajuste, mueva el control de Movimiento a la derecha hasta que desaparezca el número 5.
-
Page 15: Especificaciones
ESPECIFICACIONES Transmisor Control de distancia > 20m Frecuencia 433,92MHz Tecnología Tensión de trabajo 2,4-3,5Vcc Corriente en reposo 10uA Corriente de trabajo 50mA Salida máxima <1mW ó <5mW Distancia del láser 200m Longitud de onda 650nm Batería 2 x AAA Dimensiones 123 x 30 x 14mm Peso Receptor USB... -
Page 16: Warranty
WARRANTY This Steren product is warranted under normal usage agains defects in workman- ship and materials to the original purchaser for one year from the dat of purchase. CONDITIONS 1.- This warranty card with all the required information, invoice or purchase ticket, product box or package, and product, must be presented when warranty service is required. -
Page 17: Póliza De Garantía
1.- Para hacer efectiva la garantía, presente ésta póliza y el producto, en donde fue adquirido o en Electrónica Steren S.A. de C.V. 2.- Electrónica Steren S.A de C.V. se compromete a reparar el producto en caso de estar defectuoso sin ningún cargo al consumidor. Los gastos de transportación serán cubiertos por el proveedor.
Need help?
Do you have a question about the COM-564 and is the answer not in the manual?
Questions and answers